- REVIEWS
Camera Reviews 
More Reviews Mobile Reviews Photography Reviews - GALLERIES
- VIDEOS
- BUYER'S GUIDES
STACK & SUBTRACT: Lightroom's BEST Masking Trick for Landscape Photos (VIDEO)
Some of the most effective photo processing techniques employ masking to selectively adjust various portions of a scene for optimum exposure, enhanced color, and other key variables that greatly contribute to spectacular images.
Some masking methods are more complicated that others, and today's tutorial demonstrates one of the easier techniques that image-editing expert Jim Nix calls "Lightroom's best masking trick." It's a straightforward process that takes barely six minutes to demonstrate, and it's well within reach of all Lightroom users.
Nix pulls up a sublime landscape scene with a calm lake in the foreground. He's already made some basic enhancements to the image as a whole, like increasing exposure to bring out more shadow detail in the water. Unfortunately, this adjustment also lightened the hills, trees, and reflections retuning across the frame further back, and his goal is to keep these in silhouette for a dramatic effect.

In essence, this illustrates the problem with global adjustments that can often conflict or be counterproductive. And that's precisely why selective masking is so transformative. By including the Subtract trick you'll learn today, masking becomes even more precise and powerful. That because you'll be able to select small areas and target them accurately.
With this more sophisticated approach, Nix places a Linear Gradient over the foreground to open up the foreground without affecting the rest of the frame. He also drops Texture and Clarity to achieve his preference for smooth water. Next comes a Select Sky Mask above the ridgeline that enables him to slightly darken this portion of the scene.
Now it's time to place the middle of the frame in silhouette, and this is where Nix employs "my little trick." He does this by adding another Linear Gradient to the top of the image and dragging it down all the way through the middle area he intends to isolate. As you'll see, the middle of the frame is now selected, but so is the sky which has already been edited for the exposure Nix wants.
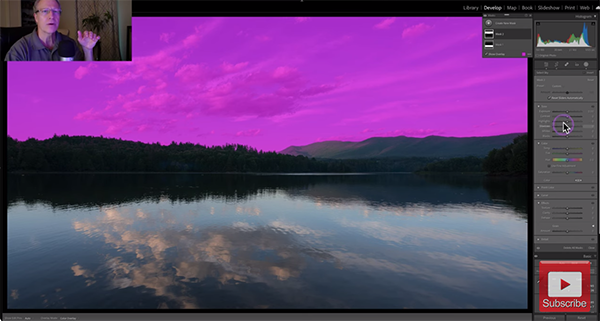
The solution is apparent in the Lightroom masking panel where you'll find the Add and Subtract options. Nix simply uses the latter to eliminate the sky from his selection. And now it's super easy to create the silhouette effect he wants in the middle of the frame as intended from the get-go.
After watching how easy this is to accomplish you'll have a new editing trick up your sleeve. Be sure to visit the Jim Nix YouTube channel where there are more great lessons like this one.
And speaking of simple, be sure to check out a tutorial we featured recently from another post-processing expert who demonstrates how to give outdoor photographs realistic depth of field of field with an easy two-minute editing trick.


![]()
Get the Latest Photo Tips, News & Reviews from Shutterbug!
| Camera Reviews Other Reviews | Mobile Reviews Photography Reviews Columns | News | Features | How-To | Resources |
 © 2026 Shutterbug
AVTech Media Americas Inc., USA
All rights reserved