- REVIEWS
Camera Reviews 
More Reviews Mobile Reviews Photography Reviews - GALLERIES
- VIDEOS
- BUYER'S GUIDES
Software Review: Tonality Pro from Macphun Converts Images Into Classic Black-and-Whites
If you are an aficionado of the rich tones and subtle gradations of fine black and white and toned images, Tonality Pro 1.0 from Macphun is a tool you will want to try. For Mac only, the Tonality black-and-white photo converter is available as a stand-alone and as a plug-in for Adobe Photoshop, Lightroom, and Elements, as well as Apple Aperture.
Tonality Pro offers more than 150 one-click presets to convert your photo instantly to striking monochrome tones – and color renditions – in a plethora of styles in categories such as Portrait, Vintage, Street, Outdoor, and Dramatic.
Bountiful Presets
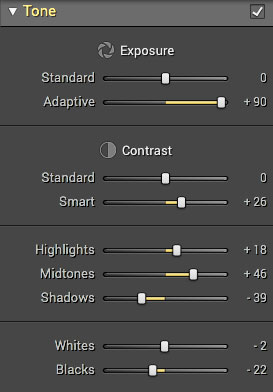
In Tonality Pro, the multitude of presets can be an end in themselves, or a jumping off point for more creative ventures. To render optimum detail and exert fine exposure control, Tonality features Adaptive Exposure, Shadow Recovery and Smart Contrast tools which aid you in the quest for maximum dynamic range. Additional advanced options include extensive clarity, structure, and detail controls with the option of tonal protection in select areas to get the details exactly where you want them. Further, there’s a gradient tool and an adjustable tone curve.
You can work directly with your Raw and TIFF files in both 8-bit and high quality 16-bit, as well as JPEG, and PNG formats in 8-bit. For advanced work, you can place different effects on multiple layers, and use layer blend modes, all within the Pro standalone application. Layers can be saved in Tonality’s native .mpt format, but once you save to tiff or psd or any other format, they are lost since the file is flattened.
Add graphic interest with the included texture overlays, or go for some vintage character via the film grain engine. To explore different looks, a variety of film stock emulations are at your disposal echoing Kodak, Fuji, Ilford, and Agfa. Beyond black-and-white conversion in Tonality Pro, there’s a lens blur emulation tool that supports selective focus, while glow is an option for controllable dreamy or romantic effects. HDR comprises several one-click options that can be further fine-tuned with all of Tonality’s tools.
Sophisticated Tools
Sophisticated toning options include color filters that operate on both luminance and saturation for selective color effects and unique stylizations. Among the many creative looks from the wet darkroom is split toning with a wide range of colors. Advanced masking techniques are supported with pressure-sensitive brushes (with a Wacom tablet), layer blend modes and separate opacity controls. Finally, add the finishing touch to your monochrome masterpiece with custom textures, vignettes, and frames.
Opening Tonality Pro as a stand-alone, I dragged my close-up of a moth specimen, #1, into the window. #2 shows the Tonality screen with thumbnail options of different effects along the bottom, and a wealth of controls in the right column. Clicking on Presets in this right column of the Tonality window brings up a Presets menu of icons, #3, which offers you 150 presets in ten categories. The two last icons allow you to create a menu of your Favorites, as well as add new combinations of settings to make your own User presets.


For this insect, I started with the Basic set. Adaptive Exposure balances the tones in a pleasing way, while Auto Improve further brought out textures and detail in the wings and background, so this is the first effect I chose. Note that you can vary the strength of the effect with a slider that appears in the thumbnail. Further options in the Basic presets include Bright & Airy, High Contrast, Push Process, Boost Clarity and more. The Auto Improve black-and-white conversion, #4, can stand on its own, but I want to take it further.

To save it at this point, Choose File>Export to image, and select the format you want to save it in including jpeg, tiff and psd. This is confusing until you know the trick. Both the Save and Save As options in the File menu save to the native mpt format. It would be better to also have a Save button in the interface that saves directly to common file formats. Although you can also access “Export to image” from the icon second to the left in the top menu bar, this requires the same number of steps as using the File menu. The icon does, however, also offer options to share to social media or to open the file in one of the compatible programs.
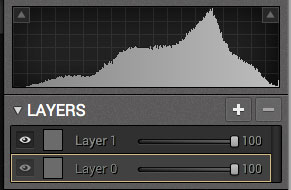
Before I can add a second effect to my moth, I must add a new layer to place it on. Only one effect can be applied per layer. So before leaving the Basic presets, I add a new layer by clicking the + button in the layers box at the upper right of the screen, #5.
Next, I want to add a touch of color to the black-and-white image, so I click on the up arrow in the Presets box in the right column and choose Toning, #6. Note that you can display a single image in the main window or a pair of before and after views, by choosing from the top bar of the window. Preset effects here encompass many wet darkroom looks including cyanotype, copper, selenium, gold, iron, and sepia, as well as Macphun creations named mint, golden sunshine, or blue morning, and more.

For the moth, I like tones of sepia, which are delightfully subtle. However, for maximum visibility of the effect in different web browsers, I have chosen sepia strong, #7. Note that you can further modify any effect by varying the opacity slider for the layer that the effect is placed on. For even more control, you can paint masks and erase them with the brush and eraser tools at the top right of the Toning screen.

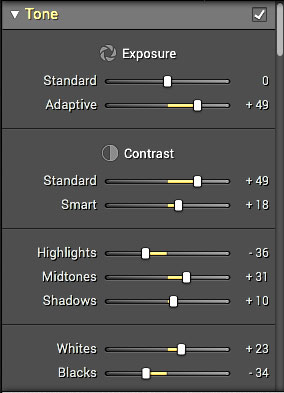
If Adaptive Exposure and Auto Improve can add detail and texture, some options in the Outdoor presets can do the opposite. After opening my shot of a runner in front of New York’s Central Park West skyline, #8, I chose the Outdoor category of presets. While Detailed Landscape brought out windows and architectural details in the buildings, I wanted a silhouetted look for maximum impact. Switching to the Yellowstone preset added contrast but still left some detail in the sky. Heading over to the Tone controls in the right column, #9, I pushed the whites slider up to +23 and took the blacks slider down to -34 to achieve a contrasty, simplified black-and-white poster style, #10.


Color Options
Tonality Pro isn’t only about black and white and monochrome, it offers a number of full color options, as well. For example, when I took my shot of a neon café sign, #11, into Tonality’s Dramatic presets, they lived up to their name, #12. While Film Noir evoked a delightfully dark and gritty atmosphere in black and white, I lightened it slightly taking the slider to about 80%, #13. Note the extreme grain in the sky and extreme vignetting. My favorite effect for this image from the Dramatic category, though, is a full color rendition called 300. As seen in #14, the neon glows beneath a strongly vignetted sky of dark brown. Among the additional options in the Dramatic presets are Baby Blues, Bleached Cool, Ethereal, Forgotten Glory, even Hitchcock.


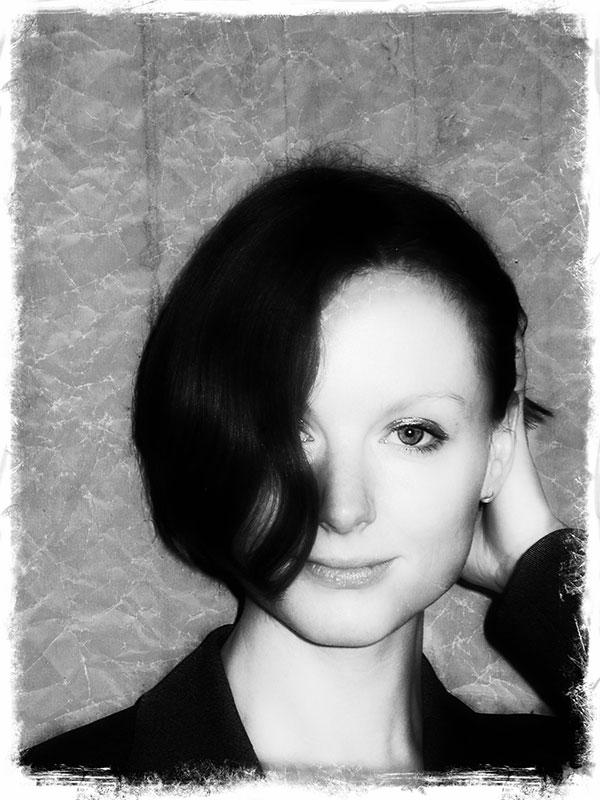
What could Tonality Pro do for a contemporary portrait of my model Paulina, #15? Because this is a street scene as much as a portrait, I explored the Street and Portrait presets, but settled, ironically perhaps, on the Vintage category. Collodion, #16, adds smeared and darkened edges, a grey color with hints of beige, and a certain contrast for what to me is a 1960’s look, even though the name echoes a 19th century wet plate process enjoying a revival today. For a totally different style, Old and Faded desaturates the color and adds creased paper marks, taking us back another decade to a snap that could have been taken in the 1950’s, #17, then folded up to rest in the attic for 60 years.


Staying firmly rooted in the past, the simple “Insurance” sign above an American flag attracted my attention in a small town, #18. The dual flowerpots add compositional and color interest. To enhance the bygone days feeling this image gave me, I used the HDR preset category and selected HDR Toned 2, #19. This warmed the color temperature and added a faded quality which I augmented by lowering the effect’s strength by about 20% via the slider inside the preset thumbnail.


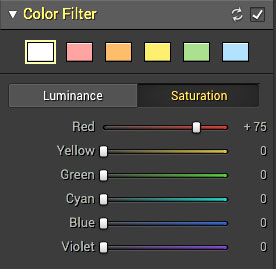
Combining black and white with a splash of color for dramatic effect is called selective color. You can do it with layers and masks in programs like Adobe Photoshop, but Tonality Pro has a much simpler approach. I took my flower above green and white leaves photo, #20, into the Basic presets and selected Boost Clarity. Then, I went to the right hand panels and chose Color Filter, #21. Here I clicked on Saturation and pushed red slider up to +75. The red leaves pop out in color in striking contrast to the black and white background, #22. Look, Ma, no masks, and no time spent creating and refining them. If you do need masks for other effects, though, Tonality offers advanced options described earlier.


Textures and Frames
I did some masking in the next example, but with Tonality, it is as easy as brush on, brush off. To demonstrate Textures and Frames, I began with a portrait of Vivien, #23. Using the Basic preset category, I selected Soft Contrast Strong, #24, for a very contrasty high fashion look. Next, I decided to add a texture to the background as a counterpoint to the smooth blown out whites and deep blacks. First, I added a second layer as described earlier. Next, in the right column, I chose Texture Overlay and clicked on the Select Texture box, #25. This opened a choice of textures including paper, metal, and film, #26, where I chose the second paper option. When you first make your selection of texture, nothing happens. Back in the Texture Overlays box, #27, the texture that you selected is now shown as a thumbnail.


To see the texture, you need to push the Amount slider to the right – here I used a setting of +47. To better see the texture overlaid on the portrait, change the blend mode to Multiply. For this portrait I didn’t want the texture to appear on the face (though sometimes that might be a fine effect). You can brush on or erase the effect with the mask Brush and Eraser tools at the top right of the screen. Here, I selected the Eraser with a soft edge setting of 50 and erased the texture that overlaid the face, neck and wrist, #28. If you make a mistake, simply click on the brush tool and paint back over it.

As a final touch, I selected the Photo Frames box in the right column. Clicking on Select Frame brought up a choice of eleven options of frames and edge treatments, #29. After making my choice of an irregular brushed edge, I pushed the Width slider in the Photo Frames controls to its maximum of 100%. To fine-tune the frame, I used the eraser brush on the lower neck area, as the frame had not applied to it properly there. The final result, #30, adds a strong graphic element to the presentation of the portrait. While other programs offer far more extensive textures, frames and borders, I do like the fact that Tonality Pro’s are easy to use and that you can add textures that you have photographed yourself.’


Once you’ve found a preset that you like for a particular image, or if you want to adjust it manually from the start, Tonality makes it easy to refine and tweak the look to your own taste. Extensive manual controls help bring out details at every level and increase the dynamic range of your photograph. In the right column, the Tone controls, #31, include Adaptive Exposure designed to brighten or darken the photo without loss of highlight or shadow detail. Smart Contrast is designed to add a glow to the image. For Clarity and Structure, #32, Clarity controls mid-tone contrast while Structure boosts or lowers perceived texture. Protection keeps these effects from the bright values. Details about all these controls can be found by clicking the Help button, upper right. I recommend that you try a variety of settings, they work marvelously on some images and are not needed for others.

Conclusion
Tonality Pro 1.0 black-and-white conversion and toning software from Macphun packs a strong array of presets and an impressive set of advanced tools for automated and manual enhancements in an economically priced package. Tonality is one of the best black-and-white and monochrome converters out there right now and offers a slew of sophisticated editing and enhancement tools, including many color options. Macphun has produced a major software contender for correcting, stylizing, and enhancing your images in a layered workflow to make them reflect your personal vision and style.
Details
Tonality (basic version for enthusiasts), a stand-alone only app, offers up to five layers and 150 presets, sells for $19.99. Tonality Pro 1.0 includes all features of the standard version plus plug-in support for Photoshop, Lightroom, Elements, and Aperture, along with eight layers instead of five max, and adds blend modes for layers, histograms, advanced selective color features and more, sells for $69.99. System requirements: Mac OS X, 10.9 or above, 4GB RAM. Mac only. See details, get a free trial download and links to free training videos at http://macphun.com/tonality


![]()
Get the Latest Photo Tips, News & Reviews from Shutterbug!
| Camera Reviews Other Reviews | Mobile Reviews Photography Reviews Columns | News | Features | How-To | Resources |
 © 2026 Shutterbug
AVTech Media Americas Inc., USA
All rights reserved