- REVIEWS
Camera Reviews 
More Reviews Mobile Reviews Photography Reviews - GALLERIES
- VIDEOS
- BUYER'S GUIDES
Phottix Odin Wireless TTL Flash Trigger: A Radio Frequency-Controlled System
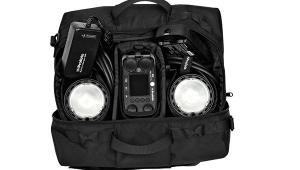
The Phottix Odin is a radio frequency-controlled system, or simply radio remote. The basic package includes two units: a transmitter and a receiver. Additional receivers are optional. You only need one transmitter to sit in the camera’s hot shoe and trigger compatible i-TTL strobes, but you need a receiver for each off-camera flash. And recently, Phottix introduced a new combo pack that includes one additional receiver—perfect for my two-speedlight setups. The unit tested here is for Nikon and I worked with my Nikon SB-900 speedlights.

The Phottix Odin is a wireless, radio frequency-controlled, remote TTL flash triggering system. The Transmitter/Control Unit (TCU) sits in the camera’s hot shoe and controls and triggers off-camera speedlights that are connected to Odin receivers. Flash units can be assigned to any of three groups (A, B, C), while responding on any of four channels—all by way of the receiver, with corresponding channel on the transmitter. Each Odin component operates on two AA batteries.

The receiver features a hot shoe for the dedicated speedlight and a threaded cold shoe, for easy attachment to a Nikon mini stand, tripod, or light stand.
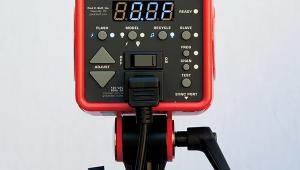
Above Photos Courtesy of OmegaBrandess
The Odin Transmitter is also the Control Unit (which is why it’s called a TCU), and it sports an easily readable, user-friendly digital display. In fact, if you’ve used your Nikon in Commander mode, it’s not a big leap to work with the Odin. I even found the Odin simplified working with off-camera flash when using Nikon’s WU-1b wireless mobile adapter with my D600 and iPad.
I often use Nikon’s CLS (Creative Lighting System) and set the camera’s built-in flash to Commander mode, and thereby control and trigger remote Nikon strobes, benefitting from i-TTL control. But outdoors, that setup has severe limitations. Namely, it requires line of sight—you can’t trigger a strobe hidden behind a tree. Strong sunlight and glinting reflections may have an adverse effect. And the distance between triggering camera and receiving speedlight is limited. Aside from that, there’s the inconvenience of having to repeatedly return to the camera menu to adjust settings. The Phottix Odin wireless system addresses all these concerns when delivering TTL-auto flash exposures.
In Operation
When the Odin radio transmitter and receiver are on, they flash green. The Nikon speedlight must be set to the basic On position (not Remote or Master). And be sure to set the speedlight to TTL mode for all operations.
In contrast to using the camera’s flash in Commander mode, which controls only two groups of strobes, the Odin transmitter, like others of its ilk, can control three groups (be sure to select the same channel on all Odin units). Assign individual or multiple remote strobes to Group A (key light bringing its A game), Group B (the Background light), and Group C (Contrast-Controlling fill), and set EV power levels accordingly. When I use only two lights, Group B serves as fill or hair light, but you get the picture. I often use the key light (Group A) with an umbrella for portraits, which requires me to increase output, owing to a loss of light when bounced/diffused. And because the Odin transmitter sits on camera, it’s very easy to make adjustments on the fly via the illuminated display that faces me.

Keeping the flash set in TTL mode, you can shape the throw of light from the Phottix Odin by setting focal length for each group independently. Group A is shown set to 17mm, while the camera retains TTL control of zoom settings over Group B. Because I jumped to this screen from the Option/ratio menu, only Groups A and B are shown. When jumping here from the Main menu, Groups A, B, and C are represented.

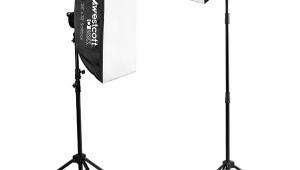
I set up one SB-900 with a shoot-through umbrella as key light, adding another SB-900 with a grid as hairlight and a collapsible reflector for fill. A Phottix Odin receiver was attached to each speedlight, with the Odin transmitter seated in the Nikon D300’s hot shoe, for a TTL flash exposure. The Odin’s lighted digital display made it easy to adjust output settings on the fly as the youngster moved about. In Photoshop, I toned down some of the excessively bright areas to focus attention on his face.
All Photos © Jack Neubart
Other Features
In the TCU Main menu, cycle through settings with the Mode button to set Manual output (down to 1/128) for one or more groups or prevent any group from firing. Use the Zoom button to reach another menu so you can manually set focal length on each group of lights.
To use manual settings, navigate to the required menu (Main menu for output, Zoom menu for focal length) and select the group; then press Mode for M—Manual; followed by the +/- buttons to arrive at the required setting for that group. Hit the On/Off button to exit settings.
There is an Option (OPT) button that takes you to another menu so you can set key-to-fill (or background) ratios with full TTL control between Groups A and B. And you can increase or decrease output for both lights simultaneously on this screen. Lighting ratio effects are not as subtle or as well defined as those achieved with the Main menu, but this is so much faster and easier, and probably more familiar to many of you. Group C is disregarded in this mode.
If you decide to start from scratch, use the Clear button. But be aware that this clears settings on all screens (but not channel settings). Also noteworthy: there’s a dedicated button to trigger the modeling light function in the flash (when supported). But don’t overdo it, for the sake of your flash.
Field Test Notes
You can turn on the Odin units, flash, and camera in any order without affecting communications.
The output from the flash units reflects the menu screen—Main or Option/ratio—currently displayed. That means that you can play around with settings on one screen without affecting output from the other screen.
When setting any group to Manual output or zoom, do not make any adjustments to the flash unit itself. Also, Manual zoom settings for Groups A and B apply equally to EV-based and ratio output.
Make sure the required group is flashing—using the Select button—before engaging the Mode button or trying to change EV settings.
What I found a little frustrating is that you have to cycle through the groups and channels—there’s no quick exit. And you have to repeatedly press the +/- buttons—you can’t hold them down to reach a value more quickly. Also, there is no sleep function, so be sure to turn all units off when not in use. And you can’t access the Zoom, Option, or Mode settings while the channel is selected/flashing. What’s more, the instructions are thin on details.
On the plus side, settings are stored when the device is shut off and even when batteries are removed—at least for the brief period while they’re being changed. And there appears to be little power drain all around. The TCU and receiver each use a pair of AA batteries, so there’s no digging around for obscure button cells. And there are no external antennas to deal with.


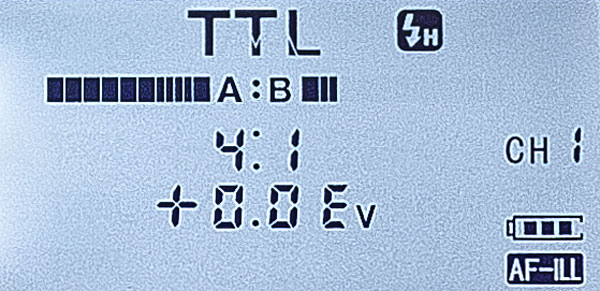
The light ratio mode (via the Option menu screen) lets you easily adjust TTL lighting when only two Nikon SB-900 speedlights are used. In these two examples (shown with Odin light ratio settings that I used), I first positioned the Group A flash (with diffusion dome) in the front-left corner of the set aimed into the ceiling but angled slightly downward toward the subject. Then I added the Group B strobe, on the floor, bounced into the wall at an upward angle so that it hit the white plastic sweep at the back. A silver card was added on the right for fill. You can see the effect that adjusting the light ratios has on this still life. I prefer the shot where the key light is stronger (4:1) because it gives the crystal goblet more of a high-key feel, while giving the candy wrappers increased presence.
Putting The Phottix Odin To Work
I tested the Odin wireless TTL remote system in several situations. Indoors, when photographing a toddler, I attached one receiver to an SB-900 with shoot-through umbrella (key light) and a second to another SB-900 (hairlight with grid). No problems there. Nor did I experience any difficulties even when triggering the strobe outdoors, from across the street. And because the system is radio controlled, obstacles such as walls and trees were no obstacle, indoors and out.
But the best part is that I was up and running immediately, without the need for test or training exposures—or having to update the firmware when I introduced the D600 into the mix. Communications were flawless all the way around. In fact, my final, if brief, test involved high-speed sync with the D600—taking it to the max for this D-SLR at 1/4000 sec.
Seamless! Simply put, wirelessly controlling my remote flashes for consistently reliable TTL exposures was never simpler.
Available for Nikon (tested), Canon, and Sony. Specifications may vary. Some camera models may not be compatible. Verify usability with third-party flash units. Nikon i-TTL and Canon E-TTL/II are supported in the respective systems.
The price (street) of the Phottix Odin TTL Flash Trigger & Receiver Set is $329; $399/Twin Pack with second receiver; $139/Receiver only. For more information, visit OmegaBrandess at www.omegabrandess.com.


![]()
Get the Latest Photo Tips, News & Reviews from Shutterbug!
| Camera Reviews Other Reviews | Mobile Reviews Photography Reviews Columns | News | Features | How-To | Resources |
 © 2026 Shutterbug
AVTech Media Americas Inc., USA
All rights reserved