- REVIEWS
Camera Reviews 
More Reviews Mobile Reviews Photography Reviews - GALLERIES
- VIDEOS
- BUYER'S GUIDES
Personal Project; The Eyes Have It
Early in my photographic career, I found myself making images that I called "mistakes." This was because my favorite images were not always the ones that I intended to take, but in fact the ones that happened by "accident" I often liked better. I discovered that it was the overall process of making pictures that birthed good pictures. This understanding led me to one more conclusion: Experimentation is the mother of invention.
 |
|
|
The first time I came across this technique of image manipulation I was sitting
at my computer and experimenting with various filters to see what sort of results
I could obtain. Though I have often found that applying a series of filters
results in an interesting stylized image, it was on this particular day that
my tinkering brought me to a very simple technique, giving truth to the adage
that the simplest way is often the best way.
Some people might ask, "Why would you take a perfectly nice exposed and
sharp image and do these things to it?" I am always looking to create
new styles that help convey mood and emotion. In this case, by isolating sharpness
to one specific area of an image your eye is drawn to what is sharp. Traditionally,
this has been achieved by manipulating depth of field, an optical characteristic
controlled by the camera's aperture. You can create images that have a
selective depth of field with your 35mm camera or digital SLR with your lens
wide-open. Also, it should be noted that the longer the lens and the closer
the focus, the more shallow the depth of field becomes. This effect can be even
more dramatic by using a view camera that can isolate a specific plane of focus.
 |
 |
Having only had the opportunity to take out my view camera once in the last year, I was excited to find a technique that possessed sensibilities of the view camera without having to endure the labor that is involved. This is a quick and easy way to create overemphasized forced depth of field. Though shown here with portraits, it can also be applied to landscapes with equally successful results.
 |
Three Quick Strokes
1. Start with a nice sharp image or at a minimum an image where
the eyes are sharp. I would recommend using a photograph of a subject with piercing
or compelling eyes.
2. Create a second duplicate layer and add a very heavy Gaussian
Blur. This is found in Adobe Photoshop under the Filters menu under submenu
Blur. Make sure that the Gaussian Blur is applied to the top layer. How much
Gaussian Blur depends upon one's taste and the size of the file (since
Gaussian Blur is applied with respect to pixels). But go pretty heavy on the
blur--you can always reduce its effect later using the Opacity control
of the blurred layer.
3. Take the Erasure tool and set it to 100 percent, make sure
the edges are soft and the tool is set to a large enough size to more than cover
the entire eye socket and then some.
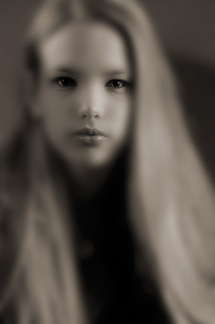
In three quick strokes, by erasing the top blurred layer over the first eye,
then second eye, and then the nose/mouth region, you have created what I would
call an engaging image with the sharpness in the eyes that have it.


![]()
Get the Latest Photo Tips, News & Reviews from Shutterbug!
| Camera Reviews Other Reviews | Mobile Reviews Photography Reviews Columns | News | Features | How-To | Resources |
 © 2025 Shutterbug
AVTech Media Americas Inc., USA
All rights reserved