- REVIEWS
Camera Reviews 
More Reviews Mobile Reviews Photography Reviews - GALLERIES
- VIDEOS
- BUYER'S GUIDES
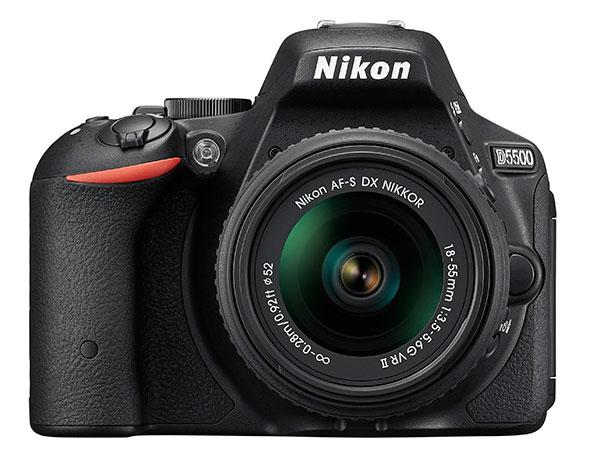
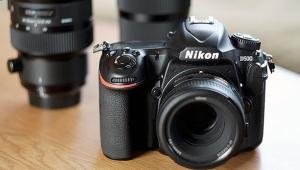
Nikon D5500 DSLR Review (Full Resolution Test Images)
The first question I’d ask of any camera is this: Is this camera a good fit for me—for my hand, for my style of shooting, for what I want to shoot?
I’ve been looking for a compact interchangeable-lens camera that I could easily carry around when I didn’t need my full-bodied Nikon D610. Yet, I don’t want to compromise image quality or the versatility that my D610 system affords me. So the obvious choices are a mirrorless compact system camera or just a smaller DSLR.
With mirrorless, I’d have to invest in a whole new system. And with DSLRs, well, we have the same cost involvement—unless I remain faithful to the Nikon system. Which led me to the Nikon D5500 compact DSLR. This camera features an articulated touch screen for Live View movie shooting and still captures, along with a typical optical viewfinder for the bulk of my still photography—I like optical finders.
And with its 24MP, albeit APS-C (cropped), CMOS sensor, I have the real estate to crop or print large. Moreover, the D5500 lacks an optical low-pass filter, which is a step toward capturing sharper images, a feature found in much more expensive cameras, such as the D810, as well as the new D7200. And the D5500 has the grit to tackle low light levels with its top ISO of 25,600. What’s more, wireless enthusiasts will welcome the built-in Wi-Fi, and video lovers will appreciate its full HD capture. And all this and more is driven by the EXPEED 4 image-processing engine.
Still, that’s all well and good, but would the D5500 allow me to effectively respond to my subject and would it impinge on my shooting style?

Build
The first thing I looked at was, how well did the D5500 fit my hand? Hmm, a nice size grip, not too chunky, no boxy feel, nicely textured—all contributing to a firm grasp. Ergonomic is the word I’m looking for. That was a plus. In fact, I didn’t even need a camera strap to have a firm hold on the camera but, to be safe, I added a sling strap anyway (which I prefer over the Nikon neck strap).
Add the AF-S DX Nikkor 18-55mm f/3.5-5.6G VR II (vibration reduction) kit lens, and you’ll have a combo that is quite small and lightweight. It was a big contrast to my D610. I carried the camera around in a compact StreetWalker backpack by Think Tank Photo, along with the DX 18-200mm and 60mm Micro Nikkors and an SB-700 flash, barely noticing the load for hours on end.
What’s more, the D5500 feels solid. Nikon says it’s made of a “monocoque structure featuring long-fiber reinforced thermoplastics.” In plain English, one-piece construction.
Don’t let plastic throw you. A ding to plastic doesn’t damage the exterior as it may do to metal (I’ve got an iPad that can attest to that). As for color choices, I’d go with solid black, but that’s just me. The other choice is red (actually, red and black).

Interface
The photo hobbyist and beginner will appreciate the streamlined interface on this camera. With an abridged Menu and relatively few control buttons, you won’t have to muddle through a hodgepodge of confusing settings. In other words, you won’t be intimidated by the camera, especially if it’s your first DSLR. I personally look for as many settings as a camera will allow, but I’m also looking at the camera with an eye toward serious, not casual, shooting.
With an entirely foreign layout compared to my D610, my initial problem was tracking down the Menu button. Finally found it snuggled up to the left of the eyepiece. Speaking of which, the second thing I do after grabbing hold of the camera is adjust the diopter in the optical viewfinder, since this will often prove critical to my work.


With that done, I was prepared to hit that Menu button and prep the camera. Oh, and one more thing—that optical viewfinder (or at least an electronic viewfinder) is something I look for to foster steadier shots, even with image stabilization. So that’s a plus right there.
The top plate of the D5500 has just enough room for the shooting mode dial with its attached Live View switch and, to the right of that, the command dial (to scroll through values). At the very forward edge of the grip is the shutter button, surrounded by the on/off switch.
Between that and the command dial are the video-record button (very logically positioned) and AE override. A nice, tidy layout overall.
Touch-Panel Display
After my recent experience with a touch-panel display on a mirrorless camera, I’ve grown to increasingly appreciate the control this type of interface affords me. So I was eager to give it a shot when the D5500 was delivered.
The touch panel here is capacitive, so just a tap of your finger will do the trick. The first thing you see when switching the camera on is a graphic/alphanumeric data display of all essential settings, which replaces the vanilla top panel LCD normally found on larger cameras.
Thanks to a built-in sensor, this display shuts off the instant you put your eye (even when wearing glasses) to the optical finder, and returns the moment you remove your eye from the camera. The display also goes dark as you press the shutter button even lightly. Regardless of which data is displayed, alphanumeric text is highly legible, so unless you have serious vision problems, it’ll be clear sailing without glasses.


Functionality
There are two function buttons—Info and “i” – that, on the face of it, appear to do the same thing—but are in fact quite different. Think of “i" as “input,” not “information.” When you tap this icon (or hit the “i” function button to the right of the screen, below the playback button), you reveal the most-used settings—which can be changed by tapping any of them. Since there’s no dedicated ISO button, tap ISO to change it, for example. Then scroll through the options, again using your finger.
You can also change settings using the Fn (Function) button, depending on how you customized this setting. Default is ISO. Hold the Fn button and turn the command dial to change ISO (or other settings, as you’ve defined) as an alternative to the touch screen. Which is faster or simpler—touch screen or buttons? Depends on what you’re used to. Smartphone and tablet users will likely lean toward the touch screen.
Now the Info button. To avoid confusion, think of this as the Display button. The Info button changes the information displayed in Live View as you hit it repeatedly. During normal viewing, hitting this button toggles the display on and off.

Performance
I’d determined that the 18-55mm kit lens had reasonable close-focusing capability, good enough to capture a large butterfly. Obvious choice for my first foray with the D5500 and kit lens, then, was a nature museum, where I’d find both live butterflies and birds to photograph.
The 18-55mm zoom employs a locking mechanism (“retractable lens barrel button”) that must first be released before you can use the camera (the display reminds you when the camera is switched on). This keeps the lens nice and tight till needed. There was no lens creep that I could detect. In fact, zooming was a bit stiff, but not uncomfortably so. The lens features Nikon’s VR (vibration reduction) and offers a choice of AF or manual focusing—but with no full-time manual override during AF operation.
Manual focusing proved easy enough. Interestingly, under dim, low-contrast conditions, I found manual focusing with the LCD preferable to the optical finder. You can magnify the image to aid in focusing, but I saw no need to take this added step—especially since it could mean the difference between capturing and losing a live critter.

For the most part, I employed AF with the optical finder. You can also use the touch screen to select an AF point, but I mostly went old school, moving the focusing point via the multi selector (cursor control). AF was fast and certain by this means under a variety of lighting conditions.
However, I did spend considerable time in Live View, and here I found AF operation somewhat lacking. It tended to be slow and sometimes missed the mark entirely. You have the option to tap/focus/shoot (“touch shutter”) in one. It’s fine with stationary subjects, but the delay often proved frustrating with moving subjects as they moved out of frame before the exposure was completed.
My experience with AF and movie shooting was passable, but nothing to make George Lucas bite his fingernails over. However, I’d add an external mic, if you’re serious about shooting movies.
Here's a sample video clip I shot with the Nikon D5500 at the Lincoln Park Zoo in Chicago:
Another Live View touch-screen AF option is subject-tracking AF. This works well—up to a point. If you’re shooting in burst mode, restrict yourself to subjects moving in a well-defined direction as you pan with the camera: the view goes dark after the first frame (makes me long for a mirrorless camera during such moments).
Also, you can’t just tap and re-tap. After selecting an AF point during subject tracking (not applicable to other touch modes), you have to first re-center the AF point (using the OK button or touch OK). This added step wastes valuable time. Hopefully, a firmware upgrade can correct this.
The display was fairly easy to view, even under bright light. However, I should add that, whereas a bright sun didn’t hamper the overall view, it did prevent me from clearly seeing the AF indicator. The only time I had a real problem seeing the entire display was when I was facing the sun.
Image Quality
The Nikon D5500 was, for the most part, a pleasure to work with. I didn’t detect any deleterious effects, such as moiré, owing to the absence of a low-pass filter. One missing feature that I did long for, however, was the digital level gauge.
The D5500 did a nice job with exposure, and AWB was largely reliable. The big question, of course, normally centers on noise levels. That depends on whether you’re shooting Raw or JPEG. Color noise was preeminent in JPEGs at high ISO levels, whereas luminance noise was the observable culprit in Raw captures.
To avoid that plastic look, stick with low or, for very high ISOs, normal NR for JPEGs. Raw noise levels to ISO 1600 were admirable, while the image at ISO 3200 was still quite usable even without NR. The image was still acceptable at ISO 6400 but would benefit from NR, with higher levels coming into question due to very noticeable luminosity noise levels.
As for the 18-55mm kit lens, it’s a good choice for starters, but I’d go with the more seasoned 18-200mm VR lens for better overall performance. However, the longer zoom will increase your initial investment by several hundred dollars, and it does add considerably to the weight and bulk.
More to the point, perhaps, you can use the built-in flash without concern for light cut-off with the kit lens, but not so with the longer zoom. I should add that the kit lens does not come with a lens shade, but the lens still managed to handle flare with aplomb. Just be careful to keep stray fingers away from the glass. Aside from that, pincushion distortion at 55mm was negligible, while barrel distortion at 18mm was tolerable and easily corrected. Chromatic aberration was also effortlessly remedied in Lightroom.
Conclusion
The measure of a camera is not its cost or features or even the size of its sensor. A camera is measured by the images it helps you capture and the depth, scope, and quality of these images. The Nikon D5500 let me capture some unusual moments. But is it the camera I’ve been looking for? I don’t think so. That doesn’t mean, however, that it’s not the right camera for you. The compact D5500 is uncomplicated and accomplished enough to warrant the attention of the photo enthusiast and certainly DSLR novices, especially if you’re on a budget. You can practically just pick it up and start shooting the moment you unpack it (provided you’ve charged the battery and remembered to buy an SD card). With the right lens and in the right hands, this camera is capable of capturing some very telling moments.
Jack Neubart (www.jackneubart.com, www.pixelPERFEXION.net) is a photographer, photo-technical writer, educator, photo industry consultant, and author with over 35 years of experience, covering practically every aspect of photography.


![]()
Get the Latest Photo Tips, News & Reviews from Shutterbug!
| Camera Reviews Other Reviews | Mobile Reviews Photography Reviews Columns | News | Features | How-To | Resources |
 © 2026 Shutterbug
AVTech Media Americas Inc., USA
All rights reserved