- REVIEWS
Camera Reviews 
More Reviews Mobile Reviews Photography Reviews - GALLERIES
- VIDEOS
- BUYER'S GUIDES
Nik Software’s HDR Efex Pro; HDR Software For The Rest Of Us
 Everybody knows the basic concept and conceit of High Dynamic Range (HDR) imaging but first let’s get rid of yet another unnecessary acronym. What does HDRI—High Dynamic Range Imaging—add to the discussion other than just another letter? Nada. Let’s ship it off to the dead acronym bureau along with other outdated terms. And besides, aren’t odd-numbered letter combinations, such as BMW, better than even-numbered ones?
Applying HDR techniques to our photography produces images that have a greater range of luminance, the difference between the lightest and darkest areas of an image, than standard digital imaging capture and processing methods. This wider dynamic range allows HDR images to more accurately represent the broad range of intensity levels found in real-world scenes, with lighting ranging from direct sunlight to faint starlight, but can, in the wrong hands, produce a cartoony look that seems to set the anti-HDR contingent’s hair on fire.
The source of HDR imagery involves merging multiple image files that are made at different exposures but the same aperture to keep the whole megillah in register. Tone mapping techniques that reduce contrast can be applied to produce images with preserved or exaggerated local contrast for artistic effect. In other words, let’s all bracket like crazy and toss the files into a software blender and see what comes out. The problem in the past has been that using that blender was easy, such as in Adobe’s Merge to HDR, but that ease didn’t always produce good results, and better results were produced using software that might not be as user-friendly as you might like. Enter stage left, Nik Software’s HDR Efex Pro, high dynamic range software that makes it easy for mere mortals to create great-looking HDR images.
 |
|
|
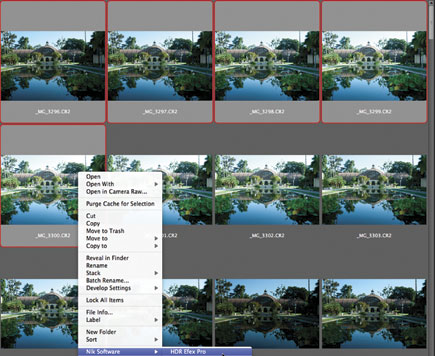
One of the first questions many aspiring HDR shooters have is: how many exposures do you need to make a good image? The answer in some quarters is the more the merrier, but it’s not the right answer. Anything more than nine one-stop increment shots won’t yield appreciably better results but will create RAM—as in not enough—issues with your computer. Practically, Nik’s HDR Efex Pro can open more than nine exposures, but a company representative told me that they “don’t know anyone who is doing that, regardless of the increments (1⁄3, one-stop) being used.”
The example images you will see here were created using three and five shots, and even one shot, something that the Nik software uses to produce what could only be called faux HDR but looks great nevertheless. This feature allows photographers to reprocess a single image in which an exposure series was not previously shot or for subject matter that doesn’t lend itself to multiple exposures, such as action. All of the software’s workflow is 32-bit color, including creating the HDR look from a single exposure. All the caption data for the illustrations mentions how many shots were used, but my personal rule of thumb is the more extreme the contrast is, the more shots I’ll make.
 |
|
 |
|
|
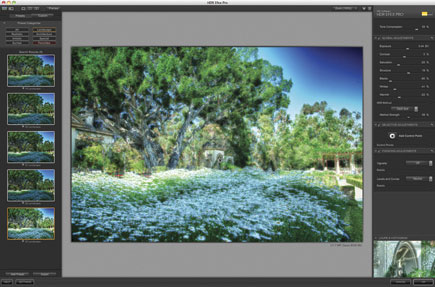
Interface Me
Nik’s HDR Efex Pro is a plug-in for Adobe’s Photoshop, Bridge, or Lightroom, and Apple’s Aperture. It works in 32- or 64-bit mode and is optimized for computers using multi-core processors. The interface of Nik’s HDR Efex Pro will be familiar to anyone who has ever used the company’s Silver Efex Pro black-and-white conversion software. The software embodies multiple proprietary tone mapping algorithms, enabling a wide range of HDR styles. That’s why on the left side HDR Efex Pro includes a selection of one-click presets, all of which have thumbnails displaying your image. On the right side you’ll find tone mapping algorithms, powerful and detailed controls, along with the company’s patented U Point technology for adjustments of contrast, shadow, structure, or saturation in selective areas, anywhere on your image. HDR Efex Pro also provides for automatic image alignment and reduction of subject motion artifacts known as “ghosts,” saving editing time later.
 |
|
|
|
 |
|
|
|
 |
|
|
|
|
|
| |||||||||
- Log in or register to post comments


![]()
Get the Latest Photo Tips, News & Reviews from Shutterbug!
| Camera Reviews Other Reviews | Mobile Reviews Photography Reviews Columns | News | Features | How-To | Resources |
 © 2024 Shutterbug
AVTech Media Americas Inc., USA
All rights reserved