| |
Here
is the starting point, just a generic hard-sided suitcase
with wheels and a retractable handle. First step, cut
out all the straps and the partition.
|
|
Over the past several months
I've shared with you some of my experiences with getting my studio
and location gear together. With new technology rapidly changing the
way pro photographers make their living, it really has become a chore
to keep up on the new gear, decide which pieces can help you do your
job more effectively, and figure out how to afford what you need.
One of the facts of life once you own some pretty fancy, expensive photo
gear is that you've got to protect it. Even if you don't
travel very far at all, you'll need to secure your gear when you're
not using it, and figure out a way to transport what you need when you
leave your home to shoot. While I lived out of a couple of gadget bags
for most of my life, I have learned that there is a different level
of protection required when your gear isn't by your side, especially
in the hold of an airplane.
When it comes to packing up your gear for life on the road, even if
the road is just a family vacation, you've got to assess your
photographic needs and the level of hassle you can endure. As I've
mentioned before, I had a large two-flight case system custom made for
me by the same flight case company that makes cases for the Rolling
Stones and Fox TV. It has drawers and a large bin at the bottom for
flash generators. The only problem is that the whole rig loaded is too
heavy for even two people to carry. I rarely travel with more than one
assistant, so it sits parked in the corner of my studio, a handy but
stationary equipment case. Since I like the idea of having lots of accessories
with me when I travel, I went to a couple of those aluminum tackle-box
style cases. While handy around the studio and brilliant for carrying
lots of little filters, batteries, and other important gadgets, they
tended to get beat to death after just a few flights. Switching to Halliburton
aluminum cases worked great, but I had to deal with loose pieces of
foam or that horrible cubed foam insert stuff. After a few flights the
airline stickers and dinged up exterior really made those cases look
mean.
|
| |
Here's
the hardware store toolbox, used as a location gaffers box.
I've stuffed the inside with cables, gels, gaffer
tape, and other loose stuff. I love these things and they
make decent equipment carryalls as well.
|
|
As I get a little older, I'm
starting to adopt one basic motto--"Everything on Wheels."
After too many long walks through those hub-and-spoke style airports,
I decided to travel with a good folding cart like a Ruxxac, or invest
in some cases with built-in wheels. I went the wheeled case route, since
then I would have one less piece of equipment to check in and chase if
it gets lost. I went back to my flight case manufacturer and had some
nice heavy-duty black cases made up with four wheels on the bottom. My
cases had removable foam covered inserts, and thus could accept a few
different loads of gear by moving the inserts around. The flight case
route is really the way to go if you intend to travel hard. Rock bands
and TV networks slam these things into trucks in the dead of night and
haul them from one corner of the globe to another, with their million
dollar cargo arriving in perfect condition every time.
After years of banging these things around the world they all still fit
together well and protect their precious cargo perfectly. The downside?
Weight and bulk. Flight cases are made out of plywood with solid steel
channels and very thick foam padding. Even a modest outfit of three or
four flash heads needs a pretty big and heavy flight case. In many cases
the case itself weighs as much as the gear inside. If most of your travel
is by car, a real flight case is probably overkill. Besides the bulk,
hoisting these things out of the car trunk gets old real fast.
|
| |
The
final product looks pretty good. Two layers of 2"
Polylam foam cut out with a steak knife securely cradles
three flash heads, cables, and mounting attachments.
|
|
One of the nicest solutions
for moderately rigorous travel with delicate gear is the new breed of
soft and hard-sided cases with built-in wheels and retractable handles.
These things come in many sizes and flavors, from elegant aluminum Halliburton
attaché style cases to cordura-clad rolling footlockers. I own
a bunch of these different kinds of cases, choosing a different size and
style for each requirement. In general, I like to own a whole lot of different
cases. Not only is it easier for me to tell an assistant to grab "the
blue and green" cases, rather than have to somehow number the outside
of the case, but this also helps when setting up and packing up on location.
Now when I arrive at the shoot, I know that the flash heads are in the
black hard-shell case, the power packs are in the silver hard case, the
RZ67 system is in the Rimowa flight case, the Hasselblads in the Lightware
cordura case, and the accessories in the Tenba lightwalker case. When
it's time to go, I just know by memory where everything fits in
every case. If there is a space left in a case, I know that I have forgotten
to pack something. It's a good routine to get used to, since it
speeds things up.
A really great invention is the Porter case, which features wheels, a
retractable handle, and a unique pivot that turns the case into a luggage
carrier. With the supplied strap, you can load three or four additional
cases on top of the Porter case and lug the whole lot through the airport.
I have two of them and every time I flip them into a luggage carrier at
the airport, someone asks me where they can buy one for themselves. The
only downside of the Porter case is that it is a somewhat small case,
so you'll need additional cases to pack a decent array of gear.
|
| |
An
added advantage of these cases is the included carry-along
strap. Here I've attached a camera bag, making an
entire location setup portable.
|
|
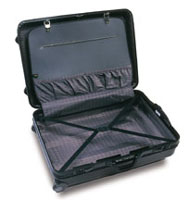
Once I got my Porter cases,
I decided to add a couple of hard-shelled cases to strap on top. This
would give me two independent rolling rigs, which would allow me and one
assistant to travel with an entire studio of gear. While I owned a lot
of those excellent cordura Tenba and Lightware cases with the tough ballistic
foam walls, I figured that a hard-sided case would offer just a bit more
protection and stack a bit neater for rolling down the long airport halls.
While I aspired to a bunch of nice new Halliburton aluminum cases or even
a bunch of sturdy Pelican molded cases, my budget was already stretched
pretty tight. While on assignment in San Francisco I stumbled upon the
answer.
In San Francisco's Chinatown you'll find shops crowded with
tacky souvenirs, overpriced Kodacolor, and lots of inexpensive luggage.
It was in one of these luggage stores that the light bulb went on over
my head. I noticed a lot of inexpensive hard-shelled suitcases, based
loosely on the Samsonite hard-sided cases. (Remember the commercial with
the Gorilla jumping on the Samsonite case?) I looked over a few, and they
seemed relatively sturdy, had decent sized rubber wheels, and a nice retractable
handle. When I compared the price to the real $200-$275 McCoy, I figured
I would see if the clones could stand up to the road. I bought a couple
of medium sized carryon cases with wheels for $55 each and brought them
home to customize.
|
| |
Once
the interior is empty, you'll need to hot glue strips
of 1/2" foam in between the bumps caused by the handle
tubes. This will create a flat bottom for your gear.
|
|
Once back in the studio, I
tried to decide what would fit into these 14x10x22" cases. I fit
three Balcar flash heads into one case and one head and a Balcar Monobloc
3 into the other with plenty of room to spare. In order to modify the
cases to accommodate this gear and create a real roadworthy setup, I first
had to locate some way to cushion the contents. While those cubed foam
sheets are available at any large camera shop, enough to do both cases
would have cost $50, which seemed a little extreme. Going to a movable
partition system would have made the cases flexible, but I found that
purchasing the partition pieces separately and modifying the cases was
also a bit too expensive. The solution clearly was custom cutting some
solid blocks of foam.
While foam can be expensive, a call to a local flight case manufacturer
provided me with enough foam to do a dozen cases for a couple of bucks.
I asked if I could pick through their scrap pile and pay for what I took.
I wound up with enough foam to pack the trunk of my car solid for $5.
I tried to find the biggest pieces of scrap that I could, and I mixed
up thin 1/4" foam along with solid 2" laminated "Polylam"
foam. This kind of flight case foam is very tough, rebounds from an injury,
and can be cut very precisely with a common steak knife.
To prepare the cases for their new life, I first cut out the suitcase
style fitting and clothes straps. I tried to hammer down the ends of the
rivets that were left hiding behind the suitcase partition, then I took
very accurate measurements. The first thing you need to do in one of these
retractable handle cases is to create a solid floor for your gear to lay
on. The tubes that the handle retracts into protrude into the case about
1", so I laid flat strips of 1" foam in between the tubes,
then glued a solid floor of 1/4" closed cell foam over the entire
floor. I found that the best way to glue this kind of foam is with a hot
glue gun and the yellow sticks of "industrial strength" glue.
I unscrew the tip of the glue gun and dribble large amounts of glue on
one side of the foam. This creates a super strong bond, so make sure your
position is correct when the two pieces touch, or you'll be sorry.
Once the floor of the case is done, you'll need to decide how you
want to construct the layers that will both locate and cushion your gear.
Since my case now had a height of approximately 4" from the floor
to the top of the bottom shell of the case, I would have to either double
up on 2" foam or cut 4" wide strips, then cut and glue a suitable
partition system. It certainly is easier to use flat pieces of foam and
cut out the correct shapes for your gear, assuming the shapes are not
too complicated. For the Balcar heads, I simply lined the three heads
up where I wanted, marked the four corners of each head with a piece of
chalk, and cut out clean rectangles with a brand-new sharp steak knife.
To create the correct 4" depth, I transferred the marking from the
cut piece to the second uncut piece, then cut through the second piece.
When both pieces are cut I glued them together and trimmed the holes for
a neater appearance. With a decent knife and a good eye, you can cut remarkably
clean holes that look almost as good as custom-made cases.
Once the holes are cut, I trim the corners of the foam to fit the case,
then glue the entire assembly together inside the case. Once the floor
is done, you'll need to add some foam to the lid. I like to have
the lid press down moderately hard on the items in the case, so I went
with some 1" soft open cell foam. Another excellent choice is the
soft open cell "eggcrate" foam, like the mattress pads sold
at most department stores. You'll want to make sure that after the
case is closed the imprint of the gear inside the case is clearly visible
on the foam attached to the lid. This will make sure that the equipment
is firmly cradled on all six sides. The idea of the foam is not only to
cushion the blow to absorbing straight line impacts, but to present enough
surface area to the gear to spread the impact out along the entire body
of the camera, flash head, or whatever.
After I built the first two cases, I was very impressed with how nicely
they have performed. I picked up a couple more cases in different colors
in New York's Chinatown, paying the exact same $55 (after a prolonged
negotiation session). While it may be hard to find a Chinatown in your
neck of the woods, any large discount luggage store will have these off-brand
suitcases available. I found a couple of $75 Travel-Tech suitcases in
my local wholesale club, and they are big enough to house two Balcar flash
generators and accessories or a 4x5 view camera setup with digital camera
back and Mac Powerbook. Now that I had a studio full of slick new flight
cases, I stumbled upon a brilliant little rolling tool caddy on wheels
at my local hardware store for $39. Made by ZAG, this toolbox is about
the size of a medium sized picnic cooler, has two massive wheels, and
a nice long retractable handle. Like all modern toolboxes it has a million
little trays and cubbyholes to store film, modeling lamps, and loupes,
as well as four or five places to affix some bungee cords. While I wouldn't
put this thing in the hold of an airplane, it has become my constant companion
on location, hauling cables, gels, reflectors, and accessories. I strap
four large cases to the top and wheel it down long city blocks, then use
it as a step stool for the duration of the shoot.
The advantages of having your gear securely stored whether on the plane,
in the car, or in your basement are pretty obvious. Locked in their cases
your expensive gear is less likely to get dirty, damaged, or stolen. While
suitcases have a definite stealth value, they do protect the gear well
and the price can't be beat. While I'm not ready to trade
in my Lightware, Tenba, and Halliburton cases, I am now finally able to
have a nice custom-made case for everything I own. Making these heavy-duty
cases that have their own wheels, yet still are able to travel like conventional
equipment cases, was almost as exciting as buying the expensive cameras
and flash systems that travel inside them.
Manufacturer/Distributor
Porter Case, Inc.
3718 W Western Ave.
South Bend, IN 46619
(800) 356-8348
(219) 289-2616
fax: (219) 289-2747
www.portercase.com
|