- REVIEWS
Camera Reviews 
More Reviews Mobile Reviews Photography Reviews - GALLERIES
- VIDEOS
- BUYER'S GUIDES
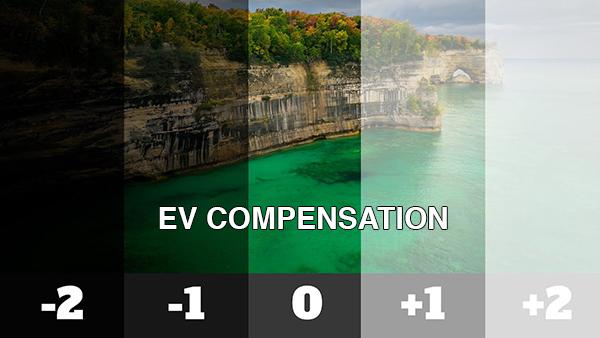
EV Compensation: How to Nail Exposure in the Camera (VIDEO)
We all know that photography is all about light, and even the best cameras make mistakes rendering what they "see"—yielding images that are either too bright or too dark. If, like most of us, you prefer nailing exposure in the camera (instead of fixing things in post), you've come to the right place.
The tutorial below explains how to use your cameras Exposure (EV) Compensation feature to achieve a perfect rending of tones—even under difficult lighting conditions. By understanding how this simple tool can overcome a camera's ability to capture light, you'll be able to avoid most common exposure problems from now on.
Instructor Chris Parker is a professional photographer based in Jacksonville, FL, and he explains everything you need to know in barely four minutes. As he says, this powerful feature is for "manually adjusting exposure when your camera doesn't provide the results you want; or in other words, compensating for the camera's mistake."

Using EV Compensation is far easier than it sounds, with only one basic element to understand; namely, the concept of "stops." In simple terms, a stop is a measure of exposure relating the doubling or halving the amount of light that reaches a camera's sensor. For example a one-stop shift occurs when switching the ISO setting from ISO 100 to 200.
Similarly, going from f/4 to f/2.8 is one stop, as is using a shutter speed of two seconds instead of one second. With these basics under your belt it's super easy to use EV Compensation to raise or lower exposure by as many stops as necessary to quickly brighten images that are too dark or doing the opposite.
Most cameras feature a physical button for accessing this critical feature, and it's typically labeled with +/- designation. Otherwise, the tool resides within a camera's quick menu or you can assign it to one of the Function buttons. Once you access the feature you'll see a simple graph with a zero in the middle, positive stops to the right and negative ones to the left—usually depicted in half-stop or third-stop increments.

Then it's a simple matter of rotating a dial until your image looks exactly like you want. Hence, a positive number means an increase in light, while a negative number is a move in the opposite direction. All this will instantly make sense while watching Parker's quick video demonstration.
This helpful lesson is part of Parker's 14 Episode Camera Masterclass for beginners, and the others are equally straightforward and helpful. You can find a complete list with links to those episodes in the link beneath this video. There's also a lot more to see by paying a visit to Parker's instructional YouTube channel.
We also suggest watching the tutorial we posted from another accomplished pro who explains the first thing you should do with a new camera before going out to shoot.


![]()
Get the Latest Photo Tips, News & Reviews from Shutterbug!
| Camera Reviews Other Reviews | Mobile Reviews Photography Reviews Columns | News | Features | How-To | Resources |
 © 2026 Shutterbug
AVTech Media Americas Inc., USA
All rights reserved