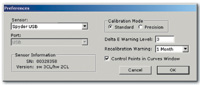
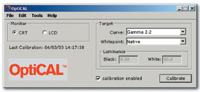
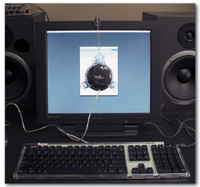
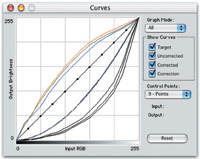
One of the most beneficial
and cost-effective procedures that anyone involved in digital imaging
can perform is calibration and profiling of their computer display.
Implementing a successful color management workflow begins with this
task, and rewards the user with a high degree of accuracy when making
visually based edits to an image. The display calibration and profiling
procedure will attempt to optimize the gray balance of the display,
ensure the maximum range of colors and density, as well as correct inaccuracies
in its color rendition. Once a custom display profile is made, ICC compliant
applications such as Photoshop can use these profiles to accurately
display images within the given application. The Pantone ColorVision
Spyder with OptiCAL software combination is one of the few current display
calibration and profiling packages that will work with both CRT and
LCD technologies.
|
|
Color Accuracy Essentials
There are usually three separate elements that influence the quality and
color accuracy of a display--the video card driver (software), the
video card driving the display, and the display itself. The ColorVision
Spyder and the accompanying OptiCAL software first attempts to put the
display into a known and well behaved state, proceeds to measure the characteristics
of the display in this state, and creates a file which alters (via software)
the look-up table of the host computer's video card to correct its
output. Finally an ICC profile for the display is generated and saved
to the correct folder on the computer. ICC savvy applications such as
Adobe Photoshop, Picture Window Pro, Corel Draw, Adobe InDesign, and others
can all use custom display profiles, so the benefit of this operation
is not strictly limited to use in a single application. Because of the fact that attributes of a display slowly change over time,
recalibrating and profiling is not a one-time event. Calibrating and profiling the display at regular intervals
becomes the best way to ensure the necessary level of accuracy is maintained
over time.
|
|
Package Contents And
Setup
Delivered in a durable black storage case, the Spyder colorimeter, OptiCAL
software CD-ROM, and assorted accessories are well protected from damage.
The CD-ROM contains not only the OptiCAL software, but the drivers for
the Spyder hardware, as well as the manual in electronic PDF format. After
reading the PDF instruction manual that is provided, installing the software
on both the Windows and Macintosh platforms was simple and trouble free.
It is very important to follow the documentation as there are important
steps that need to be taken (such as removing Adobe Gamma from the startup
folder in Windows or disabling the Adobe Gamma extension on OS 9) to ensure
a successful calibration and profiling session. The documentation also
provides very important and specific information on how to physically
configure the Spyder for use on an LCD or CRT display. By neglecting to
configure the Spyder properly, there is risk of a damaged or ruined LCD
panel.
The Spyder is a seven-filter colorimeter, and its function is to compute
color matches from measurements of the display surface. The Spyder interfaces
to the host computer using a USB connection for both communications and
to fulfill its own internal power requirements. Due to the accuracy of
the colorimeter in measuring the characteristics of the display, the resultant
profile that is generated by OptiCAL will be built with high quality measurement
data.
|
|
CRT Calibration And
Profiling Process
The first machine used in my testing was a Windows 2000 based computer
with a conventional CRT display. Before launching the software, I plugged
the Spyder colorimeter into a USB port and Windows immediately recognized
the device. When working with most CRT displays, there are actually two
separate software applications that are used, PreCAL and OptiCAL. PreCAL
(Pre-Calibration) allows CRT users to optimize the brightness, contrast,
and color temperature settings.
If your particular display has the built-in controls needed to adjust
the individual RGB gun output, PreCAL will prove valuable, otherwise skip
straight to OptiCAL and bypass PreCAL. The real power of PreCAL is the
ability to utilize the Spyder when adjusting the gain of the individual
RGB guns in the display, and equalize their output levels at a selected
correlated color temperature, in my case 6500Þ Kelvin. The purpose
of this procedure is to help correct the behavior of the display using
its own built-in color controls, which will ready the display for final
calibration and profiling using OptiCAL.
Check the accompanying illustration to see how the Spyder is attached
to my CRT display. In the PreCAL application I've balanced the output
of the three RGB guns at my target correlated color temperature of 6500Þ
Kelvin.
|
|
Using OptiCAL
Once finished with the PreCAL application, the user simply launches OptiCAL
to perform the balance of the operations. The preferences in OptiCAL allow
you to set the frequency at which the recalibration warning is displayed.
Because I recalibrate and profile every 30 days, I set the warning period
at one month. One month later when I boot my computer, OptiCAL will remind
me to recalibrate and profile.
The calibration mode (standard or precision) can also be specified in
this window, and the standard setting yields excellent results. The precision
mode is not necessarily better--it simply allows the user to specify
their own white and black luminance values that they would like to specifically
target. Because most users won't know appropriate values to set
these values at, ColorVision generally recommends using the standard calibration
mode. The option to display "Control Points in Curves Window"
is valuable if you want a visual representation of the adjustments made
by the calibration and profiling process and the ability to edit or manipulate
these results.
Once the preferences were properly set, I specified that I was calibrating
a CRT type display, specified a gamma curve of 2.2, and set the whitepoint
to "native" because I already set the whitepoint (6500ÞK)
previously in the PreCAL application. If my CRT display did not have individual
gun controls or I simply bypassed PreCAL all together, I would set the
whitepoint at my preferred correlated color temperature of 6500Þ
Kelvin. After these settings are complete, clicking the "Calibrate"
button activates the automated calibration and profiling process. Following
the on-screen instructions, the user attaches the Spyder to the face of
the display and waits for OptiCAL to complete the calibration and profiling.
Once finished, the Spyder is removed from the display, a dialog box pops
up and the user can name the profile, and the profile is saved to the
proper directory on the hard drive.
|
|
LCD Calibration And
Profiling Process
To evaluate the LCD calibration and profiling capabilities of this package,
I switched over to my Macintosh running OS X 10.2.4 that is currently
connected to a Cornea Systems 17" LCD. While the software interface
is identical for each platform, the Spyder colorimeter is altered with
two additional pieces when used to calibrate and profile LCD displays.
The most critical piece is a honeycomb sled that attaches to the underside
of the Spyder. This prevents the suction cups on the body of the Spyder
from sticking to the LCD surface. It is also used to alter the luminance
entering the sensor in the Spyder so that the LCD technology can be properly
calibrated and profiled. The second attachment is a counterweight designed
to offset the weight of the Spyder and therefore prevent the Spyder from
moving around while taking measurements from the surface of the LCD.
When performing LCD calibration and profiling, the PreCAL application
that was used for pre-calibrating CRTs is not used. OptiCAL is the only
program needed, and the calibration mode should be set to "standard"
as per the instructions. I choose "LCD" as the monitor type,
gamma 1.8 (standard system gamma for Macintosh), "native"
for the whitepoint, and clicked the "Calibrate" button to
begin the operation. Again, I followed the simple on-screen instructions
and allowed the software to do its work.
The automated calibration and profiling process for the LCD took just
under eight minutes to complete, and once the profile was generated, I
named the profile and it was saved to the appropriate directory. It was
interesting to look at the Curves Window after the process was complete.
It is in this window that you can see the degree of correction required
by the calibration and profiling process. The benefit of calibrating and
profiling each of the displays I tested was obvious, and clearly leagues
ahead in terms of accuracy over programs like Adobe Gamma or the Apple
ColorSync utility.
Final Thoughts And
Recommendations
The Spyder with OptiCAL package gives the user the ability to create professional
display profiles with a minimum of work. I can't overemphasize the
importance of display calibration and profiling to photographers. As previously
mentioned, there are many imaging applications that are ICC profile aware
and therefore can take advantage of custom display profiles created with
this software.
For photographers on the fence as to whether this kind of calibration
and profiling is necessary, realize that the visual accuracy of images
that the user is viewing in Photoshop is entirely dependent on the quality
of the display profile. This fact makes having a custom display profile
that much more important for photographers who want a truly accurate representation
of their digital files.
With a retail price of $299, the costs involved with purchasing this type
of package should be easily offset by the reduction in wasted time trying
to color correct images on an uncalibrated display. Photographers who
outsource their printing to a professional lab or do their printing in-house
will benefit from knowing that any color problems are not the result of
this particular element in their own color management workflow.
My experience with ColorVision technical support has been very good, and
the ColorVision web site has valuable information as well as product updates
so that users can always have access to the newest software. For further
information on this product, check out the ColorVision web site at www.colorvision.com.
|