- REVIEWS
Camera Reviews 
More Reviews Mobile Reviews Photography Reviews - GALLERIES
- VIDEOS
- BUYER'S GUIDES
Christopher Grey’s Advanced Lighting Techniques
In this book, Chris Grey takes you beyond the basics of lighting and shows you the tricks professionals use to create more visually complex effects. Some of these “tricks” are complex strategies that rely on a sophisticated understanding of the physics of light, but more are simply inventive solutions (the product of a lot of trial and error readers can bypass using this book!) that make it surprisingly easy to produce a very sophisticated result.
Each chapter of this book teaches you one basic technique, explaining the concept, demonstrating the setup step by step, and revealing the final results. Ample image sequences and diagrams are provided to illustrate each setup as it is built. These also show common problems you may encounter (and how to solve them) and variations you may want to try once you have the setup in place.
Killer Accents With Side Lights
We all know the value of a “kicker” light, a light that’s usually set opposite the main light to add an accent to the hair and shoulder, visually “kicking” those parts away from the background. Doing so prevents shadows from merging into a dark background and adds dimensionality to a flat, two-dimensional print. Generally speaking, these lights are typically called hair lights, and they are usually aimed to cover just a small part of the body.
Here I’ll show you how to create a much broader accent, and I’ll do it using modifiers you may not have thought of before: two separate softboxes set side by side but powered differently. Additionally, in these demonstrations, the softboxes won’t be set as high as one would usually set a hair light, with the strobe heads raised slightly higher than the subject’s face but not as high as the main light itself. This will allow the light to spread over the side of the face and body as opposed to the top of the head and shoulders.
You’ll need to think a little differently when setting up a shot like this one. Usually, we set the main light and power it up to an f-stop we’re comfortable with, then power the hair light and background light to complement the key. In this case, we’ll set the accent lights—the side lights—first, then power the main to complement them. Diagram 5A shows the first setup.

With all the other lights turned off, I powered the smaller softbox, a 1x6-foot strip light box and strobe, to f/9, aiming my meter directly at the light from where my model would be sitting.
I turned the small softbox off, and lit the larger, 2x3-foot box, adjusting the power to 1/3 stop less than the other, or f/8.
Once that was done, I turned the first box back on and measured the two together. Remember that the effects of light are cumulative. Light added to light equals brighter light. My two lights together equaled f/11, and this would be the value that I would have to work with when setting the main light.
My main light was a strobe aimed into a 48-inch umbrella. I love the light that thing produces, which is why I used it. Any other modifier would work just as well, but the look would be different. It’s only necessary to use whatever modifier you have—umbrella, softbox, or parabolic—that will give you what you need to make your client look great. I powered the main light to be 1/3 stop less than the cumulative power of the two softboxes, or f/10, which is where I would set the camera’s aperture.
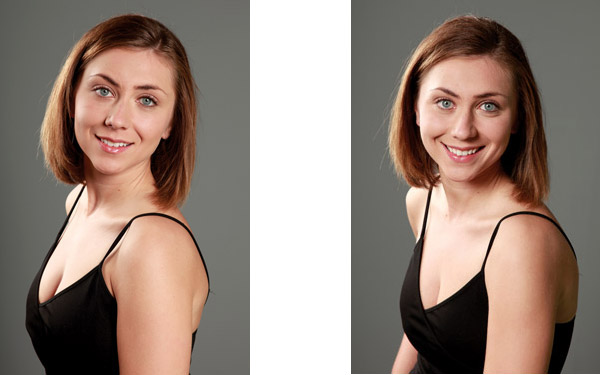
Here’s how it looked, as photographed at f/10 (see image 5.1). The first softbox, the 1x6-foot strip light, illuminated the back edge of the face quite nicely.

All Photos © Christopher Grey
The second softbox was much broader because it was aimed so much more at the side of the model’s face. You’ll notice that it hit the side of her nose. This is normally considered to be something you won’t want to do, as it puts undo emphasis on the nose, but, trust me, it will look great with this setup because it’s designed to be an accent, not a mistake. See image 5.2.
When the two lights are used together, the true look of the light becomes apparent. A brighter highlight at the back and a slightly dimmer highlight toward the front produces a look that’s much more dimensional than one light alone or a simple fill card. As you’ve probably figured out, the secret to this is the two separate power settings for the lights.
Once the main light is turned on, the results are terrific. The main light, set at camera right, fills in the shadows that so often are the result of side light yet allows those side lights to sculpt the image, producing a final shot, even with the hit on the nose, that’s evocative, beautiful, compelling, and different. You won’t see a cheap studio do something like this!
Now, let’s see what happens if we change the position of the main light.
I took a long, hard look at the position of the lights, in particular the main light. On most levels, I like the look of it. However, I noticed the main light threw a shadow onto the camera-left side of the model’s face, conflicting with the shadows thrown by the side lights. It’s especially noticeable next to her nose, just below her eyebrow. It’s not a deal breaker, but the look could be better.
For the next set, I moved the main light to camera left, the same side as the accent lights. I did this because I wanted the light to flow around the model, creating what would look like a wall of light that began with a hot edge at the rear.
The first shot with the new configuration was made without any fill on the shadow side. It looks very nice, I think, because the face is so nicely sculpted. See image 5.3.
I know that for many uses, such as headshots or publicity portraits, shadows are not wanted. It was a simple matter to tone down the shadows by moving in a white bookend, set about 3 feet from the model and at camera right (image 5.4). Be sure to re-meter if you do this. My exposure jumped by 1/10 stop, which meant I had to either power down the strobe generator (preferred) or move the main light a few inches farther away from the model to get the correct aperture power.
My final result (image 5.5) is a perfect headshot portrait. You’ll note that the accents, even though they do hit the side of the nose, create a perfect, sculpting light that complements the main light to produce a wraparound light that makes the model look great.

You must be precise with this lighting approach. Play with it and understand it before adding it to your repertoire. You could also use a 2x3- and 3x4-foot softbox to achieve a broader but slightly softer effect.
Where To Buy
Amherst Media books and eBooks are available from www.AmherstMedia.com, www.amazon.com, www.barnesandnoble.com, photo retail stores, and wherever books are sold.

About The Author
Christopher Grey is a photographer, photo educator, and author from Minneapolis, MN. In a highly competitive business like photography, professionals are often reluctant to tell others what has made them successful. That’s never been true of Chris. His willingness to fully demonstrate his techniques has produced nine lighting books, including his latest title, Christopher Grey’s Vintage Lighting: The Digital Portrait Photographer’s Guide to Lighting Techniques from 1910 to 1970 (Amherst Media).


![]()
Get the Latest Photo Tips, News & Reviews from Shutterbug!
| Camera Reviews Other Reviews | Mobile Reviews Photography Reviews Columns | News | Features | How-To | Resources |
 © 2026 Shutterbug
AVTech Media Americas Inc., USA
All rights reserved