- REVIEWS
Camera Reviews 
More Reviews Mobile Reviews Photography Reviews - GALLERIES
- VIDEOS
- BUYER'S GUIDES
Aurora HDR Pro Software Review

All Photos © Howard Millard
HDR, as most photographers know, stands for High Dynamic Range, allowing you to capture a wider range of highlight and shadow detail than you could in a single frame. You create an HDR image by shooting several identically framed shots of the same scene at different exposures, often with three brackets such as -2, 0, and +2 EV. The newest kid on the HDR block is Aurora HDR Pro from Macphun, currently for Mac only, but with a Windows version in the works.
There’s a lot of quality competition in HDR software, so how does Aurora HDR Pro distinguish itself? The interface is clean and contemporary, but what really stands out is the plethora of controls at your disposal to fine-tune and personalize your vision. You can use Aurora as a stand-alone app and as a plug-in for Adobe Photoshop, Adobe Lightroom, and Apple Aperture.
Created for the professional or advanced user, Aurora HDR Pro was developed with travel photographer Trey Ratcliff. The broad range of file support includes native Raw formats, JPEG, Photoshop PSD, 8- and 16-bit TIFF, PNG, and GIF. Advanced tools include an unlimited number of layers for selective application of effects and textures, an unlimited number of exposure brackets, layer blend modes, luminosity masking, chromatic aberration reduction, gradient masking, signature presets by Ratcliff, custom textures, a built-in de-noise tool, and more.
All-In-One Solution
Aurora HDR Pro is designed as an “all-in-one” start-to-finish software solution. You don’t need to do the tone mapping in one application, then switch to another tool for color enhancement, noise reduction, adding textures or anything else. Aurora HDR Pro offers over 40 presets with live previews that deliver striking results with a single click. Conversely, you can use Aurora solely to enhance a single photo, with or without adding an HDR effect.
Opening Aurora HDR Pro brings up a splash screen, where you can drag and drop your HDR brackets or a single image. For a test run, you can click “Load sample images” to work with a set of three brackets of London taken by Ratcliff. For my trial, I loaded three shots of the interior of Grand Central Station, New York, which I had bracketed at -2, 0, and +2 stops, changing shutter speed while maintaining a constant aperture.
Loading photos opens the screen seen in #1, displaying the bracketed shots that will be used to create the final HDR image. At the bottom, you can check boxes for Alignment, Ghosts Reduction, and Chromatic Aberration Reduction. I always check Alignment for a handheld series, but also when shooting on a tripod just in case it was jarred. Ghosts Reduction aims to eliminate blurs when a subject moves between one bracketed shot and the next. There are cases where this is indispensable, but for Grand Central Station, I wanted blurred multiples of the moving people to convey the sense of energy and motion emanating there.
Different Looks
Once you’ve checked the desired controls, click on the green Create HDR tab. This opens the main Aurora HDR Pro interface, #2. The default rendering is designed to be a natural look. I found it a tad dark with this subject. So I next chose the Basic preset category. You’ll find presets, #3, at the lower right of the main window, in these categories: Gift Pack, Trey Ratcliff Presets, Basic, Realistic HDR, Dramatic, Landscape, Indoor, Architecture, Favorites, User created, and All.

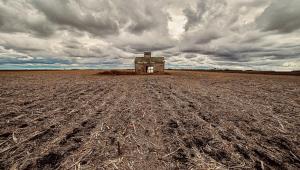
Clicking on the preview thumbnails along the bottom of the main window, you can quickly try many different interpretations of your photograph. From the Basic presets group, seen along the bottom of #2, choices include Realistic, Realistic Vivid, Bright—which I chose, HDR Look 1, HDR Look 2, Detailed, Dreamy, Romantic Glow, and Smooth. The Bright preset, #4, yielded a wide range of detail, opening up the very dark ceiling, giving a warm glow to the stone surfaces, and a lovely blue-purple hue to the daylight coming through the windows. Using the same brackets, I tried the Dramatic B&W preset to render a striking, moody, and detailed interpretation, #5, glowing with rich blacks and bright whites.
The main window interface shows you the range of your brackets such as -2, 0, +2, the ISO you used, focal length and f/stop, and the pixel dimensions. The default HDR merge is to a 32-bit file. Many of the presets are stunning right out of the click, as it were. But if you like to finesse and fine-tune, Aurora HDR Pro has more sliders and controls than you can imagine.


HDR Tools
In the right-hand column of the main window, #2, you find a color histogram, Layers, and a long list of Tools, each with multiple controls: Raw Tone Mapping, Structure, and HDR De-noise. Next come Image Radiance (adds a dreamy glow to the entire image), Color, Details, and Glow (affects only the highlights). Scrolling further down the Tools column shows Top and Bottom Lighting, Tone Curve, and Color Filter. The Tools are rounded out with Color Toning and Vignette.
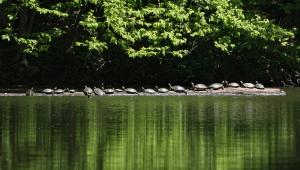
To check out Aurora’s naturalistic options, I opened a fall river scene bracket of -1, 0, and +1 that I had shot under overcast light. Selecting the Realistic preset group, I chose Realistic Detailed, which did a nice job, albeit a tad oversaturated in color for my taste, #6. With Aurora, you can dial down the effect with a slider right inside the preview box, or you can use several of the color controls in the Tools column. Check out the crop of this fall image, #7, showing fine detail in the leaves, tree bark, and rocks.


High-Octane Options
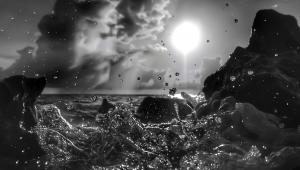
Sorry, but I couldn’t resist the iconic HDR rusting old car shot, #8. I bracketed this aging Buick at -2, 0, and +2, then loaded the three original Raw files. From the Aurora HDR Pro presets, I selected Trey Ratcliff. By clicking on the eye icon at the top of the window, you can see your original, shown here—kinda drab, right? So I selected the “Party in My HDR Pants” option (you can’t make this stuff up, I didn’t name it, just used it). The Party option provided that surreal exaggerated HDR look, which I find appropriate for oxidizing metal and creaking architecture, #9. The detectives among you will notice that I removed the new red car behind the main subject with Photoshop CC 2015’s Clone tool.


Once you’ve got the look you want, you’ll select File>Save, right? Not so fast. If you choose File>Save, Aurora saves the file in its native .mpau format. One quirk about Aurora HDR Pro is that it does not have a Save button. It’s a minor issue, but you have to choose File>Export to Image. Then a choice of output formats and color spaces will be presented to you. Maybe we’ll get a one-click option in the next upgrade?
Finally, I wanted to see what Aurora could do with a single image, one of those you wish you’d taken exposure brackets for, to do HDR, but didn’t think of it at the time. I chose a JPEG shot from an older point-and-shoot, taken in dim overcast light in Florida’s Fern Forest, and not superbly sharp, #10. From the Gift Pack presets category, I selected “Magical Sunset.” Under Tone in the Tools column on the right, I increased the highlights and added a bit to the blacks. Lastly, I used the Details tools to increase apparent sharpness. The result, #11, is indeed a magical transformation—rich color, dramatic mood. Aurora HDR Pro’s alchemy turned lead into gold.


Conclusion
Aurora has covered the full HDR spectrum from natural to painterly to high grunge. The program is effective and easy to use. Processing speed is comparable to the top HDR programs we’ve been using the last few years. And like the other top HDR offerings, there is some degree of repetition or overlap in the presets. By that I mean a preset in one category can look very similar to a preset in another category with a different name. Even so, there are an abundance of distinctive and different presets for every taste.
During the eight weeks or so I was testing it, Macphun updated Aurora HDR Pro twice (free for all registered users), indicating that they are listening to users and want to make it the best that they can. What stands out with Aurora HDR Pro is the wealth of tools included for fine-tuning, color correcting, sharpening, masking, and layer capabilities. Try it for free and I suspect that you will find it a worthy competitor in the HDR software arena.
Info
* Pricing and availability: Aurora HDR Pro, $99.
* System requirements: Mac OS X 10.9.5 Mavericks or above, 4GB RAM, Core 2 Duo processor from 2009 or better.
* A version for enthusiasts, Aurora HDR, is available from the Mac App Store for $39.99.
- Log in or register to post comments


![]()
Get the Latest Photo Tips, News & Reviews from Shutterbug!
| Camera Reviews Other Reviews | Mobile Reviews Photography Reviews Columns | News | Features | How-To | Resources |
 © 2024 Shutterbug
AVTech Media Americas Inc., USA
All rights reserved