
I really like this one. It's simple enough to understand for an amateur editor and the features are incredible too. - Rich Von Alvensleben
- REVIEWS
Camera Reviews 
More Reviews Mobile Reviews Photography Reviews - GALLERIES
- VIDEOS
- BUYER'S GUIDES
Alien Skin Exposure 3: Look Back, Look Ahead
Whether you yearn for a subtle fine-tuning or an over-the-top effect, Exposure 3 lays out a fully stocked film vault for you. Do you yearn for the gritty look of pushed Tri-X, or the impressionistic color that is characteristic of a faded Polaroid? To add the organic look of specific film types to your photos, or transform them with a wide range of processing and darkroom effects, try one of the 500 presets available in the third generation of Alien Skin’s Photoshop plug-in, Exposure 3, up from 300 presets in Version 2.

Courtesy of Alien Skin Software
Exposure 3 gives you access to effects from many stages of the photographic process: blur from cheap plastic lenses, color shifts from cross processing, grain and contrast from push processing, and warped vignettes from low-end cameras or from the printing process. Exposure 3 renders looks that span the entire experience of film back to the earliest days of photography.
As you’d expect, there is a wide range of emulations of black-and-white and color films to choose from. But Alien
Skin has gone beyond the standard out-of-the-canister look. There are aged and faded options, even early alternative processes. Kodachrome—that penultimate slide film so well loved that even Paul Simon penned a song about it—is not lost to history yet. Although the final roll came out of Rochester last year (2010), Exposure 3 gives you an array of choices, including the most recent Kodachrome 64 with subtle warmth and saturation; Kodachrome II from the 1960s with some fading and a cyan shift; Kodachrome, the original vintage, made from 1936-1962; and Kodachrome in 35mm slide format, with a round-edged black frame, replete with dust and scratches.
While Exposure 3 is highly specialized, it does what it does exceptionally well, providing a tremendous array of preset effects at the ready—only a few clicks and a couple of seconds away. The range of effects and the quality of their implementation is considerable. I strongly suggest that you go to the Alien Skin website (www.alienskin.com), check out the many before and after examples and video tutorials, download the free trial software, and discover how Exposure 3 might transform and enhance your photographs.
IR Effects
If you are a fan of black-and-white infrared, as I am, you’ll enjoy the Exposure 3 options: Kodak HIE with or without grain; Kodak HIE-Halation Strong Wide renders a strong glow effect caused by the thin backing of this film; Infrared High Contrast; and Infrared Fog-White Out.
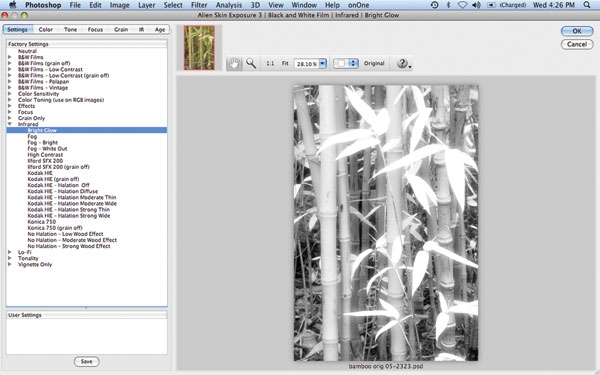
Opening my color shot of bamboo, #1, in Photoshop CS5, I chose Filter>Alien Skin Exposure 3>Black and White Film. This brings up the dialog box, #2, with the film and effects choices in the left column, and a large preview at the right. Click on the gray triangle to the left of each category to see a menu of all the options for it. With this image, I found that Infrared Bright Glow worked best. Use the up and down arrow keys to run through the options until you see one you like. To compare the effect with the original, hit the space bar to toggle between them.

#1
All Photos © Howard Millard
All Photos © Howard Millard
#2
Satisfied with my IR choice, I hit the OK button at the upper right. The 9MB 5x7” 300dpi image rendered in only a couple of seconds, considerably faster than the previous version. The infrared effect is striking, #3, showing a nicely delineated tonal range in the bamboo stalks while transforming the leaves into glowing variations of a whiter shade of pale.

#3
By default Exposure 3 conveniently places each effect on its own layer in Photoshop’s Layers panel, #4. I decided to add a vignette. Moving down the left-hand column to the Vignette Only category, I experimented with different vignette shapes, degrees of softness, and the option of black or white, #5.

#4
You can apply multiple effects using Exposure 3, but you must stack them in Photoshop layers. While it would be more convenient to apply multiple effects at the same time inside the plug-in, I am grateful that after saving and reopening to add a second or third effect, Exposure 3 still adds the newest effect as a new layer at the top of the panel in Photoshop.

#5
Portraits And Lighting Effects
In my portrait of model Tijashn Nichols, #6, she exudes glamour, so I called up Exposure 3’s color options to inject even more into the picture. From Photoshop’s Filter menu I chose Filter>Alien Skin Exposure 3>Color Film. This brings up a new set of categories to select from in the left-hand panel of the Exposure 3 window, #7. You see that both tonality and focus categories are available in addition to film and color effects.

#6

#7
I went to the Focus category and, after trying the first five or six effects, I settled on Glamour Shot-Strong, which added a nice diffusion/soft-focus effect throughout the image, #8. Check out the diffusion and blurred edges in her face as well as the softening of detail in the necklace. For magazine reproduction, I have used a stronger effect than I would for a print, so that you should be able to see it. For a print or on-screen purposes, I would use the Glamour Shot-Moderate setting.

#8
Color Options
Now, let’s explore some of the hundreds of choices under Color Film. I started with my color shot of a pink water lily, #9, saturated and dripping with color. To take that down several notches, I chose “Color>Fade all, leaving weak reds,” #10. After a couple of seconds, the floral image now looks like it could be hand-tinted, #11. Pastel colors and soft hues have replaced the intense color of the original. Note that you can also achieve this effect with even more control by clicking on the Color tab in the row of tabs at the top left of the Exposure 3 window, and reducing the saturation values via sliders.

#9

#10

#11
Think some of the Exposure 3 films are old now? How about sampling the Vintage offerings—processes harking back as far as the 1800s include Calotype, Daguerreotype, even Autochrome, patented in 1903. With its muted pastel colors and strong grain, Autochrome was one of the earliest color photo processes and used dyed grains of potato starch (I’m not kidding). Starting with the same water lily photo, I chose Color Films-Vintage>Autochrome-Vignette (soft), #12. The processed image, #13, exhibits lovely vintage color textured with strong coarse grain. A dark vignette adds to the period feel.

#12

#13
Heading back to the future, I ran a more recent filter on this same flower. Lomo is a contemporary plastic, low-tech, inexpensive camera that offers optical and color distortion for those whose taste runs in that direction. For even more color funkiness, I chose the Lomo-Agfa Film option from the Cross Processing category, #14. Cross processing involves running a film through the wrong chemistry to achieve exaggerated color and contrast effects. Well, that’s just what Exposure 3 gave me, #15—raunchy, high-contrast, otherworldly poster-like color reminiscent of the 1960s.

#14

#15
Architecture
Want to take an architectural shot back a few decades? The turrets and adornments of this New York City residential building, #16, have always intrigued me. To take it back in time photographically, I turn to Exposure 3’s darkroom toning options. Under Black and White Films, I chose Color Toning>Selenium-Warm/Cool. This renders a split-tone effect with warm brown shadows and mid tones blending into cool highlights, #17, that could have been made when this edifice was young. To add drama to the effect, I first ran the Vignette>Round soft on the photo and saved it before reopening and applying the color toning.

#16

#17
Cinema, Too
Let’s conclude with a special effect from the Cinema category. In my portrait of actor Katy Irwin, #18, she exudes attitude. To complement that projection, I headed to Exposure 3 and chose Bleach Bypass>Blown Highlights. The extremely stylized result, #19, veers away from the realm of photography and inclines toward illustration. Note that while all highlights are indeed blown out, the tonality of Irwin’s intense blue eyes and red lips have been preserved.

#18 (Left) #19 (Right)
Software & System Requirements
Software:
• Adobe Photoshop CS3 or later
• Adobe Lightroom 2 or later
• Adobe Photoshop Elements 7 or later
System:
• Windows—Intel Pentium 4 processor or compatible and Windows XP SP3 or later
• Mac—Intel processor and Mac OS X 10.5 or later
Exposure 3 costs $249, or $99 as an upgrade for registered users of Exposure or Exposure 2. For more information, contact Alien Skin Software at: www.alienskin.com.
- Log in or register to post comments


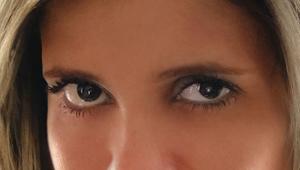


PHOTO OF THE DAY

Today’s photo is Dawn in Durango by Jeff Van Scoyk
eNEWSLETTER SIGNUP
![]()
Get the Latest Photo Tips, News & Reviews from Shutterbug!
| Camera Reviews Other Reviews | Mobile Reviews Photography Reviews Columns | News | Features | How-To | Resources |
 © 2024 Shutterbug
AVTech Media Americas Inc., USA
All rights reserved