- REVIEWS
Camera Reviews 
More Reviews Mobile Reviews Photography Reviews - GALLERIES
- VIDEOS
- BUYER'S GUIDES
Adobe DNG Format: The Power of Raw Without the Hassle (VIDEO)

Most modern digital cameras enable you specify whether you want to save images as Raw files, Jpegs, or both at the same time. Some photographers, however, experience difficulty opening Raw files, and if that sounds familiar the tutorial below is for you.
It's generally accepted that the conventional Raw format delivers optimum results as compared to Jpegs, with far more flexibility during the editing process. It turns out there's another format that's less familiar, and it delivers the benefits of Raw without any complications. It's called DNG, which is an acronym for Digital Negative, and that's what you'll learn how to use today.
Instructor Paul Farris of the Photo Genius YouTube channel has been teaching workshops and posting free tutorials for over a decade. He specializes in helping amateurs achieve more professional results, and in this episode he explains everything you need to know about converting files to DNG in barely five minutes.

Farris explains that a problem with opening Raw files typically occurs when using a new camera if your software hasn't been updated. He notes further that Raw is not a standard format like Jpeg, and it differs from camera to camera— with regular updates being the norm. Thus, "when a new camera comes out, it often takes time for Adobe to catch up and release the appropriate updates so that Lightroom and Photoshop recognize the files."
The solution is quick and simple: All you have to do is convert your Raw files to DNG and then proceed on your merry way. Farris explains how the DNG format works its magic before demonstrating how to make the conversion. One benefit is that you don't need a subscription, a license, or even an Adobe account to get the job done.
In fact, it's not even necessary to edit with Photoshop or Lightroom because many other image editors are compatible with DNG. Farris says that another benefit is that DNG files are smaller than their Raw counterparts, "without any noticeable difference in image quality." And unlike with compressed files like Jpegs, you can go back and re-edit the DNG images without any loss of data.
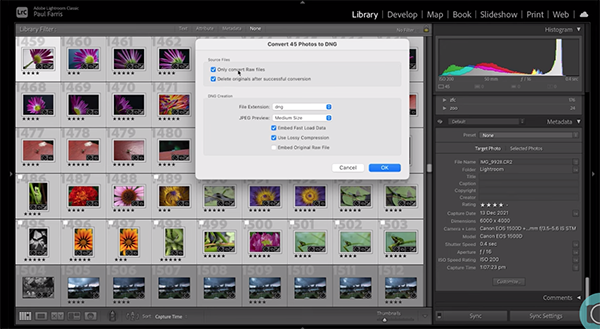
In short, you get a compressed file with no loss in quality—and you're not tied into using any particular software to process your work. Best yet, you'll never experience difficulty when opening the DNG files. It sounds like the best of both worlds, right?
With all these explanations out of the way it takes less than two minutes for Farris to explain the simple conversion process. Then you'll be able to start saving images to DNG as soon as today. You'll find more helpful tips and tricks on the Photo Genius YouTube channel, so don't forget to take a look.
We also recommend watching a tutorial we posted from another expert recently, explaining why you should use Bridge—Adobe's recently updated file browser.


![]()
Get the Latest Photo Tips, News & Reviews from Shutterbug!
| Camera Reviews Other Reviews | Mobile Reviews Photography Reviews Columns | News | Features | How-To | Resources |
 © 2026 Shutterbug
AVTech Media Americas Inc., USA
All rights reserved