- REVIEWS
Camera Reviews 
More Reviews Mobile Reviews Photography Reviews - GALLERIES
- VIDEOS
- BUYER'S GUIDES
Adobe’s Photoshop Lightroom 3; Improved Features, Added Options
The latest version of Lightroom is coming into full use as more and more plug-ins and export options come into play. This month Jon Canfield takes a look at the essential ingredients; next month we have another opinion about the latest version of Lightroom that takes a different point of view.—Editor
Lightroom, unlike Photoshop, is built from the ground up for photography and the unique workflow that we have as digital photographers. Rather than dealing with 3D, vector graphics, and other general graphics tasks that aren’t of interest to most of us, Lightroom distills the features down to what is important—image management and optimization. While Lightroom 2 is a popular option for many, the latest release of Version 3 adds some new features that improve the overall workflow and quality of output.
 |
|
|
Importing
Lightroom is a digital asset manager rather than an image browser—you need to import your images into the Lightroom database, either by copying them, or referencing them at a location on your drive, before you can use the tools or output your images. This is different from programs like Adobe Bridge, ACDSee, and Photo Mechanic that look at a folder of images and display thumbnails or previews. Other programs in this category are Apple’s Aperture, Canto’s Cumulus, and Extensis’ Portfolio. Of these other applications, Aperture is the closest in feature comparison with management and editing tools. The advantage to an asset manager over a browser may not be obvious at first, but the gains are better performance, more functionality when searching for images, and more organizational options.
Importing in Lightroom 2 was a straightforward process, but it did have room for improvement. Performance wasn’t that impressive, and if you had different groups of images on a card you needed to perform multiple imports to put these files in different locations. Lightroom 3 imported images about 10 percent faster on my tests when compared with the previous release, and given that nothing happens until your images are imported, any speed gain here is welcome.
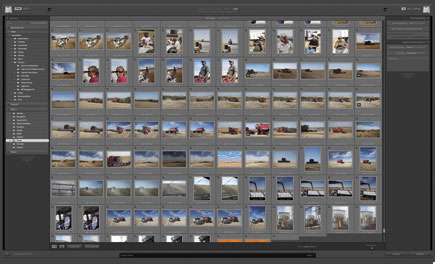
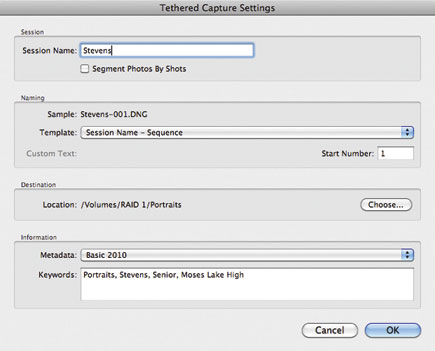
With Version 3, importing has received a complete face-lift and gained some nice new features (#1a and #1b).
 |
|
|
 |
|
|
Import now fills your screen by default (you can collapse this to a smaller window if you like). Thumbnail size of images in the preview area is adjustable so you can take a closer look if you want to filter the images out prior to import. On the right side of the import window is a Destination panel that lets you select where your images are placed. You can drag the selection bar up or down to choose the location (or double-click on the destination folder). Lightroom will display the subfolders that will be created as well as the number of images each folder will contain.
One feature I’ve found very useful is the Presets option. Once I’ve selected the settings I want to use, clicking on Save Current Settings as a New Preset will give me the options to save these settings for future use.
Tethered Capture
Related to importing, Lightroom 3 now includes a Tethered Capture option that lets you shoot directly into Lightroom. Currently the app supports cameras from Canon and Nikon, and Adobe says they expect this list to grow as testing is completed on other camera models.
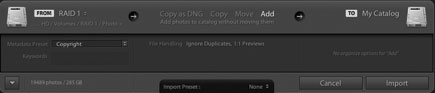
To shoot tethered, select File>Tethered Capture>Start Tethered Capture. A settings dialog box will be displayed (#2) where you can enter session information, what type of metadata is written with the images, file naming, and where the files will be saved.
 |
|
|
Once your settings are done, you’ll see the Tethered Capture Controller. If you have multiple cameras connected, you can select which camera to control, the current settings of the camera, whether to apply develop presets as the images are captured, and a Capture button (#3).
|
|
|
|
Finally, Lightroom 3 will now import your video files into the library. Support for video is minimal—unlike Apple’s Aperture, you’ll need an external player/editor to do anything with your videos, but being able to manage them is a good start. Hopefully, Adobe will add more in this area as more D-SLRs include a video capability. The ability to do at least basic editing, including trimming clips and playback within Lightroom would be good starting points.
Image Processing
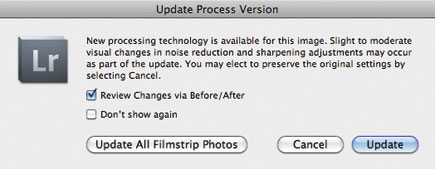
At the heart of Lightroom is the image-processing component—the Develop module. Lightroom 3 uses the same new processing engine as Adobe Camera Raw (ACR) in Photoshop CS5. The new processing version is not backward compatible, so you won’t be able to go back to a previous version of Lightroom or ACR if you use the new process, but there is really no reason to want to. The results from the new version are superior in every respect to the previous version, especially when it comes to lens correction and noise handling. Lightroom will not update your images automatically, so to help with finding what version your images are using, you can select Library>Find Previous Process Photos. This will filter your library to show only those images with the old process. You can review what changes will be made to the images when updating, and like other editing tasks in Lightroom this is nondestructive so you can always go back if you want (#4).
 |
|
|
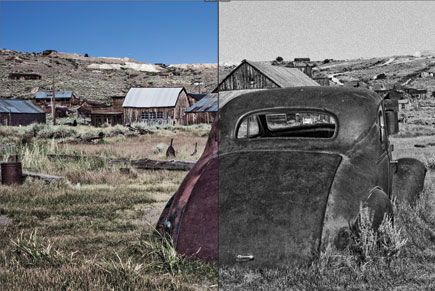
By default, the new process is sharper with better color fidelity and lower noise. In looking at several hundred images, I didn’t find a single image that didn’t benefit from updating the process.
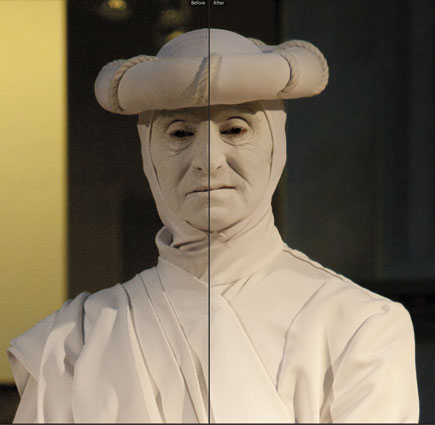
Noise reduction has been improved, with more control over the edge detail when using luminance and color noise adjustments. Typically, luminance noise reduction reduces the sharpness in your image. With the Detail and Contrast controls here, you can recover much of that sharpness (#5).
 |
|
|
Sharpening is also improved with less likelihood to generate halos or distortion on edges. The preview controls in the sharpening module are still available and can make your choices easier to refine.
Film Grain is a new feature. It’s ironic that as digital photographers we work so hard to eliminate noise in our images, and then we’ll go to a utility to add grain back in. If you’ve always assumed that noise and grain are the same thing, you’ll be surprised at the difference between the two. Film grain varies in size and shape while noise is uniform. With the new Film Grain feature (#6), you can adjust the amount, size, and roughness to simulate different film types. This effect works best with black-and-white images.
 |
|
|
|
| |||||||||


![]()
Get the Latest Photo Tips, News & Reviews from Shutterbug!
| Camera Reviews Other Reviews | Mobile Reviews Photography Reviews Columns | News | Features | How-To | Resources |
 © 2026 Shutterbug
AVTech Media Americas Inc., USA
All rights reserved