- REVIEWS
Camera Reviews 
More Reviews Mobile Reviews Photography Reviews - GALLERIES
- VIDEOS
- BUYER'S GUIDES
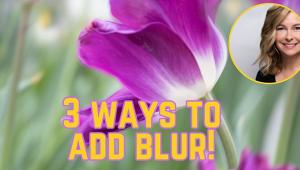
Want Better Background Blur & Bokeh? Use Lightroom's Lens Blur Panel (VIDEO)

Most outdoor photographers understand that a shallow depth of field draws attention to the key element of a scene by separating it from a distracting background, foreground or other clutter within the frame. But what if your lens doesn't have a fast maximum aperture that makes it easy to achieve this important effect?
This is where Lightroom comes to the rescue, as you'll see in the three-minute tutorial below from freelance photographer/filmmaker James Feaver who introduces today's episode like this: "Lightroom's Lens Blur panel is designed to allow you to change the depth of field in photo, as well as the plane of focus." And the tips he provides are easy enough for users of all skill levels.
There are even more benefits to these straightforward Lightroom tools, because they also enable you to create and change the bokeh of a photo by using several effects within the Lens Blur panel. In other words, "you don't need an expensive prime lens to create beautiful, shallow depth of field."

Feaver gets started by opening an image in Lightroom's Develop panel and selecting the Lens Blur option. Then all you need to do is click on the Apply box on the left side of the panel. What happens next is that "Lightroom will look at the photo, work out what's in focus and out of focus, and then create a shallow depth-of-field effect."
Sometime this automatic process results in a really nice effect right out of the box. But if you're not completely pleased by what you see there are several ways to quickly change or refine the result using the available custom controls, and Feaver demonstrates how these work.
It's easy, for example, to use the Blur Amount slider to increase or decrease the blur. There are also five Bokeh varieties from which to choose, with a Boost option for each. According to Feaver the most important control within the panel is the Focal Range slider, "and you can change both depth of field as well as the focus plan of your image." Watch how he accomplishes both tasks quickly and effectively.

There are a few more tricks to learn and we'll leave it to Feaver to demonstrate what they are, because they're so simple there's no need for us to provide a summary. Bottom line: After watching this quick video you'll want to add Lightroom's Lens Blur panel to your image-editing workflow.
You can find many more post-processing tips and tricks by paying a quick visit to Feaver's instructional YouTube channel.
And be sure not to miss the tutorial we featured earlier, explaining why an accomplished landscape photographer says to "forget the rule of thirds" and use his superior framing methods instead.
- Log in or register to post comments


![]()
Get the Latest Photo Tips, News & Reviews from Shutterbug!
| Camera Reviews Other Reviews | Mobile Reviews Photography Reviews Columns | News | Features | How-To | Resources |
 © 2024 Shutterbug
AVTech Media Americas Inc., USA
All rights reserved