- REVIEWS
Camera Reviews 
More Reviews Mobile Reviews Photography Reviews - GALLERIES
- VIDEOS
- BUYER'S GUIDES
Take Control Of Your Print Quality; A Color Managed Screen-To-Print Workflow With Adobe’s Photoshop Elements 3.0 & 4.0 Page 2
3. (1) When the Print dialog window opens click the Properties button. (2) With the Properties window for your printer open, go to the Paper & Quality Options and select from the drop-down menu the paper you are printing on. (3) In the box immediately below select from the drop-down menu the level of print quality you want for making the print (Photo quality or higher produces the best color matched print results).
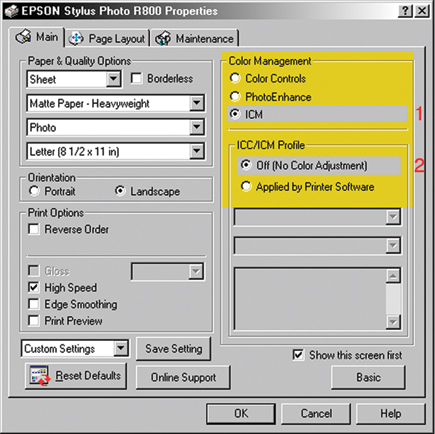 |
4. (1) In the Color Management box in the upper right of
the Properties dialog click on the radio button next to ICM. (2) In the box
ICC/ICM Profile immediately below click on the radio button next to Off (No
Color Adjustment). Click on OK to make your print.
Apple Mac Instructions
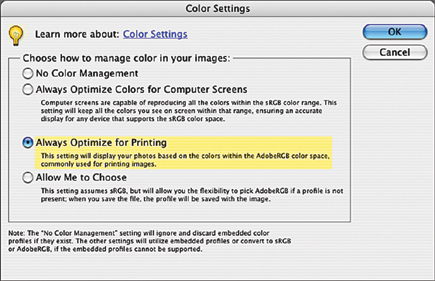
1. Once you have launched Elements go to the menu bar and click
on Edit, and from the drop-down menu selections click on Color Settings. When
the Color Settings dialog opens click on the radio button "Always Optimize
for Printing." If you are also using Elements to color correct and adjust
photo image files that you expect to print, you should also use this option
setting to manage color.
 |
2. With a photo image open in Elements to make a print go to the File menu and click on Print; that opens the Print Preview dialog window. After selecting your print size and orientation by opening the Page Setup dialog, go to the Color Management section by clicking on "Show More Options." (1) Be sure that next to Source Space Adobe RGB (1998) is displayed.(2) From the Printer Profile box click on the arrow to access the drop-down menu and select the profile that is associated with the printer you are using and the paper you will be printing on. (3) In the box below next to Rendering Intent use the drop-down menu to select Perceptual. Then click Print.
 |
3. (1) In the Print dialog box go to the third box down and from its drop-down menu select Print Settings. (2) In the Page Setup: Standard dialog from the top, Media Type, go to the drop-down menu and select the paper that corresponds with that which you will be printing. Color: Color is the default, so you can go down to Mode and click on Advanced. (3) From the Print Quality drop-down menu select the option choice Photo or Best Photo to make a photo print.
 |
4. (1) With the Print Settings selected return to the third from the top menu selection and switch it from Print Settings to Color Management which changes the bottom portion of the dialog, providing three options from which to choose. (2) Select Off (No Color Adjustment) from the three. Then at the very bottom, right, click on the Print button to start your printer to make the print.
 |
|
| |||||||||
- Log in or register to post comments


![]()
Get the Latest Photo Tips, News & Reviews from Shutterbug!
| Camera Reviews Other Reviews | Mobile Reviews Photography Reviews Columns | News | Features | How-To | Resources |
 © 2024 Shutterbug
AVTech Media Americas Inc., USA
All rights reserved