- REVIEWS
Camera Reviews 
More Reviews Mobile Reviews Photography Reviews - GALLERIES
- VIDEOS
- BUYER'S GUIDES
The Mystery Of The Aurora Borealis; Capturing Nature’s Light Show Page 2
Aurora Candle |
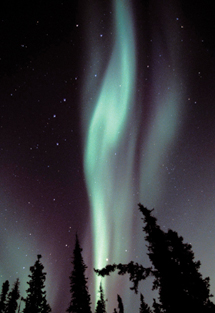 |
If the lights are especially active, too long of an exposure will result in
a sort of washed-out blurry image that's not very satisfying to look at.
Of course, we all go with what we've got and I certainly have my share
of "habitat" shots simply because I didn't have the right
lens at the time.
The beauty of digital cameras is the ability to change ISO rapidly along with
being able to view your results immediately and adjust your technique, literally
on the fly. While the first digital cameras suffered the same problems as film
of high noise with long exposures and/or high ISO settings, today's better
models have sophisticated software that virtually eliminates this problem. I
presently use a Nikon D200 and am continually amazed at its ability to deliver
sharp, clear images with long exposures or high ISO settings. Although it's
not a cure-all for poor technique or composition I honestly can't imagine
going back to film for most of the work I do these days.
I have been told that the creation of vignettes in your image is possible during
long exposures due to heat generated by the electrical charge entering and leaving
the sensor on digital cameras. If this is a problem, "fixing" it
can be as simple as adjusting your composition for cropping later, if shooting
raw, using the Vignette control in raw converter software.
A few other notes are in order to get you set up to shoot the aurora. When using
film, it's generally a good idea to overexpose the first frame of each
roll so the technician knows where #1 is when he/she starts to cut. This is
particularly useful if your film's being developed in an area where they
don't often think about night photography. Also, don't try to squeeze
that 37th shot out of a roll of 36, especially if it's on a motorized
drive. Nothing is worse than having that dry, brittle film break in the back
of the only camera body you brought out with you because you were in such rush
to not miss the event. I routinely use motor-driven bodies and have been fortunate
to not have a problem with either static electricity buildup or having the film
break except as I've already mentioned.
That said, there have also been plenty of nights where I've just stepped
out onto the porch and simply watched the show without even thinking about setting
up a camera. Not a bad thing either. A little hot cocoa, laying on the porch
in a sleeping bag looking up at the heavens and just soaking in the view. What
a treat!
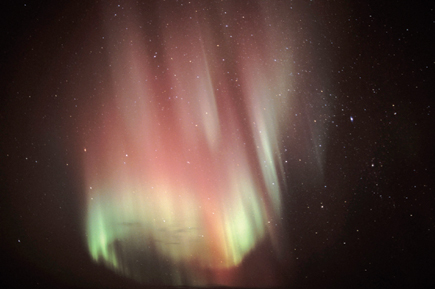
Red Aurora |
 |
Finding The Beauty
While the aurora can occur throughout the year and is visible as far south as
the middle latitudes of the US, you are more likely to see one along the same
latitude as Fairbanks, Alaska, an area of maximal auroral activity. According
to the Geophysical Institute at the University of Alaska/Fairbanks you have
the possibility of seeing an aurora some 243 times within a single year in Fairbanks.
That's assuming minimal cloud cover and dark skies. Of course, that rules
out the majority of the summer months for us so it's pretty much late
fall, winter, and then early spring or roughly September-April from about 10pm
until 4 or so in the morning.
Exposure Recommendations |
|||||||||
APERTURE |
|||||||||
1.4 |
1.8 |
2.0 |
2.8 |
3.5 |
4.0 |
4.5 |
5.6 |
||
F |
25 |
1'52" |
2'54" |
3'44" |
7'28" |
11'12" |
14'56" |
22'24" |
29'54" |
I |
50 |
56" |
1'28" |
1'52" |
3'44" |
5'36" |
7'28" |
11'12" |
14'56" |
L |
64 |
42" |
1'2" |
1'25" |
2'50" |
4'15" |
5'40" |
8'30" |
11'20" |
M |
100 |
28" |
44" |
56" |
1'52" |
2'48" |
3'44" |
5'36" |
7'28" |
S |
200 |
14" |
22" |
28" |
56" |
1'24" |
1'54" |
2'48" |
3'44" |
P |
400 |
7" |
11" |
14" |
28" |
42" |
56" |
1'24" |
1'52" |
E |
800 |
4.5" |
5.5" |
7" |
14" |
21" |
28" |
42" |
56" |
E |
1000 |
3" |
4.5" |
5.5" |
11.5" |
17" |
23" |
34" |
46" |
D |
1600 |
2" |
3" |
3.5" |
7" |
10.5" |
14" |
21" |
28" |
Useful Web Resources
Additional explanations: www.alaskascience.com/aurora.htm
Aurora forecasts from Fairbanks: www.gi.alaska.edu/cgi-bin/predict.cgi
Site in Norway: www.northern-lights.no
If you would like to see more of Mike Endres' work, be sure to visit his
website, www.wanderlust-photo.net,
or e-mail him at mendres@alaska.com.
Please note that Endres, who was born in Fairbanks, is currently serving in
the Army and his
website is still "under construction" as he remains deployed.
|
| |||||||||
- Log in or register to post comments


![]()
Get the Latest Photo Tips, News & Reviews from Shutterbug!
| Camera Reviews Other Reviews | Mobile Reviews Photography Reviews Columns | News | Features | How-To | Resources |
 © 2024 Shutterbug
AVTech Media Americas Inc., USA
All rights reserved