- REVIEWS
Camera Reviews 
More Reviews Mobile Reviews Photography Reviews - GALLERIES
- VIDEOS
- BUYER'S GUIDES
DxO Optics Pro 5.3; Raw Converter & Image Enhancer With Auto Or Manual Transmission Page 2
 |
|
|
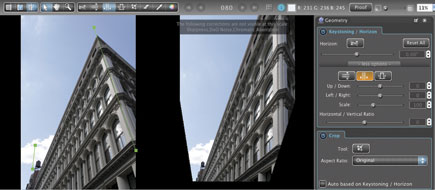
If your creative urge favors tilting the image plane up, down, or sideways, go for it using the four sliders located beneath the Keystoning tools. You’ll also find a Scaling tool here. Next come controls for Distortion, Volume Anamorphosis (to recover the shape of spheres and cylinders), and Focusing Distance.
 |
|
|
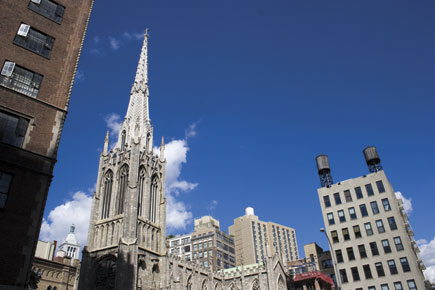
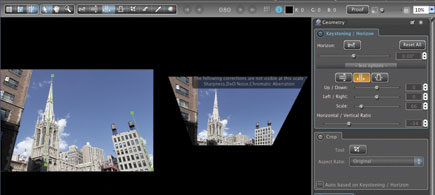
To show a full-size example of DxO Optics Pro 5.3’s Geometry correction, I started with a shot of a church steeple and other buildings bent by a wide angle lens shooting upward (#6). Under Geometry, in the Keystoning section (#7), I clicked on the center icon of two vertical parallel lines (highlighted in orange). In the original image, on the left, I drew lines (in green) vertically through the center of the steeple and along the side of the building on the right to indicate where I wanted the lines to be vertical. After processing (#8), the lines are now parallel and the buildings are standing up straight. Cropping or cloning will be required for the lower right corner, but the perspective distortion is gone.
 |
|
|
 |
|
|
To adjust sharpening and noise removal, go to the Detail palette (#9). Many photographers prefer to apply no or very minimal sharpening during the raw conversion, preferring to wait until the files have been converted, copied, and re-sized for printing. If you do want to sharpen here, the Unsharp Mask controls are similar to those in Photoshop. Grain can be adjusted to match the profile of many different films, and its intensity varied. To use the Dust Removal tool, click on the eraser brush and set the width with the slider.
 |
|
|
Chromatic Aberration sliders (#10) let you remove any color fringing problems that were not handled automatically through the lens profile. This is useful if you are using a lens for which there is no profile or if there is more chromatic aberration than the profile removed. Zoom out to 100 percent magnification, then adjust the sliders until the color fringing disappears.
 |
|
|
For noise removal, play with the sliders and see how you like the results. At low ISOs, very little may be needed. For low-light, high ISO shots, you may need to crank it up all the way to the right. The Grey Equalizer slider can neutralize color in the noise still in the image and/or the color area where noise was removed.
The My Palette icon lets you set up aliases of the palettes and sub-palettes you use most, but without preset settings.
Process Tab
In the Process window (#11) your images are processed automatically when you click on the Start Processing button at the top center of the screen. But before you click, be sure that you’ve adjusted the settings you want for your conversion on the left side of the screen. Options include: Output name, Format (TIFF, JPEG, or Linear DNG only), Compression, Force 8 bits (to reduce a 16-bit raw file to 8 bits), Destination folder, Filename suffix such as _DxO, Size, Resolution (such as 300dpi), and ICC profile (such as Adobe RGB).
 |
|
|
Some photographers keep their images at 16 bits until just before printing. Why? Significant corrections can be made to a 16-bit file without damage or loss of data, as may occur with the same operations performed on an 8-bit file. Here, I converted to 8 bits for magazine reproduction requirements.
Once you start processing, a status bar shows the progress and a read-out tells you how many of the total images have been processed.
Review Tab
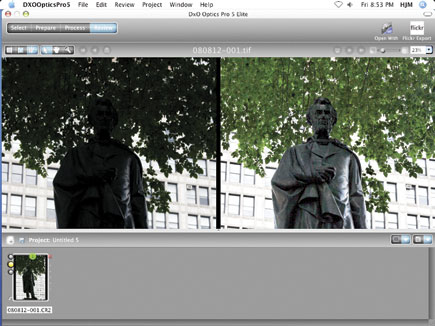
In the Review window (#12) you can see how your conversions look and zoom in with a slider to check areas you’re interested in. Here, I used DxO Lighting, Auto-Medium, to open up a dark statue and leaves in the shade. Before (left) and after (right) images are displayed in the window. If things don’t look the way you want, you can go back to the Prepare tab, change the settings, and process your photo again. Of course, you’ll also want to review your processed images in Adobe’s Photoshop or any other image editor you use.
 |
|
|
Conclusion
While the first release of Version 5 for Windows had some slow speed problems and other bugs, several updates address these issues. The Mac version was released in July 2008, with a free 5.3 update for both platforms released in fall 2008. Version 5.3 includes 64-bit support for Windows, Lightroom 2 compatibility, raw conversion to handle ISOs up to 25,600, faster download times for the program, and new camera and lens profiles. Modules for the Nikon D90 and Canon EOS 50D were not up at press time, but should be by the time you read this.
One problem I had was that some previews were garbled. I e-mailed tech support who responded with a fix: in the DxO preferences, uncheck GPU acceleration. While it requires a robust computer, DxO Optics Pro 5.3 is a powerful professional-level tool that offers unusually extensive controls for either automated or manual raw conversion with noise removal, control over color and detail rendering, and correction of distortion.
Price & Availability
DxO Optics Pro 5.3 is available in two versions, Standard for $150 and Elite for $240 (street price). Both offer the same controls, but Standard works with amateur to high-end prosumer cameras such as the Canon EOS 10D through 40D and the Nikon D40 through D300, as well as other brands. The Elite edition adds high-end pro cameras and lenses such as the Canon EOS 5D and above and the Nikon D700, D2, and D3. Be sure to check the DxO website for details and minimum system requirements, and a free trial download. DxO Optics Pro 5.3 can be used as a stand-alone application and/or with included import plug-ins for Adobe’s Photoshop and Lightroom.
For more information, contact DxO at: www.dxo.com.
|
| |||||||||
- Log in or register to post comments


![]()
Get the Latest Photo Tips, News & Reviews from Shutterbug!
| Camera Reviews Other Reviews | Mobile Reviews Photography Reviews Columns | News | Features | How-To | Resources |
 © 2024 Shutterbug
AVTech Media Americas Inc., USA
All rights reserved