- REVIEWS
Camera Reviews 
More Reviews Mobile Reviews Photography Reviews - GALLERIES
- VIDEOS
- BUYER'S GUIDES
DON'T Destroy Photos with These 5 Image-Killing Mistakes (VIDEO)
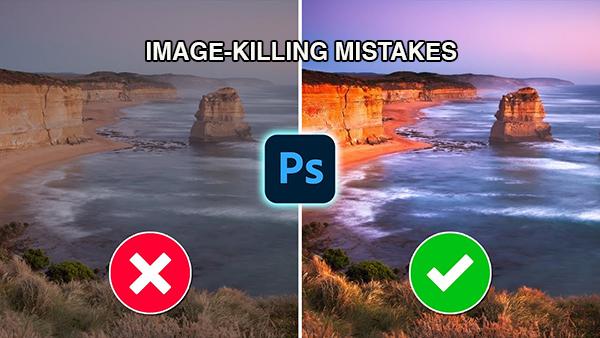
If you're falling short when processing images in Photoshop there's a good chance that you're making at least one of the image-killing mistakes explained by landscape pro Steve Arnold in the two-minute tutorial below. His lessons all have the same goal: "to help you create images that you can be proud of."
Today's episode begins with this question: "Have you ever wondered why other photographers' images are so polished and professional looking, but your photos don't have the save WOW factor?" There are many reasons that your work may miss the mark, but Arnold concentrates on a handful of the most likely—four of which involve common post-processing errors.
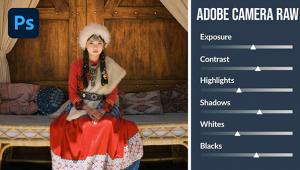
The first mistake, however, actually occurs before sitting down at the computer and it's setting the camera to capture Jpegs rather than Raw files. Using the analogy of baking a cake, Arnold says "when shooting Jpegs the camera applies its picture style to your images, using its own recipe to decide what the image should look like"—thereby baking your edits into a lower-quality image."

In other words, Arnold is a strong proponent of the Raw format because of the editing control it provides. Or as he insists, "with a Raw file you get a full panty's worth of ingredients to work with from the start." Once you begin editing is when the second mistake may occur, and this is overcooking the photos by taking a heavy handed approach. The solution is a subtle technique that enhances the image without turning it into a tasteless mess.
According to Arnold, there's another common error that "can make the whole editing process 10 times harder than it needs to be," and this occurs when you're working "destructively." The solution here is to make your enhancements using Adjustment Layers and Smart Objects, which is what's otherwise known as non-destructive editing.
Arnold says this approach is a massive timesaver because it enables you to alter any adjustment at any time without affecting the changes you made earlier in the process. He also explains why non-destructive editing results in higher-quality images.

As this point the video still has three minutes to go, with an additional two mistakes to avoid and suggestions for fixing them. All five are easy to achieve and will make a big difference in your post-processing results. Once you're done watching be sure to visit Arnold's instructional YouTube channel where there's much more to learn.
We also suggest checking out the tutorial we posted earlier, explaining Photoshop's updated Gradient features and what one expert says are the three best ways to use them.
- Log in or register to post comments


![]()
Get the Latest Photo Tips, News & Reviews from Shutterbug!
| Camera Reviews Other Reviews | Mobile Reviews Photography Reviews Columns | News | Features | How-To | Resources |
 © 2024 Shutterbug
AVTech Media Americas Inc., USA
All rights reserved