- REVIEWS
Camera Reviews 
More Reviews Mobile Reviews Photography Reviews - GALLERIES
- VIDEOS
- BUYER'S GUIDES
X-Rite ColorMunki Smile: An Affordable Calibration Option
Color calibration is the key to obtaining an accurate reproduction of what you saw when capturing the image, and what is reproduced on screen or paper. It’s long been considered a bit of black magic as to how it is done, what with terms like gamma, color temperatures, luminance, and the like as part of the mix, but the simple fact is that unless you’re working on a calibrated display you don’t quite know whether the greens, blues, or other colors you are seeing are actually what everyone else is going to see, or what you’re getting when you look at the print you’ve made.

While you can spend hundreds, or even thousands, of dollars on calibration hardware and software, there are a couple of inexpensive options available for the person who just wants the job done with minimal fuss. One of these options is X-Rite’s new ColorMunki Smile. With the slogan of “Amazingly Simple Monitor Calibration” on the box, you’d expect it to be a straightforward process. I’m happy to report that you won’t be disappointed. ColorMunki Smile takes all of the guesswork out of calibrating a display and turns it into a few simple mouse clicks.
Using The colormunki Smile
The install process is very quick, so you’ll be ready to calibrate within a few minutes of opening the box. I do suggest you let your monitor warm up first though. While LCD and LED displays don’t have the obvious change in color brightness that a traditional display shows over time, you want the calibration to be done in as close to your normal working environment as possible.
Set your lighting to what it would normally be when editing images, and plug the ColorMunki Smile into an available USB port. The software will step you through the process of creating a profile for your display after you press the large green “Start” button. As you can see in #1, there are no confusing options for setting color temperatures or brightness levels—this is about as simple as it gets.

All Screenshots © Jon Canfield
After pressing “Start,” you’ll be prompted to place the ColorMunki device on the screen (#2). A counterweight is included to keep the hardware from slipping. It is important that the device be kept completely flat against the screen to avoid having ambient light cause problems with the measurements.

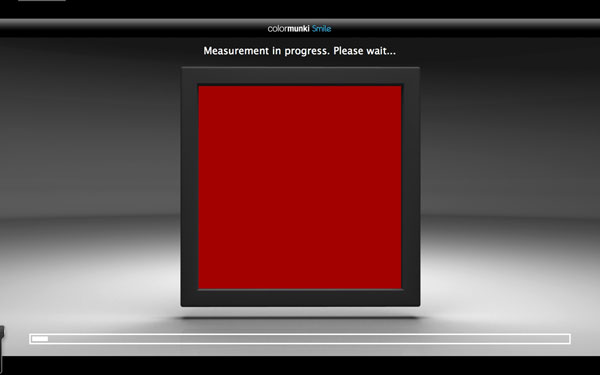
Once you press the “Begin” button, the software will start to display a number of colors that are measured against known values (#3). The differences between what is measured and these values are then used to map out how color is translated from one device to another. But we’re talking simple solutions to a problem here, so you’re not to blame if the how and why isn’t of interest. It’s the end result that matters, and here the ColorMunki Smile delivers in style.
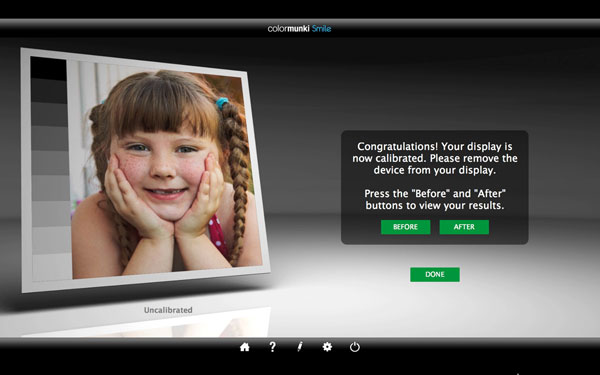
Once the calibration process is finished, you’ll be shown a screen that lets you view the before and after calibration results (#4). Clicking on the “Before” and “After” buttons shows the changes that have been made to your display settings. It might be difficult to tell in print, but the after version shows quite a bit more neutral tone in the gray ramp to the left of the portrait, and a nice warmth in the skin tones. I felt the calibration was accurate, with good white to black levels and neutral colors, especially compared to the default color of the display (#5 and #6).


The only options available to you (#7) are setting the frequency of reminders for recalibrating (I recommend monthly), whether to check for software updates, and what type of display you’re calibrating (the software determines this automatically, but you can override if you know it has misread your display).

I typically calibrate with the much more expensive X-Rite i1Photo Pro package, which runs about $1500. Granted, it can also create printer and camera profiles, but most people aren’t interested in these features. Out of interest in comparing the capabilities of the ColorMunki Smile vs. the i1Photo Pro device, I made profiles using both and was impressed at how closely they matched in gamut (#8). For $99, you’re getting professional-level monitor calibration in a minimum amount of time, and with minimal effort.

Conclusion
For $99, you’re getting a top-notch calibration unit, and software that makes it as simple as possible to get accurate results. Those of you who only want to calibrate a display, and don’t want to be bothered with the details, will find a lot to like with this package. It is now my recommended solution for my online students who want to calibrate without spending a ton of money, or have no interest in printer profiling. For those who do, the ColorMunki Photo, at $499, is a good choice. In all, X-Rite has come out with an excellent product at a good price. There really isn’t any reason not to be calibrating your display when it’s this easy and affordable.
System Requirements
Windows XP 32 or Vista 32, Windows 7 or 8 32/64
Mac OS X 10.6 or later
USB port
For more information, contact X-Rite at www.xrite.com.
- Log in or register to post comments


![]()
Get the Latest Photo Tips, News & Reviews from Shutterbug!
| Camera Reviews Other Reviews | Mobile Reviews Photography Reviews Columns | News | Features | How-To | Resources |
 © 2024 Shutterbug
AVTech Media Americas Inc., USA
All rights reserved