- REVIEWS
Camera Reviews 
More Reviews Mobile Reviews Photography Reviews - GALLERIES
- VIDEOS
- BUYER'S GUIDES
White On White: Exposure Techniques And Options
There is something ethereal and captivating about images that are devoid of the colors that we associate with the spectrum. Images that are primarily white seem pristine, intriguing, and they will complement virtually any type of home or office décor if you are looking to frame some of your photography.
In nature, whiteout conditions in winter like a fresh snowfall in Yosemite National Park (#1) are among the most beautiful experiences the outdoors has to offer. The photography is absolutely magical. Similar lighting and color can be duplicated in the studio (#2) by photographing a white subject or someone dressed in white with diffused lighting in front of a white background.

All Photos © 2010, Jim Zuckerman, All Rights Reserved

One of the easiest ways to experiment with this type of color scheme is to shoot a white flower against a white background like I did with the orchid (#3). Most photographers would think immediately of using a dark background behind a white flower. Out of focus foliage shaded from the sun or a piece of black velvet works very well. Both of these backgrounds provide a strong contrast so the flower really stands out and I shoot this type of picture often. However, the white on white approach has its own beauty that is equally dramatic.

The Exposure Challenge
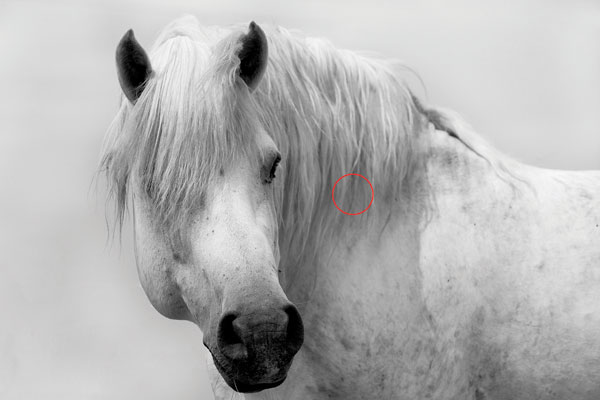
Unlike most color images you shoot, subjects that are mostly white will always fool the meter in your camera. The pictures will turn out consistently underexposed. The reason this happens is because meters are designed to give you an accurate light reading when they “see” middle toned subjects. Middle tone refers to what Ansel Adams called Zone V, which is halfway between black and white. I circled an area in the portrait of a white horse I photographed in France (#4) that represents middle tone (or middle gray). Even though this is a white subject photographed against a light background, there are still middle tones in the picture.
However, in some white on white pictures there are no middle tones at all. For example, the baby harp seal (#5) I shot on pack ice in the Magdalen Islands off the coast of Nova Scotia in Canada is virtually all white without any middle gray tones. Other than white, the nose is the only dark area in the photo and it is much darker than middle gray. The same is true of the cottonwood tree I found during a snowstorm in Montana (#6). Nothing in this scene is middle gray.

When a light meter detects this kind of scene, it is programmed to assume that it is seeing middle gray. Therefore it provides a shutter speed – f/stop combination that will make this scene middle gray, thus it underexposes the snow and the harp seal to look darker than it should be. After all, when you decrease the exposure on a white subject you get gray. This is obviously not what I wanted. I wanted the white snow to look white, and the same for the beautiful silky coat on the baby seal.
The key, though, is to expose a picture like this so that the white subjects are bright enough but they don’t become overexposed. The worst thing you can do to a photograph besides poor focus is to overexpose the highlights so they become solid white with no texture or detail.
Many photography instructors teach that the way to handle exposures on snow—or when shooting any white subject—is to use the exposure compensation feature on the camera and set it to overexpose the pictures by 11⁄3 or 12⁄3 f/stops. According to this reasoning, this compensates for the underexposure and gives you an accurately exposed shot. This approach works to a certain degree, but it won’t be entirely accurate for all situations. The reason is that there are many types of subject matter and lighting scenarios that influence the meter’s interpretation of a scene. For example, compare two winter shots of Monument Valley (#7 and #8). One of the images was taken in a whiteout condition where the lighting was diffused and virtually the entire composition is white. The other one was taken an hour after sunrise with low angled sunlight skimming the surface of the ground. Half the picture isn’t white at all. In fact, the sky is middle toned. Therefore, how can one general rule apply to both scenarios? The answer is, it can’t.


Similarly, the tight shot of snow contours I found in Yosemite (#9) shows side lighting, which creates such pronounced texture. That’s what makes this image so compelling. By comparison, the snow in the picture of the arctic fox (#10) has very little texture because the sky was overcast and the lighting was softly diffused. These are very different white on white scenarios that can’t be exposed correctly using an exposure technique that doesn’t consider these variables.


Shooting into the sun as I did on a wintry morning at Delicate Arch in Arches National Park (#11) presents another challenge. Not only is the snow light, but the sun is brilliant as well. Even when the sun is diffused through a thin cloud cover or fog, it is still so bright that meters inevitably give you inaccurate readings.

You can see, then, that there are many different types of lighting scenarios involving white on white, and that means one rule isn’t sufficient to help you obtain perfect exposures in all of them. As a result, I suggest an approach that is a lot more “user-friendly”. It is definitely easy to use and it works every time.
When you take a picture of a white on white subject, study the LCD monitor on the back of your camera. You won’t be able to see ultra subtle detail, but the image will be clear enough to determine if your exposure is good. If it is too dark (or even too light), you can then use the exposure compensation feature to make the necessary corrections.
Exposure Compensation
Most digital cameras have the ability to tweak the exposure from what the camera determines the correct light reading should be. If you don’t know where you can find this feature, check the camera manual under exposure compensation and you should find it. Usually, you can over- or underexpose your pictures in 1⁄3 f/stop increments. More sophisticated cameras also allow you to change this to 1⁄2 f/stop increments if you wish. Normally, each hash mark you see between full f/stop settings equals 1⁄3 f/stop. If your exposures are too dark, the first step is to correct them by making an educated guess as to how much the adjustment needs to be. Set the exposure compensation to the amount you think is correct and take another picture. Then examine the results on the LCD. If the shot is still a bit dark, make another adjustment and try again. If the shot was too light, change the exposure compensation in the other direction, i.e. use a minus 1⁄3 or 2⁄3 change and see what happens.
This system works if your Exposure mode is set to any of the Automatic Exposure modes—program, aperture priority, and shutter priority. If you are using Manual Exposure mode, the exposure compensation feature is disabled.
Once you get an exposure that looks good on the LCD monitor, don’t forget to change it back to the normal setting when shooting other subjects.
Alternate Methods Of Exposure
If you like to be precise in your metering and don’t want to rely on the LCD monitor (sometimes they are not perfectly accurate), there are two other ways to meter a white on white scene. First, you can use a hand held light meter such as the Sekonic L-758. In addition to being a flash meter, the L-758 reads ambient light in tenths of an f/stop. By using the meter on Ambient mode, the white plastic dome on the face of the meter is pointed toward the lens, and if the meter is held in the same lighting as the scene, it reads the light with great accuracy. This takes the guesswork out of the equation.
The second method is to use a Kodak gray card or a piece of gray fabric sewn onto a photo backpack, camera bag, or even a vest. As long as the gray card or fabric is in the same light as the subject, you can use your in-camera meter to take a reading on it. Of course, you can also use a hand held meter to read it as well, but it must be switched to Reflected mode (this means the meter reads the light reflecting from the gray card or fabric as opposed to reading the light coming from the sky). If you use the meter in your camera, you should walk over to the gray element and fill the frame with it to take the reading. Once the f/stop-shutter speed combination is determined, put the camera on Manual Exposure mode and set the lens aperture and shutter by hand.
Raw Mode
It is essential to do all of your serious photography in Raw mode. If you are shooting your child’s birthday party, Raw is obviously not important. Snapshots of memorable moments are not intended to be fine art images. When shooting white on white, though, your first line of defense in protecting the vulnerable highlights from overexposure is to shoot in Raw.
Digital technology, like photographic slides in the past, has a limited dynamic range. That means that unlike our eye/brain combination that can discern tremendous detail in both the highlights and the shadows even when contrast is extreme, digital images have a tendency to lose detail in either the highlights or the shadows, or both, depending on the contrast you are working with. The most vulnerable part of the picture is the highlights. Even a small amount of overexposure can cause a loss of texture and detail in those areas, and this is especially true if you are in JPEG mode. When it comes to photographing white subjects in a white environment, the best way to retain that detail is to shoot in Raw.
The reason I suggest you shoot in Raw mode is because there are four major advantages. First, as I just said, you will protect the highlight areas of your picture from losing texture and detail and becoming overexposed. Second, the resolution of the image will be higher. Third, you can manipulate the image in terms of highlight and shadow detail in a way that can’t be done in Photoshop (Raw is the state of the image before it’s opened in Photoshop). And fourth, with the fill light slider bar in Adobe Camera Raw (this is a software program built into Photoshop CS4) you can bring back shadow detail that you thought was lost due to contrast or underexposure. The only disadvantage of using Raw mode is that you will get less pictures on a flash card, and it takes a couple extra steps to process the photos.
There is also a slider bar in ACR called Recovery. This is supposed to help retain detail in the highlights, but it doesn’t work very well. It basically fills in highlights with density, and this usually looks grayish. The most success I’ve had with the Recovery slider is in bringing back detail in red tulips that were extremely saturated in red. There appeared to be a loss of detail, and when I used this slider it made a significant difference in bringing back detail that had been lost in the red petals.
Black On Black
A discussion of white on white would not be complete if I did not mention the opposite—black on black. Pictures like the snarling leopard (#12) present an exposure challenge equal to white pictures except from the opposite end of the spectrum. If you take a picture of a scene that is virtually all black, the meter will overexpose it in an attempt to make it middle gray (when you make black lighter it becomes gray). Therefore, you must compensate by underexposing the shot. The amount of underexposure will vary depending on many factors, such as how the subject absorbs light versus how it reflects light, the angle of the light to the subject, and your personal taste. Comparing the photo of the marine iguanas in the Galapagos Islands (#13) versus the lava heron (#14) makes it evident that different surfaces respond to light in different ways. The scales on the reptiles didn’t reflect sunlight in the same way that the feathers on the bird did. The feathers have a sheen to them that the meter will detect and it might be influenced by it. Therefore, there is no way for me to tell you how much the meter reading needs to be adjusted to produce a correct exposure.


The easiest approach is to use the immediate feedback from the LCD monitor to determine that. One of the reasons a large LCD is so helpful is because it shows a lot of detail to help you with exposures. Many of the newer cameras have a 3” screen, and this is ideal for many reasons, not the least of which is because it can help you tweak the exposure when shooting black on black subjects. If a black on black scene is too light, merely use the exposure compensation feature on the camera to darken the picture. You would typically use – 1⁄3 f/stop or perhaps – 2⁄3 f/stop to correct the overexposure.
- Log in or register to post comments


![]()
Get the Latest Photo Tips, News & Reviews from Shutterbug!
| Camera Reviews Other Reviews | Mobile Reviews Photography Reviews Columns | News | Features | How-To | Resources |
 © 2024 Shutterbug
AVTech Media Americas Inc., USA
All rights reserved