- REVIEWS
Camera Reviews 
More Reviews Mobile Reviews Photography Reviews - GALLERIES
- VIDEOS
- BUYER'S GUIDES
Wedding & Portraiture
What Do Computers And Portraits Have In Common?
At a glance, one might not
think that there is a common denominator with these photographs. A closer
look will reveal that lighting is the key. Each one has a very similar
lighting pattern on their faces. This may be achieved by different means,
but it's there on all of them. Let's take a closer look. |
|||||||
The ultimate goal is to keep
your attention on the front of people's faces. That's why
I'm always trying to light the front of the faces, keeping the side
closest to the camera in shadow. It is flattering to the subject and creates
a three-dimensional effect on the flat piece of photographic paper. A
simple plan, but extremely important. |
|||||||
As the face turns, the light
moves with it. This keeps the lighting and shadows virtually the same,
regardless of which angle of the face that you're photographing.
Look at Photo 2, for instance. As she turned her face to profile, the
main light moved also. The light pattern is exactly the same on Photos
1 and 2. All the other lights virtually remained intact. It wasn't
necessary to move any of them. |
|||||||
Now, look at the similarity
between Photos 3 and 4. Although they were made under completely different
circumstances, I placed my off-camera flash in the cake cutting picture
to create the exact same light pattern on the bride and groom's
faces. A second light on-camera filled in the shadow detail. Notice, too,
how the off-camera flash helped to show cake detail, rather than having
a single on-camera flash flatten it out and lose the detail. |
|||||||
I'm using a window as
my main source of light in Photo 5. Similar lighting patterns prevail,
however, with one minor change. I'm using the window light to illuminate
just the left side of her face. Then, I've added my Monte Illuminator/reflector
camera right to pick up the window light and push it around to the shadowed
side of her face. The reflector is positioned to--you guessed it--create
the same pattern of light and shadow on her face that we've seen
in the previous photographs. |
|||||||
Again, we have the same light
pattern on his face. No surprise, huh? The flash was from a Quantum flash
unit, triggered by a Quantum radio slave attached to my Hasselblad camera. |
|||||||
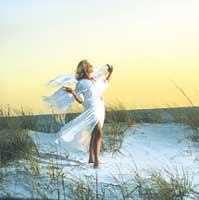
There's no difference
here in Photo 8 except that she was outdoors. Late afternoon sunlight
was coming from my left. It lit her hair beautifully. There was also light
bouncing off a building to my left. I positioned the woman, so that the
main light would split light her face. My reflector, camera left, again
pushed the light around to the left side of her face. |
|||||||
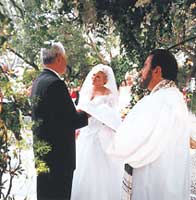
Even in Photo 10, the bride
and groom exchanging marriage vows, I was able to position myself in a
spot where the soft daylight was split lighting her face. The open area
all around her helped wrap the light around onto the left side of her
face. So, even in a photojournalistic situation like this, it's
always better to understand how light works on faces to create this dimensional
look. Lighting technique is the same under all given conditions. |
|||||||
Even outside in bright sunshine
it's possible to create similar light patterns. Look at the group
of three in Photo 11. I've positioned them, so that the direct sunshine
is split lighting their faces or creating the exact lighting pattern that
I always look for. A very bright Quantum flash to my right (almost directly
in front of their faces) is opening up the shadows. The flash could have
been on-camera, but it would not have achieved the three-dimensional look
that's there in this picture. |
|||||||
Photos 13 and 14 are just about
the same in every way. Using late afternoon light for both of them it
was not bright at all. I could turn their faces toward it and use the
sunlight as the main. Then, all I had to do was add a weak flash camera
right, two f/stops less than the ambient light. I exposed for the natural
light and didn't even take into consideration the amount of light
added, it was so insignificant. Still, notice how the faces are always
turned toward the source of light. |
|||||||
|
|
||||||
|
|
||||||
|
|
||||||


- Log in or register to post comments


![]()
Get the Latest Photo Tips, News & Reviews from Shutterbug!
| Camera Reviews Other Reviews | Mobile Reviews Photography Reviews Columns | News | Features | How-To | Resources |
 © 2024 Shutterbug
AVTech Media Americas Inc., USA
All rights reserved