- REVIEWS
Camera Reviews 
More Reviews Mobile Reviews Photography Reviews - GALLERIES
- VIDEOS
- BUYER'S GUIDES
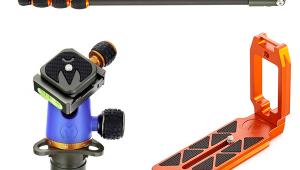
Vanguard ABEO Pro 283CGH Kit: Tripod, Pistol Grip Head & More
Some folks have a few tripods and heads for different tasks. They may have straight-up sticks for landscapes or a “splaying leg” tripod for macro and tough terrain, plus various heads for articulation, panos, and panning shots. The Vanguard ABEO Pro Kit starts out as a solid carbon-fiber tripod but then adds features and functions like a removable and rotatable (vertical or horizontal) center column, a pistol grip with built-in trigger release with cable attachments for many cameras, bubble levels, 80-degree leg spread, three “feet” supports (pads, spikes, and rubber), a quick-release base plate and mechanism, and etched degree settings on the center column for those who want to do precise panoramas. There’s even a solid carry bag thrown in for good measure. While it might strike you as a bit of a “kitchen sink” approach to design, the sum is greater than the parts in making this a pretty complete setup for whatever tripod work you have in mind.

Setup Options
In fact, the options are so numerous on this unit that it behooves you to play with it prior to even mounting a camera and heading into the field. Some tasks are simple, like using the leg locks to extend from the folded 30” height to a height of 54.5” (50-degree spread any leg, in three sections); extending more with the center column (up to 67.5”, although full extension with any tripod is not the best idea, so drop about 3” from that); splaying the legs and using various leg lengths for macro and tough terrain (max 80-degree spread with each and every leg); and mounting the camera to the head with the quick-release plate (screw fasten). Max load is stated as 17.6 lbs, although big rigs with heavy teles are probably best mounted using the lens tripod collar and counterweighted when using the center column horizontally, something I’ll describe in a bit.
Simplicity also reigns when using the supplied pistol grip head (other heads can also be used, but the pistol grip is in the kit). There are a few bonuses in this grip, like a trigger release, with various and sundry remote attachments supplied (check Vanguard’s website for wire and plug-in compatibility with your setup) and an etched guide on the grip (180 degrees plus and minus) for those who like to use such scales for panoramic shots. The grip head is actually mounted in a ball head, so it moves quite freely and locks securely. It can even be tilted for verticals with no problem.

© George Schaub
Horizontal Column Setup
What at first is a bit challenging is removing and setting up the center column for horizontal setups. The supplied word instructions are sufficient but the diagrams are a bit “Ikea-like,” so take some practice time before you set up with the camera looking down at some lily pads, and do your first runs without the camera mounted. The first step is loosening the center column lock, the one you use for extending the center column. You then raise it up. At the base of the column you’ll see a mark that says “stop”; at that point you push in the small metal pin at the base to raise the column through the assembly until the stop indicator is above the collar, but still engaged. The next step is rotating the column assembly out of the path of the center column guide; you do that by first releasing the large orange tab on the collar assembly and then using the leverage of the column to move it forward. Don’t force it or jam it; it has a bit of resistance but it will come into place. You then close the orange tab and move the now horizontal column as far as you like forward and back, locking it with the center column screw when it’s where you want it.

© George Schaub
I locked it down about 3/4 of the way back in my test and felt very comfortable shooting with a D-SLR and medium tele lens. If you are concerned about tipping (although positioning and splaying the legs properly help a lot) then just hang a counterweight on the end of the column. And speaking of splaying legs, the versatility of the unit comes to the fore when you realize that you can configure leg length and angle of splay in numerous ways. One of my favorites for horizontal macro was what I came to call the “praying mantis” setup, with the two front legs the same height and solid over the subject and the rear leg extended back and away. Keep in mind that the degrees of spread and the distance of one stick from the other are what make for a solid setup, but the ABEO lets you take full advantage of a combination of balance, solidity, and positioning.

© George Schaub.
Pistol Grip
Last but not least is the pistol grip head and built-in trigger. There’s something inherently reassuring about getting your finger away from the shutter button on the camera itself, especially when you need to eliminate any chance of causing camera shake; in fact, all tripod shooting benefits from using a cable release or remote. I tested the release in both single and continuous drive modes and it worked fine. Keeping pressure on the release in continuous gave me the maximum drive rate. Do keep in mind that when using AF putting full pressure on the release button will cause the camera to autofocus first before firing. A light touch of the grip’s release button will confirm focus for you, just as with any shutter release, so practice with the soft touch/full release sequence and the unit will prove as responsive as any camera.
Conclusions
In all, the ABEO Pro 283CGH is one versatile tripod. Weighing in at a bit under 7 lbs and with enough setup options to satisfy most needs in the field or indoors, it feels like it was designed by those who didn’t want to miss a beat when it came to options and affording photo opportunities. And if a pistol grip head is not your speed, you can get the unit without that head and add another, but for me it added a level of shooting convenience that would seem a shame to pass up.

© George Schaub
The ABEO Pro 283CGH Kit has a retail price of $549 (check reliable merchants for sale price at time of purchase). For more information and full specs, contact Vanguard at www.vanguardworld.com.
- Log in or register to post comments


![]()
Get the Latest Photo Tips, News & Reviews from Shutterbug!
| Camera Reviews Other Reviews | Mobile Reviews Photography Reviews Columns | News | Features | How-To | Resources |
 © 2024 Shutterbug
AVTech Media Americas Inc., USA
All rights reserved