- REVIEWS
Camera Reviews 
More Reviews Mobile Reviews Photography Reviews - GALLERIES
- VIDEOS
- BUYER'S GUIDES
Traveling With Your Gear: Match The Trip With Packing Strategy
I have spent a great deal of time and money trying to find the perfect way to travel with my gear. As I buy more lenses, and as computer technology changes, I must re-examine how I carry everything because the volume and shape of my equipment changes.
I have learned one thing from all my travels: one photo backpack or one carrying case doesn’t address all of the travel situations that we photographers have to deal with. Going to Europe is very different than going on safari, and shooting in Monument Valley requires a different travel strategy than visiting a game farm in Montana. What you carry with you also depends on what you will be shooting and your style of photography. For example, if you like to use a lot of artificial lighting when you do travel portraits, the equipment you carry will be different than photographers who use only available light.
Airline Hassles
The biggest problem photographers face today involves airline travel. If you drive to a destination, the weight and volume of your equipment are not issues you must contend with. If you fly, however, carrying camera and computer equipment is a royal pain in the neck.
First and foremost, never pack vital equipment in checked baggage. This means your camera(s), lenses, laptop and/or backup hard drives, flash cards, flash, and tripod should all be carried on-board. This can be a sticky problem, of course, especially if you happen to prefer a large tripod. The problem I fear is not damage. There are many rugged cases available that can protect your gear from rough handling. I have even packed vulnerable glassware I’ve purchased abroad in my checked baggage and wrapped it very well in clothes, and it’s arrived back in the US in perfect condition. I’m sure camera equipment could be protected in the same fashion.
My big concern is that my equipment will be lost or delayed. If I am on a photo tour, for example, and my luggage was sent to London instead of Lisbon, I wouldn’t have the equipment for a few days and there would be many missed photo opportunities while the airline locates the gear and (hopefully) delivers it to me. If I happen to be on safari, delayed equipment may not reach me for a week or so. That would be catastrophic.
The airlines allow you to have one carry-on and one “personal item”. I divide my equipment between these two things, but the actual configuration depends on where I’m going and the type of planes I have to fly.
If commuter planes are involved, the problem is more serious. The overhead compartments are ridiculously small. The regulation size luggage that airlines permit to be stowed overhead won’t fit in the commuter planes, and they will consequently require you to “gate check” the bag. This means that at the door of the aircraft you put your bag (or an airline employee puts it for you) on a cart that is then wheeled over to the belly of the plane and loaded in a special holding compartment. The normal baggage handlers are avoided and so are the conveyor belts and rough handling. Upon landing at the destination, these carry-on bags are unloaded and you can pick them up as soon as you step off the plane. I have done this only when I absolutely have no choice, and I hate doing it.
If I know I’ll be taking a commuter flight (you can get this information from the airline by phone or online), I pack a small backpack that I know for sure will fit into the overhead compartment. I don’t mind gate checking a tripod because it won’t get damaged and it really can’t get lost. Cameras and lenses always go with me. I use the Tenba Shootout, a small backpack that works very well (#1). The Tenba will hold a 13” laptop as well as a tripod secured outside the pack. I usually remove the ball head from the tripod and put that inside the backpack or even in a jacket pocket to make the carry-on seem smaller. The last thing I want is for an airline employee to demand I check my camera and lenses. This has never happened—at least so far.

All Photos © Jim Zuckerman
Sometimes I wear a photo vest with large pockets and use it to carry crucial chargers, cables, an extra lens, electrical adapters, and the ball head. This is not considered a carry-on. You will still have to remove it when going through the X-ray machines, but as far as the airline is concerned it is an article of clothing as opposed to luggage. This is one way to expand the amount of gear you can carry on the plane.
When I travel with my 500mm lens and I must make a connection with a commuter airline, I use one of two strategies to prevent my equipment from being too large to fit into the overhead compartment. First, I use the Airport Ultra Light from Thinktank (#2). This bag is just deep enough to accommodate the long telephoto lens and still fit snuggly in the overhead. However, there are two caveats. If I also have my laptop in the outer pouch, this must be taken out and stowed beneath the seat in front of me or, if the airline permits it, in the pocket of the seat. In addition, the Airport Ultra Light cannot take the large lens hood for the 500mm. To solve that problem, I strap the lens hood onto the back of the backpack with a bungi cord and, inside the plane, I take the hood off and stow it overhead next to the backpack.

The second option I use is to carry the 500mm in its own case and then I can use the small Tenba backpack for the rest of my gear. I bought a carrying case made for a video camera (#3), but it fits the 500mm perfectly including the lens hood. This also gives me some extra space for all the electronic stuff—cables, rechargers, portable hard drives, etc. Both bags fit into the overhead compartments of commuter planes without a problem.

I haven’t mentioned using a bag with wheels yet. When traveling on a smaller jet, you don’t have the luxury of using one of these bags unless you are willing to check it. The wheels and the support structure of the bag make it too large to fit into small overhead bins. On flights with larger aircraft—say 737 aircraft and larger—a wheeled bag makes a lot of sense. It is not burdensome to carry it long distances in airports, and since camera and computer gear gets to be pretty heavy as you buy more, it’s a joy to have this kind of convenience.
Traveling By Car
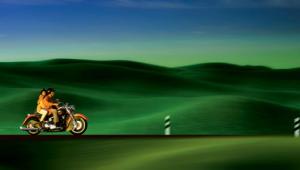
If you will be traveling by car, van, or RV, there are no weight or volume restrictions. You can bring anything you want including a large tripod, lighting equipment, a large laptop (or desktop if you have AC power in a motor home), props, etc. A wonderful addition to your equipment when traveling by car is the Vagabond II Portable Power Pack (#4) and a White Lightning flash head. The pack provides a tremendous amount of power for the flash head, and if you will be shooting models or even distant wildlife (such as at a water hole or a nest high up in a tree), this kind of mobile lighting system is far superior to the typical on-camera flash units. The increased power gives you much more reach, and at the same time you have the option of increased depth of field. The photo of my wife in costume was taken using this system (#5).

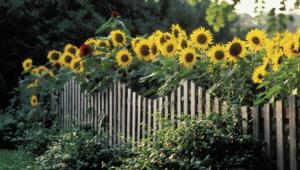
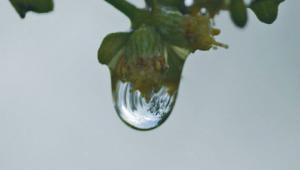
One of the things I typically carry with me in the car are print backgrounds for macro work. I leave these at home on international trips. When I do close-ups, to eliminate unwanted and unattractive backgrounds I place a 13x19” print of out of focus foliage mounted on foam core behind the subject. Flowers, mushrooms, leaves and insects look great this way, and when I am driving it’s easy to take several different backgrounds with me.
An important piece of equipment that is easy to overlook when traveling on the road is a charger for your laptop that plugs into the cigarette lighter. In remote areas, you may deplete your batteries and will be in trouble if you happen to be using the computer as a backup for your pictures. Photographers are now terribly dependent on electricity, and you don’t want to be caught anywhere without the ability to recharge your batteries. When you have a car, you always have the ability to draw electricity from the 12-volt battery to power a laptop.
If you plan on shooting wildlife from the car like birds in Bosque del Apache, bison or elk in Yellowstone, or alligators in the Everglades, a door mount camera support is a useful thing to have (#6). Many animals won’t flee from a car and you can often get surprisingly close. It acts as a mobile blind. As soon as you step out of the vehicle, though, the subjects take off and you probably will miss the shot. Setting up a tripod is impossible in a car, of course, so shooting from a stable platform like a door mount will ensure that you get sharp pictures, particularly in low light circumstances.

Security
With all this expensive gear, protecting it from theft is a constant concern. When I am driving, I always have the car in my sight if the equipment is left inside. When I step into a restaurant or mini market, for example, I park the car in full sight. I bury my gear under a jacket, an old towel, or other stuff that looks unappealing to a thief and I’m meticulous about locking the car. I prefer to carry my backpack with me, though, no matter where I go.
When I am staying in a hotel and I have to leave my equipment in the room, I enclose it in the Pacsafe Security Lock System by Lowepro. This consists of a heavy gauge wire mesh that allows you to lock the backpack to something large and heavy such as a bed frame or door hinge. This makes it impossible for thieves to quickly grab the gear unless they happen to carry wire cutters with them, which is most unlikely.
Contacts
Canon
www.usa.canon.com
Lowepro
www.lowepro.com
Tenba
www.tenba.com
Thinktank Photo
www.thinktankphoto.com
White Lightning
www.white-lightning.com
My Gear List
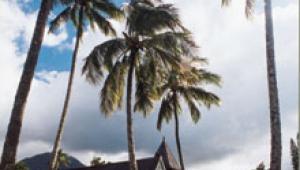
I acquired my equipment over many years. I didn’t go out and purchase everything at once, obviously. Photography equipment is very expensive, and I thought long and hard about each piece before I bought it. Below is an itemization of the equipment I carry with me when I travel, and I’ve divided it up into a few different types of trips. Please don’t feel that if your photo gear isn’t as comprehensive as mine you won’t be able to take great pictures. That’s categorically not true. Photography is all about seeing. It’s about graphic design, composition, light, and choosing dynamic subject matter. Having a wide variety of lenses means that you have a lot of useful tools, but ultimately without an artistic photographic vision, all the lenses in the world won’t be enough to enable you to take great images. The picture I took in Palm Springs, California in 1969 (#7) was done with a 50mm lens because that’s all I had at the time. I had owned a camera for just a few months, and you can see that even with this simple lens I was able to capture a beautiful image.

Gear for international air travel to shoot cities, architecture, and people in destinations like India, Turkey, Indonesia, and Europe:
One camera body and a backup (at the time of this writing, I am using the Canon 5D Mark II as my main camera and the Canon 1Ds Mark II as a backup).
14mm, 15mm fisheye, 24-105mm, 70-200mm, 50mm macro, 1.4x teleconverter, extension tubes to convert my medium telephoto lenses into telephoto macro lenses.
A Canon 580EX flash, Pocket Wizard wireless transmitter to use the flash off-camera, 80 gigs of flash cards, a carbon fiber tripod with a ball head, laptop, an electrical adapter, small flash light, additional small camera that can shoot Raw and that I can wear on my waist for grabbing quick shots (I use the Canon G10).
Gear for international air travel when going on a wildlife safari to places like East Africa, the Galapagos Islands, and eco-lodges in Cost Rica:
A Canon 5D Mark II and a backup.
14mm and 24-105mm lenses for tribal people and landscapes, 70-200mm, 50mm macro, 500mm, 1.4x and 2x teleconverters, extension tubes to be used in conjunction with my telephotos to allow them closer focusing.
A Canon 580EX flash, Pocket Wizard wireless transmitter to use the flash off-camera, 96 gigs of flash cards, a carbon fiber tripod with a ball head, laptop, an electrical adapter.
Gear used when traveling by road for landscape and nature shooting in American national parks:
A Canon 5D Mark II and a backup.
14mm, 16-35mm, 24-105mm, 70-200mm, 50mm macro, extension tubes to convert my medium telephoto lenses into telephoto macro lenses.
A Flash, collapsible diffusion panel to soften the light during the middle of the day for doing macro work, a Pocket Wizard wireless transmitter to use the flash off-camera.
A graduated neutral density filter, polarizer, a carbon fiber tripod with a ball head, small flash light, 13x19” print backgrounds mounted on foam core.
- Log in or register to post comments


![]()
Get the Latest Photo Tips, News & Reviews from Shutterbug!
| Camera Reviews Other Reviews | Mobile Reviews Photography Reviews Columns | News | Features | How-To | Resources |
 © 2024 Shutterbug
AVTech Media Americas Inc., USA
All rights reserved