| |
Photo 1.
Photos © 2003, Jay Abend, All Rights Reserved
|
|
Over the past few years,
I've covered more and more digital imaging technology, as it completes
its total worldwide domination of the professional photography marketplace.
Like a lot of you, I still maintain a full black and white darkroom,
and the smell of stop bath and fixer is the smell of photography. For
us old-school guys, there is little to challenge the depth and power
of the black and white portrait.
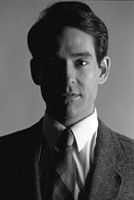
While the world of mass media is clearly one dominated by color, motion,
and frivolity, the stark reality of black and white remains an important
communication tool. As a still photographer, stripping an image of its
color information limits your options while opening up an entire new
world of possibilities. Whether you plan to shoot black and white film
and process it yourself, hire an outside lab to do the dirty work, or
even shoot digitally using your camera's "B/W" mode,
there are some important considerations to keep in mind when shooting
people in black and white.
|
|
Lighting.
As with any photograph, the light source defines the image. As you can
see in Photo 1, dramatic lighting can be particularly effective in black
and white. For this corporate headshot, I went with a stark "Meet
The Beatles" look by placing a Chimera medium softbox to the right
of the subject, lighting only one half of his face. To keep light from
streaming into my lens I hung a large black gobo between the light and
the camera. To keep some tone in the background I aimed a flash head with
a silver reflector at the floor behind the subject, allowing enough light
to spill up and give the wall some tone.
If this were a color image, the viewer might be too disturbed by the lack
of tone on one side of the subject's face. By removing the color
information and keeping the contrast in check, we're left with a
strong image that looks "right."
Choose The Right Lens. I tend to think differently when
shooting black and white than when shooting color. In fact, my brain is
so conditioned to seeing the results of different kinds of film that I
think differently when shooting Tri-X, T-Max, or Plus-X. For this shot
I took about 10 years ago, the client wanted a somewhat gritty feel with
Boston in the background. While this image (Photo 2) is a little dated
with its "Miami Vice" feel, the concepts still apply.
The first idea was to shoot from a low angle with a wide angle lens. Of
course we would need to be right in the city, rather than over the Mass
Avenue Bridge into Cambridge as we were here. Since we needed a grainy,
hard-edged black and white image with a soft edge, it was decided instead
to have some of the frame out of focus. This would soften up the effect
of the harsh black and white and make the model stand out more. I set
up a tripod with a Nikon F2 and 200mm f/2.8 Nikkor lens. To punch up the
model I added a Balcar flash head firing into a white umbrella. By shooting
with a long lens at eye level I got a nice soft background, crisp detail
in the foreground, and a relatively rough looking feel. Ten years later
I'm not sure the cigarette would still be used as a prop, but I
still like this shot.
|
|
Perspective Matters.
With black and white more than color film you need to choose the right
perspective. Black and white reveals certain elements of form that are
often masked by the normal colors we see on a daily basis. While the quality,
quantity, and direction of the prevailing light source will do most of
the work in defining the look and feel of your image, the perspective
you choose can add a lot. I always choose an eye level or above camera
position for standard portraits and modeling shots, but I tend to get
more adventurous when shooting black and white. Why? Because when color
information is lacking, your eye is just more naturally drawn to the subtle
details and lines that might otherwise get lost. For this shot (Photo
3) the model chose a heavy weight sweater that had an interesting pattern.
To keep the sweater a prominent feature, I lowered my camera angle. In
fact, I was just about laying down on the floor to get this shot.
Once I had the low angle chosen, I went for a mild tele, in this case
a 135 on a Canon EOS-1. To give the sweater some detail and keep some
drama in the model's face, I hung a large 42" square Larson
Soffbox over the model's left shoulder angled downward. I then placed
a flash head with a silver reflector and a set of barn doors on the floor
to the model's right and aimed it upward at the seamless. When developing
and printing it was important to keep the tone in the model's face,
since it's easy to take high key shots like these and blow out the
details when printing.
|
|
Moody Black And White.
For this gritty urban street scene (Photo 4) shot for a magazine assignment
we needed to convey a sense of desperation. While the rest of the piece
was shot on vibrant Fuji Velvia, I shot this series on old-fashioned Kodak
Tri-X film developed in Agfa Rodinal 1:25. To keep the reportage feel,
I shot everything very tight with long lenses. I think that this shot
was done with a 300mm lens bolted to a heavy-duty tripod. I resisted the
urge to punch up the scene with some fill flash, and I even waited for
a wispy cloud to pass overhead to create a duller mood.
For shots like this the perspective offered by a long lens really makes
the shot. By compressing the background and really making the model stand
out in the foreground, the little details like the wrought iron railing
and people in the background become integral parts of the composition.
By developing the Tri-X in a relatively strong mixture of Rodinal, I gave
the image strong black, pronounced grain and a razor crisp edge to everything.
If I had chosen a smoother film like Ilford Pan-F I would have lost the
grit in the image, losing some impact.
|
|
Adding Light. Here's
a typical black and white assignment. A corporate executive at a window,
(Photo 5) lit in the foreground with flash. The whole idea here is to
create a scene that looks real, not fake. In order to create a real sense
of reality of course I have to fake it anyway. I added a silver reflector
card to bounce back some of the window light as well as a 2400 ws flash
in a large softbox. By adding plenty of flash punch I can stop the lens
way down, keeping the window frame sharp and reducing the flare that a
bright window light might have caused wide open.
The client wanted a sense of real-world black and white, so I didn't
try and let the flash overpower the window light. By carefully regulating
the power of my flash and the aperture on my lens I could make the added
lighting provided from the flash look like natural room light. On a shot
like this with color film I'm always fighting the color temperature
of the various light sources. With black and white, I have the great luxury
of mixing as many daylight, tungsten, and flash light sources as I want
and firing away. To preview the effect of the mixed lighting sources I
always shoot some Polaroid film first, and I always make sure to bring
along some black and white Polaroid, since the color stuff makes it too
hard to see what's going on.
While the world revolves around us in glorious color, there is still a
stark, elegant power that black and white images offer. No matter what
happens with the development of digital cameras and printers, I will steadfastly
maintain my old-fashioned darkroom, remaining loyal to my Omega D2 and
Beseler 45MX. I developed all of the images in this article myself in
my darkroom, and every roll of film was developed with a different developer,
using different dilutions and development times. This level of control
over the image is unique to black and white, because you can do it yourself
at home. The power of black and white is particularly potent when the
subject is human. While I can make anything look good using Adobe Photoshop,
controlling images this way using a stopwatch, my two hands, and some
chemicals imbues the images with a certain kind of magic that really can't
be duplicated using any other method.
|