- REVIEWS
Camera Reviews 
More Reviews Mobile Reviews Photography Reviews - GALLERIES
- VIDEOS
- BUYER'S GUIDES
A Soft Touch For Wedding Photography; Soft-Focus & Blur Effects In The Digital Darkroom Page 2
Lens Blur
Most image-enhancement programs include at least one built-in blur command and Photoshop offers a complete submenu of blur commands. Photoshop’s Lens Blur filter (Filter>Blur>Lens Blur) can be used to blur an image, giving the effect of a narrower depth of field so some objects in the photograph appear in focus while others are blurry. The way that the blur is applied to the image depends on the shape you choose in the Iris section of the dialog box and you can modify the digital iris by curving (making it more circular) or rotating. Fortunately, you can check changes you make in real time using the preview window.
Tip: Magnifying the image size in the preview window makes it easier to do this.
Lens Blur Filter |
|
 |
|
|
|
 |
|
|
|
 |
|
|
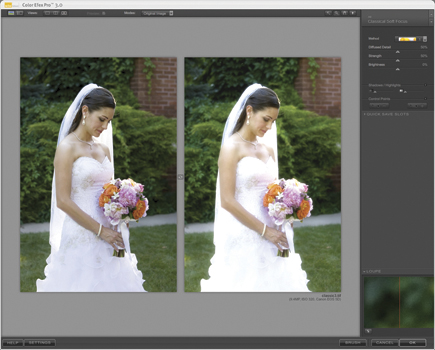
Classic Soft Focus
The Select and Complete Editions of Nik Software’s (www.niksoftware.com) Color Efex Pro 3.0 package of plug-ins contain a Classical Soft Focus filter that mimics soft-focus camera filters that are used in traditional film photography and can add diffusion to an image while preserving detail, much like the Zeiss Softar of film days past. Like a Softar, the Classical Soft Focus filter creates a soft-focus image—not a blurry one—that can be so subtle that the only way you can tell if it was used is to compare it against the sharper original, which is why wedding clients will love this effect that
doesn’t look like an effect.
The Classical Soft Focus control panel’s pop-up menu lets you select the type of effect from delicate to more pronounced diffusion. The Diffused Detail slider controls the amount of random detail to maintain the appearance of some sharpness and prevent banding.
Softar Effects |
|
 |
|
|
|
 |
|
|
|
 |
|
|
Tips, Tricks, And Techniques
There is no rule of thumb about how much blur or soft focus to apply to a particular image, but that doesn’t mean you can’t have a few tricks up your sleeve. When using Photoshop-compatible plug-ins, start by moving all of the control panel sliders to their extremes to see what this produces. If you go too far there’s always that Undo command. Don’t forget the Fade option. After applying any filter, you can reduce the effect by applying the Fade command (Edit>Fade). Using the Fade slider you can moderate the filter’s effect from 1-99 percent to create a desired soft or blurry effect.
Layers are an important tool in creating soft-focus or blur effects. It’s a good idea to start the process by making a duplicate layer (Layer>Duplicate Layer) of the original photo and applying the filter to the duplicate layer. Then you have the option of lowering the layer’s Opacity setting, allowing some of the bottom layer to show through thereby reducing the effect and letting you control just how much of the effect is applied. For even more control you can use the Eraser tool to remove portions of the duplicate layer, allowing the sharper background to show through and place focus on a critical part of the photograph, such as the bride’s eyes. Since you can also set the Eraser tool’s opacity at any level, you can selectively remove but not totally eliminate soft focus/blur in specific areas, giving the impression of sharpness while maintaining overall soft focus.
As with anything involving layers, plug-ins, and the manual application of Brush and Eraser tools, take it easy, apply light strokes, and have fun in the digital darkroom.
Acknowledgements: Many thanks to Staver Photography’s Pulitzer Prize-winning photographer Barry Staver (www.staverweddings.com) for providing the photographs used for this story.
|
| |||||||||
- Log in or register to post comments


![]()
Get the Latest Photo Tips, News & Reviews from Shutterbug!
| Camera Reviews Other Reviews | Mobile Reviews Photography Reviews Columns | News | Features | How-To | Resources |
 © 2024 Shutterbug
AVTech Media Americas Inc., USA
All rights reserved