- REVIEWS
Camera Reviews 
More Reviews Mobile Reviews Photography Reviews - GALLERIES
- VIDEOS
- BUYER'S GUIDES
Smith-Victor FL700K Strobe Light Kit: An Affordable, Full-Featured Package
One of the first lighting kits I ever owned was a set of Smith-Victor Adapta-Lights that had screw-base sockets for photoflood lamps. Son of a gun, the company still offers Adapta-Lights as an entry-level solution for beginning portrait photographers who want to work with hot lights. On the other hand, if you prefer making portraits using electronic flash, Smith-Victor’s three-light FL700K Strobe Light Kit may be just what you’re looking for.

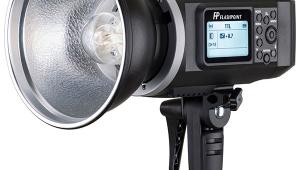
The FL700K Strobe Light Kit that I tested is designed for amateur photographers and aspiring pros and contains two FLC300 (320 ws) FlashLite and one 110i (110 ws) FlashLite monolights. The FLC300 monolights offer continuously variable flash power settings, a test button, a ready light, and an optical slave for wireless triggering and have an umbrella stand adapter that’s compatible with 3/8” through 5/8” light stand posts. To expand the kit’s capabilities, Smith-Victor offers more than 100 accessories and light modifiers for the FLC300 monolights, including softboxes, reflectors, snoots, grids, and barn doors. The 110i monolight has a full- or half-power setting, optical slave, small built-in reflector, and umbrella mount. When used together, all three lights give you lots of flexibility for lighting studio or on-location portraits.
Also included in the kit are two Smith-Victor C4-12C UV-corrected replaceable flash tubes, two 100w quartz modeling lamps, and one 60w quartz modeling lamp. The modeling lights and flash tubes are easy to install but I was careful inserting the three-pronged flash tubes because they are delicate and cost $47.95 to replace. I wore a pair of “Mickey Mouse” lint-free cloth gloves when installing the modeling lights because grease from fingers can cause breakage after the bulbs get hot. But that’s just me; I’m a “belt-and-suspenders” guy like my Dad.

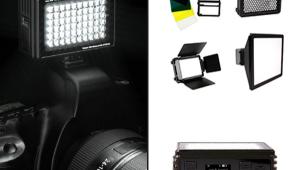
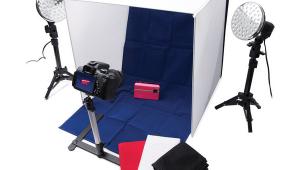
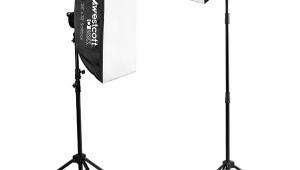
Everything you need for lighting portraits can be found in the kit, including two 24x24” light banks, one 45” black-backed white umbrella, and two 7.5” high gain removable reflectors for the FLC300 monolights. These reflectors have a knockout that allows an umbrella to be used and using a screwdriver and hammer I lightly tapped it out.
Tip: The knockout should come out cleanly but if not, a small round file should remove any burrs left behind that could tear the umbrella’s fabric.
The kit contains two sturdy Smith-Victor 8-foot black-anodized light stands along with an “Imaging with Light Guide” to help you get started and demonstrates various lighting styles. The kit is delivered in a 14x30x14” wheeled carrying case for easy transport and weighs a hefty 40 lbs when full, but it’s compact enough to fit in most cars, including my MINI Cooper. Smith-Victor tells me that they expect the street price to be around $960 for the whole megillah.

Setup
Assembling all of the components of the FL700K Strobe Light Kit is a lot like working with the world’s biggest Erector set. There is no information telling you which of the two 24x24” light banks fits which monolight, but while they are both the same size they are also slightly different. But all’s well that ends well and it soon becomes obvious which one goes where. Here’s a hint: one of the differences is their lining. The light bank for the 110i has a smooth silver finish; the FLC300 light bank has a crinkled silver lining. The light bank with black-tipped rods fits the 110i monolight and mounts to a black plastic speed ring. The tips for the FLC300’s light bank are silver as is the speed ring for attaching. It will be obvious which rods go where because it’s assembled much like any other light bank.
The 110i light bank, on the other hand, assembles backwards (from what I would consider) with the tips first fitting into the front screen and then into the speed ring before wrapping the fabric around the structure. It may seem odd but it works and, more importantly, is easy to do. This light bank has an inner diffuser panel that you can use or not (I did) and uses touch-fastener tabs to hold it in place and, because of its clever design, is easier to knock down than most softboxes.

Tip: Assemble the 110i light bank with the speed ring attached to the monolight; assemble the FLC300 light bank with the speed ring off the monolight and then fasten the fully assembled light bank/speed ring to the light with a bolt that holds the whole assembly in place. It worked for me.
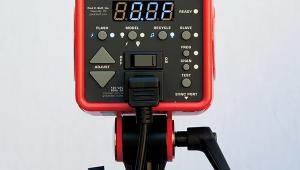
The controls on the monolights have a no-frills approach. The FLC300 monolights utilize a three-position sliding switch—off-flash-flash/model—and a non-switchable slave. A small knob controls the continuously variable power output. On the 110i there’s a rocker switch for full and half power, although I used it at full power much of the time. A separate switch on the barrel of the 110i turns the modeling light on and off and most of the time I used it only for initial light placement.
Tip: Instead of a standard three-plugpower cord, the 110i has a fixed (non-removable) two-prong power cord that appears sensitive to polarity and improperly grounded AC outlets. If the light is not working properly, try reversing the plug or changing to another outlet. I keep a Gardner Bender (www.gardnerbender.com) GFCI Outlet Tester in my personal lighting bag to check for wiring problems on location and even in my new home studio. Outlet testers like this are available at Home Depot for around $8.

Like most monolights, firing the FLC300 and 110i monolights requires a connection to your camera and you can use the provided 10-foot cable (one is included for each light) with a mini phone jack connection that allows it to be triggered from your SLR’s Prontor-Compur outlet. Since not all digital SLRs have a PC connection I attached my Flash Wave 2 Pro Kit (www.boothphoto.com) radio-controlled release that lets the monolights be wirelessly triggered without a cable and I needed a phone>mini adapter, which is in the kit, to connect it to the FLC300. The other two monolights’ built-in optical slaves worked perfectly inside my 11x15-foot home studio.
The 110i monolight’s recycle time is rated between 2 and 4 seconds while the FLC300’s recycle time is 0.3 to 3 seconds and both are realistic but waiting 4 seconds to make a shot may seem like a long time when working with an inner-directed model. (See “Inner-Directed and Outer-Directed Subjects.”) If so, you may need to be patient waiting for the 110i to fire. When it doesn’t you lose the benefit it provides as a hair or background light.
On the other hand, these modestly priced FLC300 monolights provide lots of power even with the power set to mid-levels and if you look at the captions you’ll see that I was able to achieve apertures of f/14 to f/16 at ISO 125. During initial testing I used the 110i as a hair and back light with the 24x24” light bank attached but in subsequent testing I removed the softbox from it and used it “raw” to get the maximum, undiffused power.

With the FL700K Strobe Light Kit Smith-Victor has been done everything possible to provide a comprehensive assortment of lighting tools for the portrait photographer on a budget. Check out their website for the other kits in this series that might fit your needs—lighting or budget—other than the one that I tested. I chose the FL700K Strobe Light Kit because it is truly a “studio in a box” and provides everything that a photographer needs to create portraits. This is truly no-frills lighting but as a wise man once told me a long time ago, “light is light,” and Smith-Victor has provided all of the necessary tools so it’s up to you to provide the creativity.
Inner-Directed And Outer-Directed Subjects
Inner-directed people are the Energizer bunnies of photo subjects. You tell them to stand “over there,” point the camera at them and they’ll change poses as fast as you can click the shutter, which is why a light’s recycle time can be critical. These subjects will make you look like a better photographer than you really are but it’s still your job to get the lighting right. Unfortunately, this type of subject represents only 20 percent of the subjects that the average portrait shooter ever gets to photograph.
Outer-directed subjects represent the other 80 percent of photo subjects and expect you to tell them what to do. Shooting this type of subject takes more time and patience but if you take the time to communicate what you want it will pay off in better portraits. The upside is that during a session with this kind of subject you will not likely be able to outshoot the 110i’s 4-second recycle time. Ultimately, it’s up to you to tell the subject how to pose and in order to do that, you need to know what you want.
For more information and full technical specs, visit Smith-Victor’s website at: www.smithvictor.com.
- Log in or register to post comments


![]()
Get the Latest Photo Tips, News & Reviews from Shutterbug!
| Camera Reviews Other Reviews | Mobile Reviews Photography Reviews Columns | News | Features | How-To | Resources |
 © 2024 Shutterbug
AVTech Media Americas Inc., USA
All rights reserved