- REVIEWS
Camera Reviews 
More Reviews Mobile Reviews Photography Reviews - GALLERIES
- VIDEOS
- BUYER'S GUIDES
Shoot Like You're In A Pro Studio By... Making Your Own Digital Backdrops Page 2
If you choose Gaussian blur, which renders an overall unfocused look, experiment
with the radius setting--the higher the value, the more the image is blurred.
However, contrast and saturation may be lowered. To boost them, use Levels,
Curves or Brightness/Contrast adjustments.
Any of these techniques may give you exactly the background you were longing
for. But if you're still not satisfied, pile on another filter effect
or two from among the many built-in special effects choices in the Filter Gallery
in Photoshop CS and Elements, or the filters menu in other image editors. The
variety of looks and combinations available is endless. And the Filter Gallery
makes it easy to combine filters like layers.
Send In The Clouds
These are all great ways to generate a background from an existing image. But
you can just as easily create a background from scratch. Want a cloud filled
blue sky, but just don't happen to have one handy? Look no further than
your filter set. Open a new blank white file, File>New, and type in the dimensions
and resolution you want.
Next, press the letter "d" on your keyboard to be sure that your
foreground and background colors are set to their default. Select Filter>Render>Clouds
and you'll see your blank image filled with black and white clouds. Furthermore,
every time you do it, the effect will be slightly different. If you don't
like the way the first one looks, undo it and try again.
Now, if you're not working in black and white, you'd like a sky
with some color in it. Whether you want a rich blue sky or a fiery orange one,
it's easy to add color. Choose Image>Adjustments>Hue /Saturation
to bring up the dialog box shown in #8.
 |
|
|
First, check the Colorize and Preview boxes at the lower right. Then move the sliders to get the colors you want. For this blue sky, I set them as follows: Hue: 244. Hue determines the color--red, blue, purple, etc. Saturation: 57. Saturation varies how rich or deep the color is. Lightness: +36. As expected, Lightness adjusts how dark or light the image is. After clicking OK to apply these settings to the black and white clouds image, it was transformed into the realistic cloudy blue sky shown in #9.
 |
|
|
For more abstract effects from scratch, open a new file and paint on it with the colors you want to appear in the background. Then blur it as described earlier, or apply effects filters to create new abstract looks.
On The Rocks
Now let's move into the studio, digitally speaking. Product and still
life photographers often use stone or marble as backgrounds for shiny jewelry
or a fine watch, but they'll nicely compliment a fine face as well. To
quarry your own stone, open a new blank file and apply Filter>Render>Clouds.
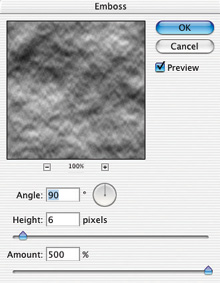
Just as before, you'll see a black and white cloud effect. Now choose
Filter>Stylize>Emboss, #10, with the amount cranked all the way up to
500. Adjust the angle and height (90 and 6 in this example) to your taste and
voila, you have a finely textured slab of grey granite, #11, suitable as a backdrop
for color or black and white. If you'd like a stone of a different color,
simply use Image> Adjustments>Hue/Saturation as described earlier.
 |
 |
||
|
|
Studio Fabrics
Many commercial photographers use fabric backgrounds made of muslin or canvas.
The fabric texture of these drops can enhance portraits, still life, and product
shots. Let's put one up, on screen that is. Open a new file the size you
need, File>New. Then choose Edit>Fill. In the fill dialog box, for Contents
choose Custom Pattern as shown in #12. Then click the arrow at the right of
Custom Pattern and choose one. From the Patterns group, I selected the first,
a Dark Coarse Weave. Next I clicked OK to apply it. This gave me a rich burlap
texture, but in grey scale. To add color, use Image>Adjust> Hue/Saturation
as described earlier. I added a warm brown tone to make the fabric look realistic.
 |
|
|
Edit>Fill with a pattern offers a tremendous variety of patterns and textures, some of them fabulous, others not. This is a great place to experiment.
Feathered Lighting
Now is where the more advanced techniques for extra credit come in. Here's
how I used what is called a gradient to emulate light on the top of the backdrop
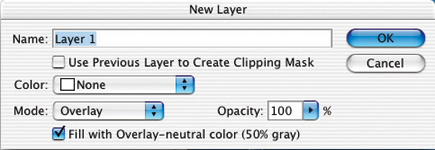
falling off toward the bottom. I added a new layer by choosing Layer>New
Layer from the menu. In the New Layer dialog box, #13, I clicked on the double
arrows in the Mode section and selected Overlay from the drop-down menu. Then,
at the bottom of the dialog, I checked the box to Fill with Overlay-neutral
color (50 percent gray). Click OK and a new layer, Layer 1, is created as seen
in the Layers palette, #14.
 |
|
|
 |
|
|
With this layer still active, press the letter "d" on the keyboard. Next, click on the gradient tool in the toolbox--you can also select it by pressing the letter "g" on the keyboard. Now drag within the background from bottom to top. This will create a gradient going from darker at the bottom to lighter at the top. As seen in #15, the result is a highly textured fabric backdrop with a realistic feathered lighting effect. If you don't like the way the gradient looks, simply drag again, starting in a different place. If you want to make the top dark and the bottom light, start dragging at the top. Once you have achieved the desired look, click on another tool to leave the gradient mode.
 |
|
|
Now Place Your Subject
How do you place your subject over these backgrounds? First, extract
your subject from its original background by selecting it using the Magic Wand
tool, the Extract tool, the Pen tool or whatever method you prefer. Then simply
drag-and-drop it on top of the new background you've created. I showed
how to remove a subject from its original background with the Magic Wand tool
in an article titled "Make It Move" in the January/February 2003
issue of this magazine.
As soon as you try some of these techniques, you'll open the door to an
endless supply of backgrounds that you create yourself, according to your personal
color preferences and your specific needs.
Adobe Systems Inc.
(800) 833-6687 www.adobe.com
|
| |||||||||
- Log in or register to post comments


![]()
Get the Latest Photo Tips, News & Reviews from Shutterbug!
| Camera Reviews Other Reviews | Mobile Reviews Photography Reviews Columns | News | Features | How-To | Resources |
 © 2024 Shutterbug
AVTech Media Americas Inc., USA
All rights reserved