- REVIEWS
Camera Reviews 
More Reviews Mobile Reviews Photography Reviews - GALLERIES
- VIDEOS
- BUYER'S GUIDES
Sharpening Strategies; There’s More Than One Way To Get It Done
Adobe Photoshop users soon come to realize that almost every technique can be done in more ways than one. What you want to be aware of are those who say “this is the best” or “this is the only” way to do something. In my experience there is no “best” or “only” to Photoshop. Some methods are faster to use, some are slower but provide more control. It’s a little like driving to Los Angeles from San Francisco. Interstate 5 gets you there faster but Highway 101 is more scenic. Taking either route will get you to Los Angeles.
Sharpening is no exception. There are a number of ways in Photoshop to sharpen an image. Some methods, such as the High Pass Technique (HPT) are non-destructive of pixels (see, “Sharpening Simplified” by Howard Millard in Shutterbug, September 2007 and on the web at www.shutterbug.com). Others, such as Unsharp Mask (USM), which is perhaps the most widely used by professionals, does destroy pixels or create artifacts. This does not mean it should not be used as it does work quickly and well for most images.
 |
|
|
The Why
Digital images straight out of the camera are inherently unsharp. Some camera companies provide sharpening presets, in fact, this is one of the reasons they resist using the Digital Negative Format, it won’t allow them to build in proprietary presets for dummies—which they are convinced sell more cameras. I suggest you not use them. Turn off any presets and make your own color and sharpening corrections in Lightroom, Photoshop, or Elements. There are a number of reasons for this, but the bottom line is an image should almost always be sharpened at the size it will be reproduced.
What this means is that in an ideal workflow you would make your corrections on a Photoshop Document file (PSD), including cropping. The PSD would be saved at the largest size you would ever want to print it (you should still have the original and unretouched raw, TIFF, or JPEG saved with another name should you ever change your mind). When it comes time to print you should flatten the PSD file, re-size it to the print size, sharpen it using your favorite technique, and save it as a TIFF file with a name that identifies it is sharpened. This is important because a thousand TIFF files later you will be asking yourself, did I sharpen this one?
Which is another part of the equation. There is a difference between sharpening to compensate for the lack of sharpness in capture, and an image once it is sized for printing. Using the Clarity tool in Lightroom, Adobe Camera raw, and Elements, you can make a first pass at sharpening to make up for the loss of sharpness in image capture. After that, the image should only be sharpened once more at the size it is to be printed in order to prevent image degradation.
When I name an image file I round up the largest side of the image and add FS for flattened and sharpened. So, if I had an image that was 6.65x9.5 to be printed on my Epson 2400 I would name it [Image Title]_10FS.tif. What this tells me is that the image is to be printed on a 10” piece of paper that has been flattened and sharpened.
The How
Regardless of the technique you use in a digital image, sharpening looks for areas in the image of greatest contrast. It then darkens one side and lightens the other. By darkening and lightening the two opposing sides you have increased contrast with the illusion of increased sharpness.
There are three sharpening terms you should be familiar with to master sharpening techniques: Amount, Radius, and Threshold.
Amount controls how much lighter or darker the pixels are adjusted. Normal settings are usually between 60 and 180 percent. Generally, use higher settings for subjects with fine detail.
Radius controls the width of the adjustment occurring at the edges. Using too high a radius will create a halo effect in the image. A general rule is to divide the image resolution by 200 to determine the radius amount (300 ppi ÷ 200 = 1.5). Even so, it is rarely necessary to exceed a radius of 1.0 if the image is not to be printed larger than 8.5x11”.
Threshold determines how much difference there needs to be between two pixels to be considered an edge. At a setting of zero any difference between two pixels would be considered an edge so almost every pixel would have some sharpening. At the other end, with a threshold of 255, almost no pixel would be sharpened.
In general keep the threshold low, around 1-2, for images from digital cameras and medium or large format cameras. For 35mm images the threshold is often set at 3. Increase the threshold when necessary to avoid accentuating noise in digital images, especially in skin tones, and grain in scanned film images, but rarely higher than 12.
Here are four of the many strategies for sharpening in Photoshop. When using any method for sharpening it is important to judge the results by looking at the actual pixels. This means zooming in to 100 percent so that one pixel on the monitor equals one pixel in the image. I also recommend doing all of your sharpening on a Background Copy. If your results are satisfactory you can flatten the image before saving. If not you can discard the Background Copy and start over rather than trying to back out one step at a time.
The one thing to remember is that sharpening is not about making a blurred image sharp; it is about getting the optimum sharpness from a photo that was sharply focused. In any event, choose one sharpening method and use it until you find another method you prefer.
Method 1—USM
USM is the best documented and most used of all sharpening techniques. The name USM is derived from a darkroom process where an “unsharp” duplicate transparency is sandwiched with the sharp original. The blurred image is larger along the edges, causing halos that brighten one side of the edge and darkens the other. The USM filter in Photoshop functions in a similar manner, creating halos along contrast edges to improve perceived sharpness. When using USM be aware that the effect on the screen may not be as strong as in the final print.
Step 1. Create a Background Copy, Ctrl/Cmd + J. It is not necessary to rename it but for this article I have renamed it USM.
 |
|
|
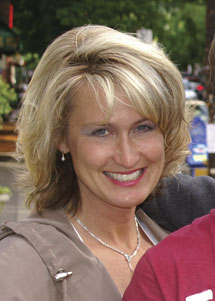
Step 2. Open the Unsharp Mask dialog, Filter>Sharpen> Unsharp Mask. For this image of Kimberley I have chosen an amount of 150, Radius of 1.5, and a Threshold of 0. Click OK and then view the image on your screen.
 |
|
|
If it is a go, flatten and save.
Method 2—USM Variation
While USM is a popular method for overall sharpening and in most cases does a good job it is considered by some to be too coarse of a tool. Here is a variation of USM that allows more control.
Step 1. Begin in the same manner as USM with a Background Copy, enlarging to 100 percent, and opening the USM dialog.
 |
|
|
Step 2. For this technique take the Amount to 300 percent or higher. For this demonstration I will use 500 percent. Threshold can be left at 1 but I’ve increased the Radius to 2.
 |
|
|
|
| |||||||||
- Log in or register to post comments


![]()
Get the Latest Photo Tips, News & Reviews from Shutterbug!
| Camera Reviews Other Reviews | Mobile Reviews Photography Reviews Columns | News | Features | How-To | Resources |
 © 2024 Shutterbug
AVTech Media Americas Inc., USA
All rights reserved