- REVIEWS
Camera Reviews 
More Reviews Mobile Reviews Photography Reviews - GALLERIES
- VIDEOS
- BUYER'S GUIDES
Raw Image Converter Essentials
How To Choose The Best One For Your Work
While most digital photographers are familiar with JPEG and TIFF formats, the latest format to come down the pike for digital cameras, known as "raw," as it deals with the raw information right from the sensor, is something fairly new. Simply stated: to gain maximum image quality, you should use the digital camera's raw format. To work with raw files you need a "raw converter" to create standard TIFF or JPEG files. To no real surprise, not all raw converters deliver the same benefits in the quality of the output and, more importantly, a good raw file workflow. All current raw file formats are proprietary. That is why every manufacturer features its own raw converter, which works only with files from that manufacturer. Here are some of the raw file converters now available: |
|||
· Canon's File
Viewer Utility (free with the camera) |
|||
The Raw Workflow Raw Converter Responsibilities
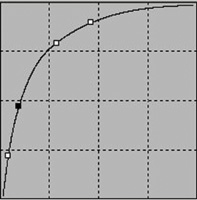
Linear Conversion |
|||
Raw Converter Essentials |
|||
White balance--Essential:
Good white balance support is crucial for any useful raw converter.
There are two kinds of white balance correction techniques. One involves
obtaining gray balance by clicking on a neutral spot in the photo. The
other provides white balance correction controls (mostly in terms of presets
and/or color temperature) that you modify yourself. |
|||
Other Important Features Histogram--Essential:
To help better judge exposure, the raw converter needs to display a histogram.
To fully judge proper contrast and color balance, a histogram that displays
all three RGB color channels is necessary. Fortunately histograms are
now common (not all show all three channels though). Some Other Useful Features Summary |


- Log in or register to post comments


![]()
Get the Latest Photo Tips, News & Reviews from Shutterbug!
| Camera Reviews Other Reviews | Mobile Reviews Photography Reviews Columns | News | Features | How-To | Resources |
 © 2024 Shutterbug
AVTech Media Americas Inc., USA
All rights reserved