| |
The
Sigma software support for the new SD10 camera provides
a very effective thumbnail page interface for managing
files. A generous selection of options for image size,
embedded color space profile, and bit-depth are offered.
In addition, both a Custom selection that provides a sizeable
preview window and an extensive palette of image adjustment
tools, including a new X3 Fill Light slider, are provided.
There's also an Auto adjust mode. (Photo by James
Chen.)
|
|
Unlike
film cameras, digital does not capture a likeness of the subject on a
"physical artifact," like a film negative or slide. A digital
camera just gathers information that describes what the lens and sensor
"saw." What is stored in files on that little memory card
in a digital camera is information, just ones and zeroes specifying how
much red, green, or blue light was sensed and recorded for each pixel
at each XY coordinate in a matrix of so many megapixels. Everyone now
knows about megapixels, the primary determinate of a digital camera's
worth. But, does how much information a camera gathers really tell you
anything about the quality of the content that is stored on that little
memory card?
|
| |
The
new Camera Raw support that is included in Adobe Photoshop
CS is a convenient and efficient way to access raw digital
camera files. The tools provided, including an effective
histogram with global interactive slider adjustments, help
produce consistent, effective color interpretation and overall
balancing of the primary dimensions of image quality. When
done with the raw processing the program opens the image
directly in Photoshop's work space. Also, Photoshop's
new CS Browser generates thumbnails for all supported digital
camera files, making drag-and-drop file management as easy
as it can be.
|
|
The JPEG Injury
Camera manufacturers only talk about the correlation between image quality
and megapixel count in the broadest terms. One reason for this vagueness
may be that the great majority of digital cameras sold (point-and-shoot)
do not save the information as it is read by the camera's sensor.
The sensor information first goes to the camera's on-board processor
and automated adjustments are applied to optimize the image gamut, and
regulate brightness, contrast, and color to predetermined standards. Then
the information is compressed by the JPEG compression method that throws
out all "redundant" information.
The JPEG file format squeezes the information into a small file size by
dividing the information into blocks of so many pixels. If all of the
pixels in the block are similar (but not identical in RGB value), then
the entire block is written by a shorter line of information that says
that all of the pixels in the block are the same.
To add insult to the JPEG injury, in recent years many of the digital
camera manufacturers have adopted the use of the sRGB color space to generate
.JPG digital camera saved files. The "purpose" of generating
images from the sRGB color space is to make the images more compliant
for computer use by means of a "standard" color space profile.
Unfortunately, the sRGB standard is a very limited color gamut based on
the average of what typical computer monitors are capable of displaying
in variations of color.
|
| |
The
SilverFast image-editing and adjustment tools familiar to
many scanner users have been available for some years to
also provide the same functions with high-bit image files.
I found SilverFast HDR was an effective and efficient method
to edit and color correct X3F Sigma SD10 files batch-converted
to 48-bit TIFF using the Sigma Photo Pro software. SilverFast
HDR was a particularly effective way to assure that the
fine color differences the Sigma SD10 Foveon chip is capable
of recording are precisely represented in the final image
file.
|
|
The result of a digital camera's
post-capture image processing (JPEG compression generated from sRGB color
space) is that the color in the file opened by a typical consumer software
application with a PC is much more restricted in color image information
than what was captured by a digital camera's sensor.
The EXIF 2.2 Standard
It should be noted that some attempt has been to ameliorate this problem.
The digital camera industry's EXIF 2.2 standard is intended to preserve
the color gamut that would ordinarily be reduced by the limitations of
the standard sRGB color space profile. In other words, camera makers who
produce cameras that are compliant with EXIF 2.2 preserve the color gamut
after post-capture processing in .JPG files. However, for the user to
have the advantage of EXIF 2.2, the application used to open, edit, and
print an EXIF 2.2 .JPG file must also be compliant with the EXIF 2.2 standard.
Major color printer manufacturers do provide EXIF 2.2 support and compliance
through their own software, and there are also Photoshop plug-ins available.
Be aware, however, that most independent, third-party, image-editing software
applications still lack EXIF 2.2 support. (See www.exif.org/specifications.html
for more on this.)
|
 |
A
broad selection of files made with different cameras were
processed by each of the alternate software and workflow
choices covered in the article. Comparing the final edited
and adjusted result from the same camera file showed that
there were minimal differences in the major aspects of image
quality. However, each processing software choice did produce
subtle differences. For instance, the image on the left,
processed with Photoshop Camera Raw, compared to the same
file processed using SilverFast DCPro, on the right, revealed
SilverFast's advantage. It was able to remove the
color cast, thus reproducing cleaner neutral values in the
subject with more separation of color differences.
|
|
Enter Raw, And Adobe
RGB
Today, every pro and prosumer digital camera, and many advanced amateur
digital cameras, offer the raw file format option. Why choose the raw
option? One of the main reasons is that it allows you to get all of the
information a digital camera sensor captures. But there are other good
reasons to work with raw as well. The larger advantage is that it provides
you with the ability to make your own choices as to how the resulting
photograph should look, rather than have those choices made for you by
automated camera post-capture processing. This, of course, assumes that
you will be processing, editing, and adjusting raw image files made with
a digital camera with a personal computer.
There is yet another option that will enhance your images. Many of the
leading brands of digital cameras now provide the ability to choose the
Adobe RGB color space. Where that choice is located will depend on which
brand and model camera you have. For instance, Canon cameras provide the
Adobe RGB option as one of the Parameter settings, however, with the Sigma
SD10 the Adobe RGB color space choice is made as an output option of the
Sigma computer processing application, not as a camera setting.
|
 |
The
foundation for building image quality is fitting raw image
information to completely fill the 256-level gamut of standard
computer image space. The black graph area of this relatively
low contrast subject captured by a digital camera will not
produce either a true black or a true white. Printed as
is, it would make a dull, flat, poorly saturated print.
Photoshop's Image/Adjustments/Levels dialog provides
two manual and one automatic method to expand the image
data to fill the gamut of color space available. One is
to set the black and white points by using the color pickers
in the lower right of the Levels window. Click on what should
be a black and a white pixel in the open image, or move
the black and white arrows at the outer bottom edges of
the histogram window to where the image data begins, indicated
by the black graph shape. A secondary function is to remove
color cast using the middle gray slider. Choose the middle
gray and click on a neutral gray area in the image and any
color cast that will be neutralized.
|
|
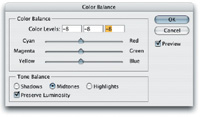
There are two reasons for choosing
Adobe RGB for raw file output. One is that it is consistent with the Adobe
Photoshop recommended work space profile for working with digital photographs
[Adobe RGB (1998)], and second is that it supports effective color management
by establishing the raw file as a known, profiled source, even if the
Adobe RGB profile is not embedded in the raw file. This makes editing
and color correction using a color managed application like Photoshop
or Corel's PHOTO-PAINT easier, more effective, and efficient.
What Not To Choose
Just about every digital camera allows you to select options that affect
the contrast and color saturation of the image files saved in raw format.
Simply put, do not choose such color options. It is easier and more effective
to increase contrast or saturation during computer processing and editing
the raw file; it is not as easy to decrease either. The same goes for
adding sharpening to the raw image file information--don't
do it.
One final precaution--some brands and models of digital cameras have
manufacturer color management profiles that may be installed on a computer
system either by installing the manufacturer's software or simply
connecting the camera to the computer via USB or FireWire. When opening
or importing raw camera files DO NOT select a manufacturer camera profile
as the Source profile. The reason is that those manufacturer profiles
usually assume the camera menu options are set at default for JPEG file
output. When applied to a raw image these profiles will distort the image
characteristics, making them unusable.
|
 |
The
Curves dialog in Photoshop's Image/Adjustments provides
the digital photographer with an advantage film photographers
never enjoyed--the ability to adjust the characteristic
balance of tones (curve) of an image. With this control
you can change the image contrast without affecting the
image gamut (Levels adjustment), as indicated in the gentle
S curve shown in the graph to increase contrast. Other uses
include brightening shadow values to bring out detail, or
darkening very light highlights. Unfortunately, many contemporary
imaging application programmers tend to look down on users
and assume they are too lazy or dumb to learn how to use
Curves effectively, so the tool is often missing from software
made to adjust and color correct raw digital camera images.
|
|
Choose Your Tools,
Pick Your Path
From a practical and functional point of view, digital camera raw files
are like raw files saved from a scanner at the sensor's bit-depth.
Some scanner users choose to scan directly to file without adjustment,
capturing what the scanner senses and then adjusting and correcting color
using an image-editing application like Photoshop. Essentially the same
approach could be applied to raw digital camera files, were it not for
the fact those files involve proprietary non-lossey compression and specific,
imperative color translation processing. This essential processing is
facilitated by the camera manufacturer's software. With all of the
software I have used there is a facility to view thumbnails, use selection
and editing tools and to batch process to high-bit standard image formats
like TIFF.
In addition, camera manufacturer software includes an image-editing and
correction capability. Again, there is a similarity with scanning software,
as both share the same faults and limitations. In most, the adjustments
supported are limited to simplistic, global, single dimension changes
like brightness, contrast, color balance, and saturation. And, the tools
provided are usually restricted to coarse sliders, that are neither intuitive
or user friendly. My opinion is that even if these camera manufacturer
software raw file adjustment tools are used, many if not most of the image
files that result will require further tweaking in an image editor like
Photoshop to yield a fully satisfactory print.
|
 |
Only
after the image brightness and contrast is adjusted and
established can you make an assessment of the color content
and balance in a picture on screen, because color is affected
considerably by Levels optimization and Curves adjustment.
The Photoshop Image/Adjustments/ColorBalance dialog allows
you to shift the balance of colors on three tangents of
opposite values on the color wheel. Unlike most color balance
adjustment tools that are global--that is, affect the
entire gamut--Photoshop's is divided into three
levels of Shadows, Midtones, and Highlights. If, for instance,
you made photographs under a clear sky early in the morning
or late in the afternoon, and you want to preserve the warm
highlight but neutralize the blue in the shadows, click
on the Shadows radio button. Then move the arrow from the
center of the bottom Yellow/Blue slider toward yellow, and
move the top Cyan/Red slider arrow a little toward red.
|
|
Raw Processing Alternatives
In the last year, digital camera users who save in raw have been provided
alternative processing tools and more efficient workflow options. Early
in 2003, Adobe released their Camera Raw plug-in for Photoshop 7.01, which
I reported on in the August 2003 issue of Shutterbug, page 98 (also see
www.shutterbug.com for a copy of this article and others mentioned). That
Camera Raw capability has been expanded and is now a part of Photoshop
CS, and was described in my Photoshop CS report in the March 2004 issue
of Shutterbug, page 70. Although the Adobe Photoshop solution is a convenience
to those who purchased the plug-in or upgraded to CS, not all cameras
which enable raw output are supported, and Camera Raw has some of the
same limitations as camera manufacturer software, still making post-raw
processing tweaking necessary.
One of the alternatives I have also reported on is a more sophisticated
and efficient alternative--LaserSoft's SilverFast DCPro (see
this report in the January 2004 issue of Shutterbug, page 88).
Another new alternative I recently explored is one that is not currently
supported by either Adobe Photoshop Camera Raw or SilverFast DCPro. It
came about when working with the new Sigma SD10 digital SLR, which was
made available for my use and evaluation by its sensor maker, Foveon (see
sidebar). Although I did output raw, high-bit TIFF files using the Sigma
Photo Pro software without using any Custom adjustment, rather than use
48-bit Mode in Photoshop to adjust and color correct the images, I chose
a long established LaserSoft software product, SilverFast HDR 6, to do
the final processing.
|
 |
Once
you have established a good overall image color balance
it is not unusual to find that a specific color is not ideal.
Although the Image/Adjustments/Hue/Saturation tool allows
making global HSL adjustments, practical experience has
proven to me the greatest value of Hue/Saturation is to
work more selectively. I use the Edit drop down and select
a color range, like Yellow, and then click on that yellow
in the image on screen. This allows me to make selective
changes to that yellow while protecting the rest of the
colors in the image. This works particularly well with people
pictures, as you can precisely adjust complexion tones while
not altering the balance of any other colors in a photograph.ž
|
|
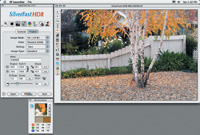
SilverFast HDR 6 can be run
either as a stand-alone application or as a Photoshop plug-in and is designed
for editing and color correcting high-bit files output by a scanner. In
all respects, HDR functions just like the Ai 6 versions of SilverFast
used to drive scanners or, for that matter, SilverFast DCPro to produce
fully adjusted, optimized final scans that usually don't need any
post-scan tweaking. When I compared the processing done by the HDR software
with Sigma Photo Pro and 48-bit, manual Photoshop processing, the HDR
had a small edge in refinement and handled the process much more efficiently.
Another alternative means for processing raw digital camera files is the
solution available from Phase One, their C1 RAW Workflow Software (www.PictureFlow.com).
I must confess that I have not tried this yet, but will in the near future.
I am sure that we will see even more players entering the raw camera processing
and editing software field as the digital camera market continues to grow.
Different Tools, Same
Desired End Result
The tools you select to process and adjust raw files might be chosen for
their convenience, efficiency, and price points. Irrespective of your
choice, there are four basic functions which must be performed, or at
least checked, with every raw camera image before it is ready to be used
for any and all kinds of output. The best-known tools for this purpose
are those found in Adobe Photoshop and competitive image-editing applications.
They include the Image/Adjustment tools: Levels, Curves, Color Balance,
and Hue/Saturation, and they should always be used and applied in that
order to make initial adjustments and color corrections. (For a detailed
description of how to use the basic image adjustment tools you may want
to refer to my article "Making Digital Photos Sing--Basic Image
Optimization Using Photoshop," in the July 2003 issue of Shutterbug,
page 72.)
Conclusions & Recommendations
In preparation for this article I processed many stored raw digital camera
files made with four different cameras. I used as many different software
options and alternate workflows as are currently supported. I then compared
the final image files, which were evaluated on screen and test printed.
In addition, I obtained the support of Foveon to borrow a new Sigma SD10
with two lenses, and my friend and colleague James Chen and I test shot
a variety of subjects and conditions. These "fresh" images
were processed with the Sigma Photo Pro software and color corrected from
raw 48-bit TIFF files in Photoshop and SilverFast HDR.
Both James and I were very favorably impressed with the Sigma SD10's
finely detailed and high fidelity 10.2-megapixel image files. I was particularly
impressed with images made in fairly soft light, where the Foveon X3 sensor
chip was able to record and distinguish very subtle subject color differences
that required a minimum of post-processing color correction. On the other
hand, this exceptional color sensitivity became a color correction challenge
when the subject was lit by a mix of natural window light and a variety
of artificial sources, including household tungsten, quartz-halogen, and
fluorescent lighting.
All of the software options and alternate workflows used to process raw
files and covered in this article functioned effectively to produce high
quality image results. Each solution tested--the camera manufacturer
software, Photoshop 48 bit, Photoshop CS Camera Raw, Lasersoft SilverFast
DCPro and HDR--did affect both the look of the final output as well
as the convenience and efficiency of the experience. In all, there were
only minor distinctions in final output image quality. All produced comparable
levels of basic dimensions of image quality including detail, sharpness,
saturation, and contrast. The distinctions were primarily based on how
each interpreted color in subtle ways, which varied, to some extent, depending
on the different kinds of subjects photographed.
|
 |
Generally, both camera manufacturer
software and Photoshop Camera Raw function efficiently to make basic image
adjustments, but very often those images, once opened in Photoshop, require
further refinement for ideal print output. On the other hand, the Lasersoft
SilverFast DCPro and HDR tools support adjusting and color correcting
to a finer extent, producing results that seldom required any further
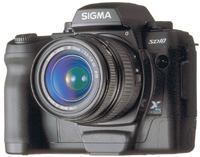
tweaking.
Which solution should you use for your work? I don't believe the
answer can be generalized on the basis of whether one is better than another.
However, if the choice depends on your image style preferences and the
kinds of subjects you photograph, as well as workflow efficiency, there
are choices to be made. Fortunately, you can try out demo versions of
both the Lasersoft and the Phase One options, available at their respective
websites (www.lasersoft.com
and www.phaseone.com).
However, you have to dive in and get your feet wet to find out if Photoshop
CS and its Camera Raw options are the way to go. Whatever way you do go,
keep in mind that raw provides you the best imaging options, and that
more and more raw processing solutions will be coming soon.
The Sigma SD10 Single-Lens
Digital Camera System
The new Sigma SD10 digital SLR is a solid, well-balanced, full-size system
SLR. It allows you access to the full range of Sigma mount lenses, including
two "digital" SD10 only zooms, an 18-50mm and 50-200mm. The
latter two digital lenses are available as a kit along with the SD10 body
at a street price of under $1600. The Sigma SD10 is set apart from the
competition by its use of the Foveon X3 sensor chip. Unlike other sensors,
the Foveon has three layers, one each for red, green, and blue light sensitivity,
much like the layers of a color film emulsion. The controls, both digital
options and camera functions, are logical and straightforward and very
easy to use. The proof is in the pudding, of course, and the images produced
were very sharp, finely detailed, and had accurate color fidelity. The
images I made with the camera produced quite superior 11" wide prints
on 13x19" ink jet paper.
|