- REVIEWS
Camera Reviews 
More Reviews Mobile Reviews Photography Reviews - GALLERIES
- VIDEOS
- BUYER'S GUIDES
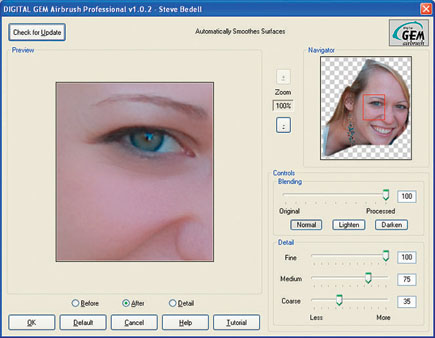
The Portrait Photographer’s Triple Combo; Two Programs (Photoshop CS2 & CPAC Imaging PRO) And One Plug-In (Kodak DIGITAL GEM) To Help You Speed Production Page 2
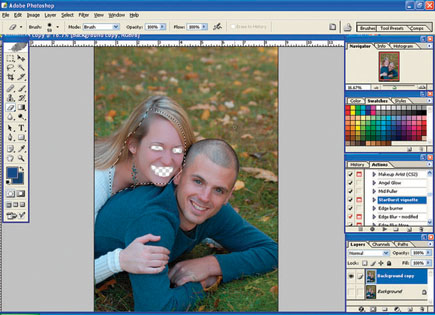
There are many adjustments you can make but I always prefer to overdo it and then adjust the opacity on the layer. That way I'm not continually trying to tweak the result. Before you adjust the opacity, click off the eyeball in the Layers palette so the bottom layer is not visible and use the Eraser tool to erase the eyes, lips, and teeth. Deselect the selection, flatten the image, and repeat the same thing for the next subject. This photo shows how things look after retouching, softening, and vignetteing. The image is now ready to send to your lab for printing.
 |
 |
 |
Steve Bedell holds Masters and Craftsman degrees from the Professional Photographers of America. Bedell recently released an educational DVD about shooting in the sun called "Sparkle Light." For more information on the DVD or to subscribe to EPhoto, his free online newsletter for professional and advanced amateur photographers, contact Bedell via e-mail at: steve@stevebedell.com.
How To Avoid Destructive Dodging & Burning
If you use the Dodge and Burn tools in Photoshop, you may be destroying
or "bruising" pixels. Going back to the file later will mean going
back to a file with missing information. Here's a way to avoid that problem:
Step 1:
a) Create a new layer, using Choose New Layer on the fly-out menu or Alt-Click
(Opt-Click) the Create New Layer icon, to bring up the New Layer dialog box.
b) Select Overlay mode.
c) Check "Fill with Overlay neutral color (50 percent)."
d) Click OK.
This creates a new layer with 50 percent gray above your current active layer.
This layer ignores the color and is transparent on your image window.
Step 2:
a) Select the Brush tool (B) and in the options bar choose a medium soft edge
brush and set the opacity to 10 percent.
Step 3:
a) Press "D" to set your foreground/background colors to black and
white.
Step 4:
a) Click and paint on with foreground black to burn in. Press "X"
to switch to white for dodging.
b) Use multiple strokes to build up your effect. If 10 percent is too much,
or too little, adjust the opacity of the brush in Step 2 to fit your taste.
Making this an Action and/or making it a shortcut, will save considerable time.
Note: If you create an Action, you will have to select the
Brush (B) option manually.
For more information, contact Adobe Systems Inc., 345 Park Ave., San Jose, CA
95110; (800) 492-3623, (408) 536-6000; www.adobe.com.
Manufacturers/Distributors
Adobe Systems Inc. (Photoshop)
345 Park Ave.
San Jose, CA 95110
(800) 833-6687
(408) 536-6000
www.adobe.com
CPAC Imaging (CPAC Imaging PRO)
5440 Oakbrook Pkwy
Norcross, GA 30093
(800) 262-9333
(770) 448-0250
www.cpacimaging.com
www.cpacasia.com
Kodak's Austin Development Center (DIGITAL GEM)
8920 Business Park Dr.
Austin, TX 78759
www.asf.com
|
| |||||||||
- Log in or register to post comments


![]()
Get the Latest Photo Tips, News & Reviews from Shutterbug!
| Camera Reviews Other Reviews | Mobile Reviews Photography Reviews Columns | News | Features | How-To | Resources |
 © 2024 Shutterbug
AVTech Media Americas Inc., USA
All rights reserved