Paint Your Photos; It’s Easy With Corel’s Painter Essentials 4 Page 2
Restoration Software
Many digital artists like to refine the auto work by bringing back more detail
in areas where they want to direct the viewer's attention. To do this,
head to the Restore Detail palette at the lower right of the window (#6) and
select the Soft Edge Cloner Brush. The cloner brushes will restore detail from
your original photo. Zoom in on the image and paint with a small size brush
on the areas where you want to restore detail, such as the center of the flower
here (#7) or with a portrait, the eyes, nose, mouth, and some areas of the hair.
 |
|
|
If you're using a mouse, lower the brush opacity to 20 percent or less and make multiple strokes. If you have a graphic tablet, such as a Wacom, you can control the degree of restoration via the pressure on the stylus. To make the finished work look like a drawing or painting, leave some of the brush strokes visible in the detailed areas.
 |
|
|
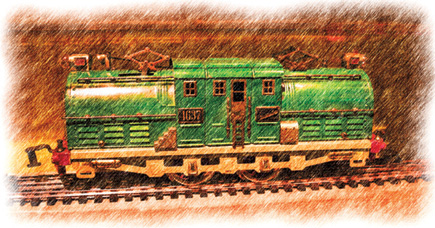
In contrast to the broad strokes of most of the paintbrushes, a pencil drawing can bring out more detail. PE4 offers both black and white pencil and colored pencil options. Beginning with a photo of a vintage model train (#8), I selected auto-painting with the colored pencil setting. Because of the fine detail, the auto-painting took several minutes to render a detailed, richly colored drawing (#9).
 |
|
|
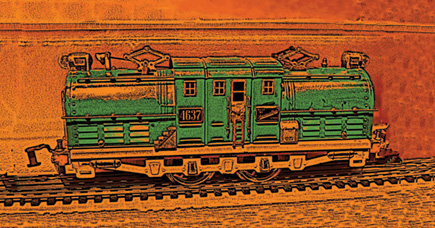
PE4 offers several special art effects, including five types of Woodcut. To access these, open your photo and leave it visible. Then, from the menu bar, choose Effects>Surface Control>Woodcut. You can choose and adjust the number of colors to be used, or you can select one of the presets. Here, I chose Woodcut 3 to produce this colorful and graphic rendering (#10).
 |
|
|
Painting And Drawing "By Hand"
In general, you'll want to leave the background as it was auto-painted--with
broad, soft strokes. Or you may even want to switch to the Drawing and Painting
work space (click that tab at top right) and add some hand-drawn strokes. I
know your first reaction: "I don't have any art training."
But I suggest you try it--how hard can it be to trace over your own original
photo? You can do this with a mouse if you're careful and patient but,
for speed, efficiency, and expressiveness, I recommend a graphic tablet such
as Wacom's Graphire or Bamboo, or the pro Intuos line (see www.wacom.com
for more info). Models are available starting at $79.
 |
|
|
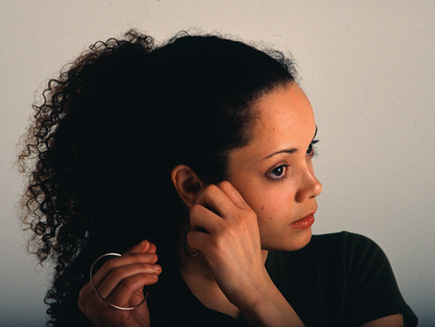
I began with my portrait of Tanya (#11) which I opened in the Photo Painting palette. I clicked the Use Open Image button and checked the tracing paper box to turn it on. To choose a brush, click on the Brush icon at the top left of the screen and a new palette will open showing a wide range of brush types with examples of what their strokes look like. I went over to the Photo brushes at the far right of the open palette, then clicked on Camel oil cloner to select it. Once the brush was selected, the palette retracted and I began painting.
 |
|
|
I used a larger brush for the broad areas like the hair, then reduced the
brush size and opacity for more detailed areas of the face. After making the
broad strokes, I partially filled in gaps by painting over them with a very
low opacity, in order to maintain a painterly feel. Check your work periodically
by clicking off the tracing paper so you can see your brushwork on a plain white
background. Click again to turn the tracing paper back on.
Draw your strokes in the direction of the lines of the subject, or for any effect
you want. When you reduce the brush size to paint in smaller details, use the
Zoom slider at the bottom of the image window, or Cmnd/Ctrl with the plus or
minus keys. If you make a mistake, choose Edit>Undo (or Cmnd/Ctrl-Z) to revert
to the previous state. PE4 offers 32 levels of undo--a real lifesaver.
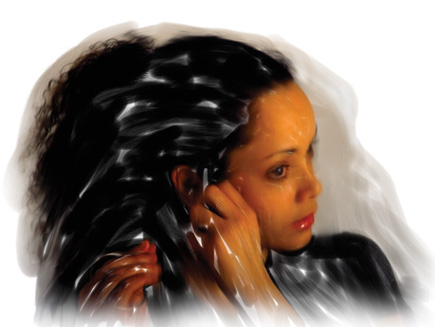
Here, I did a lot of painting on the face to make it very smooth and detailed.
For dramatic contrast, I painted the hair with very broad strokes and then added
a feathered outline around the head, leaving some of the background unpainted.
In the final result (#12) the realistic fine detail of the face is offset by
the loose brush strokes of the rest of the image.
 |
|
|
Go to Corel's website (www.corel.com/painteressentials)
for further information, upgrade details, and to download a free trial version.
If you want to start to digitally draw or paint from your photos to create images
that really look like they were made with traditional art media, PE4 offers
great versatility.
Corel's PE4 is compatible with Windows XP or Vista, and Mac OS X, 10.4
or 10.5.
- Log in or register to post comments


