- REVIEWS
Camera Reviews 
More Reviews Mobile Reviews Photography Reviews - GALLERIES
- VIDEOS
- BUYER'S GUIDES
Output Options; Improving Your Prints And Saving Your Sanity Page 2
 5 |
Photoshop Elements doesn't offer the same level of control on the working space. For printing, you'll want to set the Color Preferences (Edit>Color Settings) to "Optimized for Printing" (#6). The Print With Preview option in Elements gives you the same control as Photoshop, and you should set these as outlined.
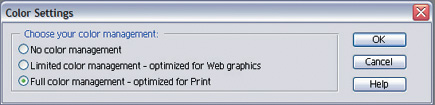 6 |
Going Custom
What if you don't have a profile for your paper? If you do much printing
with third party papers, such as Kodak, Ilford, or the generic papers at the
computer store, most will have an info sheet that tells you the optimum settings
for their paper. Some, notably Ilford, provide profiles for their papers on
their websites. You'll almost always have better results using the correct
profile so I highly recommend checking the company's website.
A final option and one that many serious photographers take is to have custom
profiles made. There are many choices for custom profiles, but Dry Creek Photo
(www.drycreekphoto.com)
and Cathy's Profiles (www.cathysprofiles.com)
are highly respected and will generate profiles starting around $40 each, depending
on the options you select. Considering the cost of the hardware involved--quality
measuring tools start at about $1000 and rapidly climb in price--this is
a viable alternative if you're using one or two papers. These profiles
have an advantage over generic ones because each is created from a print made
by your printer rather than one that is created to work on the "typical"
printer. The drawback of course is the time and expense involved. You'll
need to download a target file, which is typically a color patch that you'll
print and mail in. The profile creator will then read each color sample with
special hardware to create a custom profile tuned to that printer and paper
combination and will in turn e-mail back the profile with instructions on how
to install it.
Getting accurate prints can be confusing and irritating, but with the right
settings you'll be printing images that closely match your screen on the
first try. Before investing in custom profiles or making changes to match your
monitor to your printer, make sure your printer settings are correct--it
may be the only thing standing between you and the perfect print!
Jon Canfield is the co-author of "Photo Finish: The Digital Photographer's Guide To Printing, Showing, and Selling Images," published by Sybex. You can see Jon's work on his website, www.joncanfield.com.
|
| |||||||||
- Log in or register to post comments


![]()
Get the Latest Photo Tips, News & Reviews from Shutterbug!
| Camera Reviews Other Reviews | Mobile Reviews Photography Reviews Columns | News | Features | How-To | Resources |
 © 2024 Shutterbug
AVTech Media Americas Inc., USA
All rights reserved