- REVIEWS
Camera Reviews 
More Reviews Mobile Reviews Photography Reviews - GALLERIES
- VIDEOS
- BUYER'S GUIDES
onOne Software’s FocalPoint 2; Post-Exposure Depth-Of-Field Control
 Renowned for her blurred, often defocused style, 19th-century British portraitist Julia Margaret Cameron is said to have remarked, “Any fool can take a sharp picture.” Through the 1930s and beyond, soft focus was one way still photographers and motion picture studios gave their female stars a dreamy, otherworldly aura. The trend has continued with new digital means to inject atmosphere and mood through controlled focus effects.
The onOne FocalPoint 2 plug-in software offers you a powerful option to speed and simplify the process of controlling focus “post exposure.” This latest iteration adds substantial new features and controls. In fact, FocalPoint 2 may lead some photographers to question whether they really need to carry those heavy, expensive super-fast SLR lenses, or a view camera, when the look they create can be quickly replicated on their digital desktop darkrooms. This plug-in for Photoshop, Elements, Lightroom, and Aperture provides multiple controls for adding realistic soft-focus effects to any digital image. You can create depth-of-field variations, selective focus and edge vignette effects to place emphasis where you want it.
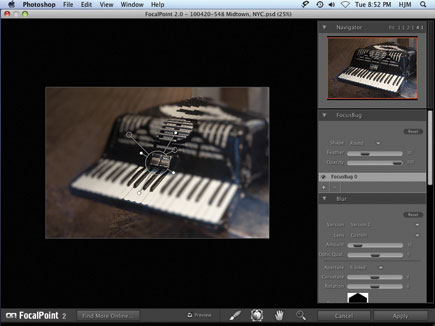
1. To work on an image first open it in Photoshop. Next, from the menu bar choose File>Automate>FocalPoint 2. The FocalPoint 2 window opens and takes over your screen, with Photoshop still open behind it. You see that a default setting has kept the center of the image sharp while blurring the rest. If you move your cursor into the image area, an unusually shaped critter appears in the center of the sharp focus area. This is called the FocusBug and is used to control where you want sharpness, as well as other parameters.
 |
|
|
2. Go to the FocusBug panel at the upper right below the Navigator. To choose the shape of the area that will remain sharp, go to Shape and click on the down arrow in the center of the panel to choose either Round or Planar. According to onOne, Round is most commonly used to simulate lens effects while Planar can echo the tilt-shift focus controls possible with a view camera. For this example I chose Round.
 |
|
|
3. Next, I click inside the large center circle and drag to reposition the FocusBug over the area I want to keep in sharp focus, the “sweet spot.” Then I pull and turn the four “legs” of the FocusBug (the four shortest protrusions that terminate in solid white circles) to adjust the size, shape, and angle of the sweet spot as indicated by the grid seen here—it appears while you drag. For this accordion, I move the FocusBug to an oblique angle to follow the position of the instrument.
 |
|
|
4. Get out your magnifying glass to closely examine the anatomy of the FocusBug. The two longer protrusions on the FocusBug are called antennas. Adjust the length of the right antenna to control the amount of blur. Then twist the angle of this right antenna (clockwise or counterclockwise) to control the amount of feathering or how soft the edge of the sweet spot is.
Now, move to the left antenna, which controls the vignette effect. Push the antenna in toward the center or pull it out to change the midpoint of a vignette you want to add. Twist this left antenna clockwise or counterclockwise to control the brightness or darkness of the vignette. You can also adjust these parameters through panels.
 |
|
|
5. The previous image shows what the actual mask looks like behind the FocusBug. To see the mask, go to the FocusBrush panel seen here and select the Show Mask button. Sometimes this is an easier way to see how much feathering is appropriate, and to see if the area of focus is the shape and angle that you want. When you have finished reviewing the mask, return to the regular FocalPoint 2 window by clicking the Hide Mask button (which is what the Show Mask button changes to when a mask is displayed).
Note that this panel also offers the possibility of painting in focus (or blur) via the FocusBrush. Further, you’ll find check boxes to control brush size and opacity through a Wacom graphics tablet.
 |
|
|
6. To further add emphasis and graphic interest to this static subject, I chose to envelop the accordion in a dark vignette. With FocalPoint 2, you can create either a light or dark effect, to best complement each photograph.
 |
|
|
In the Vignette panel at the lower right, set the Lightness slider to less than 50 for a dark vignette, greater than 50 for a light vignette. The Midpoint slider controls the size of the vignette. Here I left it at 50, then set the Lightness slider to 18 and checked “Vignette Follows FocusBug.”
7. Here is the final image as refined via FocalPoint 2. Selective focus leads your eye to the center area of the keyboard and front panel, which remain sharp and clearly defined while the rest of the image fades into a lovely softness, as if the photo had been taken with a very old lens in a bygone era.
 |
|
|
8. Once you’ve found the look you like, click the Apply button at the lower right and FocalPoint 2 processes the effects. This can take 10 or more seconds even on a fast machine for a high-resolution photo. When completed, the adjusted photo opens in Photoshop with the FocalPoint 2 effects conveniently placed on their own layer named FocalPoint above your original in the Photoshop Layers panel.
 |
|
|
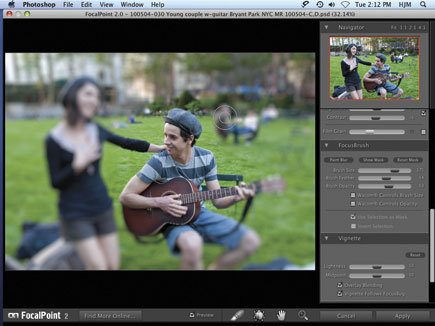
9. Selective focus effects can be useful with portraits and with any subject in front of a cluttered background. I came across this couple recently in New York’s Bryant Park and thought I had time traveled back to see Bob Dylan in the Village in the 1960s.
 |
|
|
10. Enlisting the aid of FocalPoint 2, I try both the Planar and Round options and settle on Round, rendering only the young man and his guitar sharply. However, some people in the right background remain obtrusively in focus. The solution—use the FocusBrush panel to paint with blur. After several brush strokes, I soft focus them into oblivion, as shown here.
 |
|
|
11. The effect is not quite right, yet, though. The adoring listener had been totally defocused by my original blur. Going back to the FocusBrush panel, this time I select Paint Focus and brush over her face a couple of times to bring back detail there.
 |
|
|
|
| |||||||||
- Log in or register to post comments


![]()
Get the Latest Photo Tips, News & Reviews from Shutterbug!
| Camera Reviews Other Reviews | Mobile Reviews Photography Reviews Columns | News | Features | How-To | Resources |
 © 2024 Shutterbug
AVTech Media Americas Inc., USA
All rights reserved