- REVIEWS
Camera Reviews 
More Reviews Mobile Reviews Photography Reviews - GALLERIES
- VIDEOS
- BUYER'S GUIDES
Monochrome Conversions: RGB To Monochrome: The Case For Shooting Raw
We live in a world of color. Rendering a multicolored scene in monochrome, or as “black and white” (in quotes because that label is a misnomer), is a paradox. Back in the old film days, the difference between shooting color and shooting black and white was explained like this: amateurs begin with black and white, graduate to color, and when they really understand their art, go back to black and white. I subscribe to that theory, and that’s why my mission today is to warn you to never let your camera create monochrome images for you.

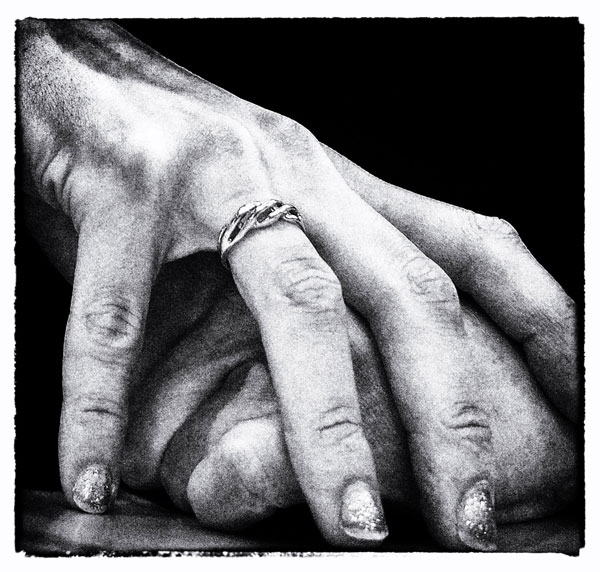
All Photos © Jon Sienkiewicz

I know that it’s tempting. Most D-SLRs and even advanced point-and-shoots have a Scene setting or some other feature that allows you to record the original image in monochrome. I’ll admit that I’ve fallen prey to the lure of simplicity, but in my own defense I assert that I do it only when the camera can bracket monochrome and color images with a single shot—as in the case of my Ricoh GR or Olympus OM-D. Although I admit that even then it’s wrong. Or at least lazy.


Color To B&W
What is the best way to shoot in black and white? Start with as much color information as possible. There’s one format that does not compress the image files, allows for 16-bit (which affords more information), and allows for conversion of colors to tonal values. In other words, shoot in Raw and make your adjustments to the color data. There are several ways to do this. Here are some of them:
1) Use the Raw converter that came with your camera. All manufacturers of cameras that can shoot Raw provide a Raw converter, some excellent and some not so. Try it before moving on to another option. Conversion applications like Silkypix, Canon’s Digital Photo Professional (DPP), and Nikon’s ViewNX2 have loyal followers, and for good reason. They are free, capable of handling virtually any conversion chore, and, once learned, are easy to use.

2) Use an aftermarket Raw converter like Apple’s Aperture, Corel’s AfterShot Pro (formerly Bibble Pro), Phase One’s Capture One, DxO’s Optics Pro, or Adobe’s Lightroom. Ask a group of photographers which program is the best and you’re in for an argument. The best, of course, is the one that produces the results you want most often, is powerful enough for your future needs, and fits your budget.
3) Use the Adobe Camera Raw (ACR) feature of Photoshop.

Workflow
Because all the B&W color to tone converter tools work in essentially the same fashion I’ll use the last in my list to show you how simple and effective the technique can be.
1) Open the Raw image in ACR. Under the Basic tab, make whatever corrections might be necessary. Then move to the HSL/Grayscale tab and click the Convert to Grayscale box.
2) Beneath the Grayscale Mix header you’ll find eight sliders that correspond to the visible spectrum. Begin at either Auto or Default (I prefer Default because it sets every slider to zero) and adjust the sliders until you achieve the results you’re after. If you’re new to this, make bold adjustments so you can more easily see the results. As you gain experience, move the sliders in smaller increments.
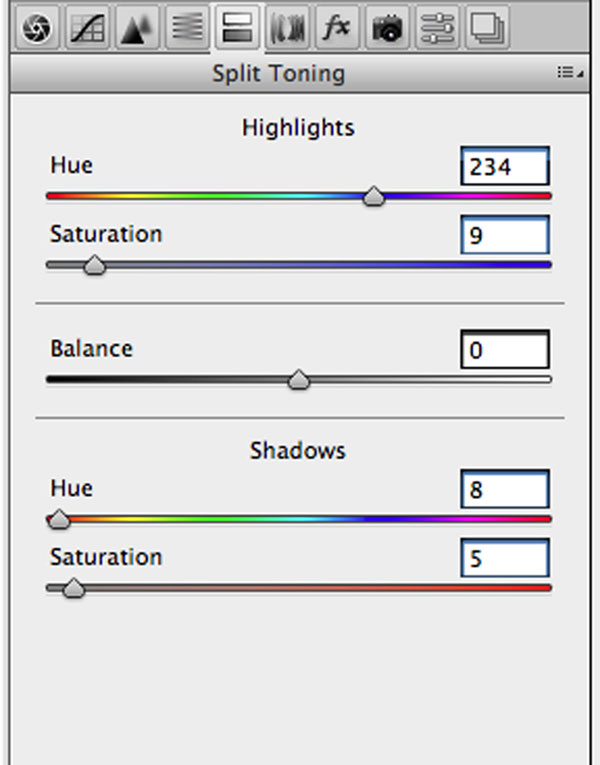
3) When you’ve achieved the look you want, you can do more fine-tuning to the coolness or warmth of the image by opening the Split Toning tab and adjusting the highlights and shadows separately. First select a Hue and then slowly increase the Saturation as you like. Move in small steps and keep the adjustment minimal, otherwise the image will take on an overall toned appearance. By tweaking the Split Toning sliders you can make that monochrome pop.
Tip: You can also open the Tone Curve tab and adjust the Highlights, Lights, Darks, and Shadows separately. This step can be used instead of the Grayscale Mix tab, after that step, or omitted altogether.
What About DNG?
Although all contain just about the same data, the architecture of Raw format files differs from manufacturer to manufacturer. Consequently, software that can process one format may not be able to process another brand’s. Additionally, camera makers alter their formats from time to time, further mucking things up. To provide cross-platform compatibility and to assure that Raw files shot today can be processed in the future, the DNG (Digital Negative) format was born. Adobe provides a converter that quickly converts virtually any Raw format to DNG. And a few manufacturers, including Leica, Pentax, Ricoh, and Samsung, offer DNG as the native Raw format created directly in the camera.
- Log in or register to post comments


![]()
Get the Latest Photo Tips, News & Reviews from Shutterbug!
| Camera Reviews Other Reviews | Mobile Reviews Photography Reviews Columns | News | Features | How-To | Resources |
 © 2024 Shutterbug
AVTech Media Americas Inc., USA
All rights reserved