- REVIEWS
Camera Reviews 
More Reviews Mobile Reviews Photography Reviews - GALLERIES
- VIDEOS
- BUYER'S GUIDES
The MK Gem eBox; A Self-Contained Box For Small Product Lighting
 I
'm always looking for new solutions to light small things. Change that.
I'm always looking for easier and faster solutions to light small things.
Let's face it: lighting tabletops is never easy, although you'd
think it should be. And sometimes, formulaic lighting is exactly what's
needed. Then along comes the Gem eBox, from MK Digital Direct. Diminutive in
size, it's a self-contained box with the lights built-in. Would this be
the answer?
I
'm always looking for new solutions to light small things. Change that.
I'm always looking for easier and faster solutions to light small things.
Let's face it: lighting tabletops is never easy, although you'd
think it should be. And sometimes, formulaic lighting is exactly what's
needed. Then along comes the Gem eBox, from MK Digital Direct. Diminutive in
size, it's a self-contained box with the lights built-in. Would this be
the answer?
OK. I know what you're saying, it's small. The Gem eBox, as the
name implies, was originally designed for gems and jewelry. But I've been
able to do much more with it, fitting things in it as large as small glass sculptures
and porcelain miniatures, even a portable CD player.
What's really sweet is that it's pre-constructed--nothing to
put together or take apart, and because it's small and lightweight, it
stows away on a closet shelf. The only thing missing is a vinyl cover, to keep
dust out.
On the downside, it is pricey--just under $500. Will I get my money's
worth, you ask? I'd have to sell an awful lot of stuff on the Internet
to make it pay for itself. That's true, but if you're continuously
putting new (or used) stuff out there for sale, then the Gem eBox may be the
ticket to a modest fortune.
Outside The Box
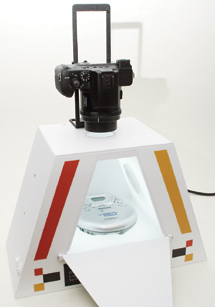
The Gem eBox is almost totally enclosed. Upon first glance, it looks rather
odd, with its trapezoidal shape largely reminiscent of an Aztec or Mayan pyramid
(if you squint from a distance, with the sun in your eyes, that is). The sides
slope outward toward the bottom to form a base that is about 15" wide
by 7.5" deep, from a height of nearly 10.5", narrowing to 8"
at the top. At the apex is where you'll find an opening through which
the camera lens peers. Fitted to the roof of this enclosure is a sturdy bracket
(or you can leave it off), which holds the camera centered over that aperture.
You're probably saying, but the tripod thread at the bottom of my camera
is not centered. No problem. The bracket is designed to allow for that, as well
as for the camera's zoom lens, by the use of various adjustments. What's
missing is a spirit level to help with alignment, so you'll have to eyeball
that.
The front panel, aside from giving you access to the interior, affords an alternative
viewpoint, which proved very handy. While it's obviously best to mount
the camera on a tabletop or full-size tripod with this approach, you could always
pile some books underneath the camera and use that as a raised shooting stage--especially
if the camera doesn't have a tripod thread. The box can readily be moved
into position in front of the lens, often more easily than moving the camera.
I found myself doing this often.
The bracket is designed for point-and-shoot cameras. In use, I've attached
something as large as a 12x zoom Panasonic Lumix, which just fit over the opening.
If the lens were any wider in diameter this would not have worked.
Moving to the next level, I've also managed to employ my Canon EOS 20D,
but not with the bracket. For overhead views with this SLR, I used a Benbo tripod,
mounting the camera to a three-way pan head attached to the end of the cantilevered
centerpost. In this instance, my lens of choice was a 28-105mm zoom, with extension
tube. The EOS 20D combo also figured prominently when photographing from the
front, from an elevated level.
...And Inside
The interior of the box is a milk-white Plexiglas-like material, on each side,
top and bottom, except inside the access panel, which is white-surfaced to reflect
back light. You may also notice two fans built into the back of the unit. That's
to prevent the interior from overheating.
There are two forms of lighting built into the unit--fluorescent and halogen.
While there isn't that much heat build-up with fluorescents, halogen bulbs
do generate considerable heat. You would not want to photograph any food with
the halogen lighting, fans notwithstanding. Also, I strongly caution against
using paper or fabric or anything flammable or delicate anywhere inside the
box when employing the hot lights. You can add paper or fabric backdrops or
diffusers with the fluorescent lighting, provided you keep an eye on things--just
in case the heat builds up.
The Built-In Lighting: A Closer Look
The idea behind a closed lighting system is to eliminate unwanted reflections
from jewelry, glassware, porcelain, and metallic objects--in essence, anything
shiny. That said, you might have to contend with some reflections when shooting
through the access panel. And the lens at the top might also show up. But in
practice, neither situation presented itself, or at least not to the point of
ruining the picture.
So, why the trapezoidal shape? The sloping sides contain lights, which are angled
downward toward the subject, somewhat reminiscent of copy stand lighting. Each
side holds one light of each type (halogen and fluorescent), while the base
adds one more fluorescent tube for wraparound lighting. All bulbs/tubes are
turned on or off together, with no dimmers. As for when exactly to use these
two lighting systems, read on...
Halogen lighting. The manufacturers recommend this lighting for gems and jewelry.
This flicker-free light comes in at the subject from both sides. Stated color
temperature is 3200K (suitable for tungsten-balanced film or tungsten white
balance with digital).
Fluorescent lighting. This softer, nondirectional light is supposed to simulate
natural daylight, with a stated color temperature of 6500K, which puts it on
the cool side. This is also a flicker-free, continuous light source. The manufacturer
further notes that the fluorescent tube in the bottom extends in all directions,
in a "D" configuration, and it is big enough to cover the entire
platform. The fluorescent tubes inside the side panels are vertical.
Case Studies
After preliminary tests (plus color meter readings), I found it easier to simply
use custom white balance than to try to figure out which white balance preset
worked best with which camera, especially since I was working with several cameras.
Still, I had to tweak color balance, along with contrast, within Photoshop in
each case, selectively boosting saturation to a small degree, where needed.
Also, it was very important to make my exposures for the subject, not the background.
I allowed the white backdrop to go slightly gray in order to retain the richness
of color and the character of each subject. The Canon EOS 20D was used for all
shots.
|
| |||||||||
- Log in or register to post comments


![]()
Get the Latest Photo Tips, News & Reviews from Shutterbug!
| Camera Reviews Other Reviews | Mobile Reviews Photography Reviews Columns | News | Features | How-To | Resources |
 © 2024 Shutterbug
AVTech Media Americas Inc., USA
All rights reserved