| |
Photos
© 1999, Monte Zuker, All Rights Reserved
|
|
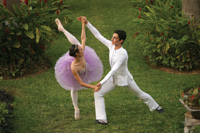
In our first installment,
Monte shared some of his exciting posing and lighting secrets on his
trip to Mexico. We continue with more lighting tips...
When The Background
Outside Is Important, Match The Light On The Subjects To The Light On
The Background
It was a gorgeous day outside. The trees and the sky seemed perfect.
So, to keep the color in the background I set the camera for "sunny
16," the usual exposure for ISO 100. Then, I set the camera to
manual, using my digital Quantum flash above and close to the lens.
With subjects facing in opposite directions I usually keep my flash
close to center. Quantum's digital accessories allow me to tell
my flash to expose anywhere, from three f/stops below the ambient light
to three f/stops over. In this case I set the flash to read one f/stop
above, brightening my subjects to match the outside light.
|
|
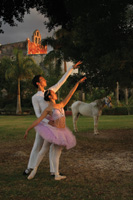
When looking at the final results
I felt that the dark, cloudless sky actually detracted from the photograph.
So, I selected one of my sunny, fluffy clouds to keep up the white of
the costumes the dancers were wearing. To eliminate the sky I used Select/Color
Range. With a few clicks of my pen (I'm now using Wacom's
Cintiq tablet) I selected the sky on a separate layer, went to the Clear
key on my Mac and eliminated the blue sky. With Select/Color Range you
can pick up all the small areas in between leaves, etc. Of course, at
the same time you may pick up other areas in the picture that you do not
want to select. However, you can cut those areas out of the selection
by choosing and eliminating them (using the Option key on a Mac). I then
used the Move tool to move the image of the dancers on top of the puffy
white clouds and kept moving it around until I filled the area with the
clouds. Of course, I again changed the blue inside of the archway with
Image/Adjust/Hue/Saturation.
|
|
Let The Sun Shine In!
I kept telling everyone, "Blend the clothing with the background,
then the subject jumps out at you." Sometimes, however, the background
makes the photograph, as it does in this picture. With the costume this
dancer was wearing I needed to find something equally dramatic. One of
the photographers partaking in The Yucatán Photographic Experience
pointed out the small bandstand by the pool. It seemed perfect! But there
was no light in it. It was completely in the shade.
Taking an idea from the past, I had one of the photographers hold my Westcott
reflector out in the sun and throw the light back into the area in which
I placed my subject. It was perfect! I first photographed from the same
level as my model, then went into the empty pool in front of him and photographed
from below--it added so much drama from that viewpoint. Here's
a photograph of exactly how the picture was made.
|
|
Take Advantage Of The
"Sweet Light"...Just Before Sunset
Toward the end of one day's shooting at the hacienda Michele called
us out to see the sweet light just before darkness. I came out the front
door and looked at our models below the staircase--what an incredible
viewpoint! I went from below the ground (inside the pool) to way above
the ground, photographing down to my subjects. The background was simplified
to just the grass around them. There was backlighting all around the couple
from the open areas that surrounded them.
The parallel lines formed by their arms and legs worked beautifully. I
cropped in close to them this time, filling the entire area with the models.
The background only needed to be darkened in the corners of the picture.
This time I set the white balance for "shade." This warmed
up all of the photographs, making them appear even warmer light than existed.
|
|
One Last Shot
A final photograph just before the sun went below the horizon was created
when I saw the sun's golden rays hitting an area below and simultaneously
hitting the top of the chapel above. I simply posed the couple again,
so that their faces and arms would catch the last rays of sunlight.
The chapel in the upper left corner of the picture, however, appeared
a little too light and washed out in the final photograph. I selected
that area of the picture using the Magnetic tool; eliminated the rest
of the picture by selecting Inverse/Clear and then layered the remaining
area on top of the original picture in the "Multiply" mode.
It intensified the color to match the glow on the dancers.
|
|
The Group Shot
Each day I photographed the photographers in the class in the environment
in which we were working. With my camera set to a 20-second delay I placed
it on top of my Manfrotto Carbon One 443 tripod (it's lightweight,
sturdy, and indispensable). I switched to my 17-35mm wide angle lens,
but kept the camera close to the group so that we would not be dwarfed
by the monastery behind us. The picture was the end of a perfect day,
but only the beginning of a lifetime of useful photographic help for everyone
there--including me!
Remember to join me later this
year for a photographic adventure in Alaska! For more information, visit
www.photographycruise.com.
|