- REVIEWS
Camera Reviews 
More Reviews Mobile Reviews Photography Reviews - GALLERIES
- VIDEOS
- BUYER'S GUIDES
Making One Light Two
Get The Main And Fill From One Source Page 2
The color of light is probably the least considered of the four factors, but a basic understanding of it is crucial to producing quality work. Film shooters know that they must use the proper film for the given lighting conditions, e.g., daylight-balanced film for flash and daylight, and tungsten film for incandescent light. While the color of daylight varies widely with time of day and location, that's beyond the scope of this article. Digital shooters can either opt to go with "auto" white balance or choose from some built-in settings for various lighting situations. A "custom" white balance can also be chosen to ensure optimum results.
Big Light Sources
With that basic lighting primer out of the way, we can now look at the subject
of this article--big light sources--with a better understanding. For
the last 15 years or so, using big softboxes as light modifiers has been in
vogue. I believe the change in lighting from small, parabolic light sources
to much bigger light sources can be traced to one person: Dean Collins. He was
instrumental in teaching photographers the benefits of large light sources,
from big softboxes to large panels of fabric to aim lights through. As a bright
guy and an entertaining speaker, Collins attracted huge crowds to hear his message.
There were two big points: 1) the larger the light source in relation to the
subject, the softer the light and 2) the softer the light, the more gradual
the transition from highlight to shadow area. In general, this means a much
more flattering light for the subject.
 |
|
|
Now just about every photographer
uses softboxes of one fashion or another; trying to find a photographer using
parabolic light sources (not that that's a bad thing) is difficult. To
take a closer look at why the light from such big boxes is so popular, let's
see just how they work.
Basic portrait lighting has traditionally used a "fill" light to
lessen the harshness of the shadows from the main light. Indeed, the relationship
or "ratio" of the main light to the fill light determined just how
dark or how bright the shadows would be. If the main and fill light were equal,
there would be no shadows. If the main light had twice the power of the fill,
shadows would be distinct. The greater the difference between the light output
of the main and fill light, the deeper the shadows. But the shadows were still
well defined since the main light was coming from a relatively small light source.
The transition from shadow to highlight was relatively abrupt.
Now let's look at the way most current portrait photographers use their
softbox for lighting. I use a 4x6 Larson softbox, a very popular model among
portrait photographers since its output from edge to center and back to the
other edge is consistent. By that I mean the center is not brighter than the
edges, which is how some softboxes are designed, and that also has its uses.
I use the box horizontally on my light source and keep my subject toward the
"back end" of it. Using it in this manner creates a light that thinks
it's two lights!
The light from the softbox that's closest to my subject is the "main"
light. But all that other light--that from the forward part of the softbox--is
creating not only its own fill but also a gradual transition from highlight
to shadow area. This is what's known as "wraparound" light
since the light source literally wraps itself around the subject. A large light
source (relative to the subject) is how this effect is achieved. In effect,
the big light source becomes both the main and fill light! Many times I'll
use the big box solo and just add a reflector for an accent without destroying
the lighting pattern. If you are currently using small light sources and want
to achieve a different look, give this a try.
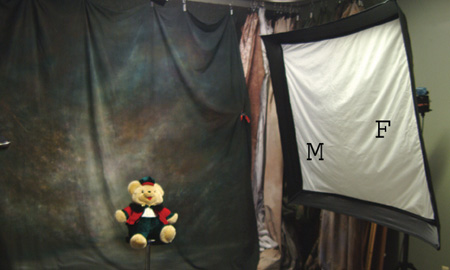
Softbox Subject Placement
The enclosed photo shows my Larson 4x6 softbox and where I place it
relative to my subject. You can see I use the "back end" of the
light as the main light and the part of the light closest to the camera acts
as its own fill. Note that with the light and subject in this position I will
create a "loop" lighting pattern with a triangular highlight on
the shadow side of the face. If I were to move my subject to the center of the
softbox a "split" light would be created. Placing the light behind
and either above or to the side of the subject would create a profile light.
The reason this particular softbox is so popular with portrait photographers
is because the output from edge to edge is consistent. I measured the light
from one edge, then the center, then the other edge, and the light output varied
by less than 2/10 of a stop! If the center was stronger, it would destroy the
lighting concepts I noted earlier because the light would not drop off but be
stronger or the same, depending upon the distance of the light and how it is
aimed.
The photo above shows "M" for the main light and "F"
for the fill. Please note I am not receiving any consideration from Larson--it's
just what I use.
And for more photo tips, sign up for my free newsletter by e-mailing: steve@stevebedell.com.
|
| |||||||||
- Log in or register to post comments


![]()
Get the Latest Photo Tips, News & Reviews from Shutterbug!
| Camera Reviews Other Reviews | Mobile Reviews Photography Reviews Columns | News | Features | How-To | Resources |
 © 2024 Shutterbug
AVTech Media Americas Inc., USA
All rights reserved