- REVIEWS
Camera Reviews 
More Reviews Mobile Reviews Photography Reviews - GALLERIES
- VIDEOS
- BUYER'S GUIDES
Making Digital Contact Sheets From Negatives; A Hybrid Solution For The Film/Digital Photographer Page 2
Step 4 |
|
 |
|
|
|
 |
Tweaking And Examining
Once you have the image in Photoshop you can adjust the contrast and color in
the usual ways. You may find, as I do, that part of the scanned image is too
light, probably due to uneven output from the light box. Simply select that
part in Photoshop and darken it. You can compensate for individual differences
in image density, within certain limits, by selecting that image or images with
the rectangular selection tool and changing levels, contrast, brightness, or
color balance. In more extreme cases, you may have to rescan, or simply scan
the individual frames on your film/slide scanner, which will make the adjustment
automatically.
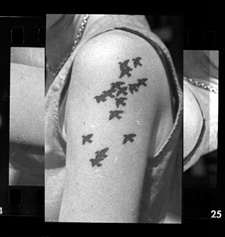
Now comes the beauty part. At 300dpi you can enlarge the contact sheet in Photoshop
(Cntrl/Command - = [PC/Mac]) to examine any particular image. Here frame #8
(above) is enlarged from the contact sheet. Images will stay sharp up to half-screen
magnification, and you'll see more than you would with a loupe on a paper
contact sheet.
Changing Orientation Of Individual Frames
If you want to change the orientation of a particular frame, select it using
the rectangular selection tool; copy it; then open a new file in Photoshop Cntrl/Command
- N) and paste. It will open to the same size as the image you've copied.
Then choose Rotate Canvas under the Image menu, and select 90Þ CW (clockwise--or
90Þ CCW, if you're left handed or took the picture with the left
side of the frame up). Then copy this and paste it back on your contact sheet.
You may have to move it around a bit so it won't cover up any other image.
When you have it correctly positioned, select Flatten Image from the Layers
menu then save.
Labeling
Now that you have your contact sheet, you can mark it up. Type in any label
you wish using the Type tool. To check off or circle your favorite shots, choose
the brush tool on the Photoshop menu, and, if necessary, set the brush size
to something convenient (Brushes palette). Click on the foreground color to
choose one that will contrast with the background of your contact sheet. You
can check those images you wish to scan, then cross-check those that you've
done.
You can, of course, print out your contact sheet--or any enlarged part
thereof. And of course, you can e-mail it in whole or in part (down to an individual
frame--very readable) to editors, models, and friends.
 |
|
 |
|
 |
|
|
Slides, Too
Naturally, the same approach will work with a page of slides. You may find it
more convenient to have digital files of your slides cataloged and stored on
your computer, rather than leafing through looseleaf pages in your slide files.
For slides or unmounted transparencies, set the scanner to color positive. I
find that 20 slides mounted on a page will come out quite sharp when scanned
on a flat-bed scanner, despite the thickness of the mount and sleeve.
One of my favorite benefits of making digital contact sheets or slide images
is the ease of creating proofs for e-mailing without separate scanning. Simply
select the images you want to display and copy. Then open a new Photoshop document--it
will open to the size of your copied image--and paste. Tweak as necessary,
then save. Take it down to a 72dpi JPEG at medium quality for e-mailing.
Joel Simpson (www.joelsimpsonphoto.com) lives in New Jersey and photographs mainly nature and rather surreal body projections, which he exhibits in New York galleries. He is the founder of Positive Focus Reviews, the first major portfolio review event held in New York City in April, 2004.
|
| |||||||||
- Log in or register to post comments


![]()
Get the Latest Photo Tips, News & Reviews from Shutterbug!
| Camera Reviews Other Reviews | Mobile Reviews Photography Reviews Columns | News | Features | How-To | Resources |
 © 2024 Shutterbug
AVTech Media Americas Inc., USA
All rights reserved