| |
Photographed
in the late afternoon in the shade, this Buddha statue
in Bangkok, Thailand, maintains its magnificent golden
glow. (Canon EOS 1N, Canon 50mm f/1.4 lens, Kodak Elite
Chrome 200.)
Photos © 1999, Rick Sammon, All Rights Reserved
|
|
Many amateur photographers
have a simple remedy for shooting in low-light conditions--they turn
on their flash units and blast the hell out of a scene or subject. Well,
that technique sure is effective. For a more pleasing and more creative
picture, however, there are several other tips, tricks, and techniques--as
well as a few accessories--that you can use when light levels get low.
Let's take a look.
Fast Film. When you take a picture with a traditional camera (not a
digital camera), you are basically recording light on film (a piece
of celluloid coated on one side with a light-sensitive material that
is suspended in gelatin). When the film is processed, the latent image
comes to life, and, presto, you have a picture.
As the film's speed increases, from ISO 100 to 200 to 400 to 800
etc., its sensitivity to light also increases. So, in dim lighting conditions,
you want to shoot with a fast film. An easy rule of thumb is this: the
lower the light, the faster the film. (If you want to know where the
expression "rule of thumb" comes from, drop me an e-mail
at RickSammon@aol.com)
|
| |
A
small f/stop (f/16) was used in this low-light situation
to get all the Buddha statues in sharp focus. A tripod was
used to steady the camera during a relatively long exposure
(1/15 of a sec). (Canon EOS 1N, Canon 24mm f/2.8 lens, Kodak
Elite Chrome 200.)
|
|
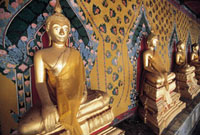
Low-light shooting usually
falls into two categories: natural light (daylight) and artificial light
(light from bulbs and lamps). First, let's take a look at natural
light shooting--the kind of light you might encounter in your house on
a sunny day, in a bright building, in the shade, outdoors in the early
morning or late afternoon, and so on.
Today, color print film (technically called color negative film) photographers
are using ISO 800 films in low light with good results--much better results,
in fact, compared to the ISO 400 films of several years ago. That's
due to advancements in film technology that would take another article
to explain. Simply put: pictures are sharper, contrast is better, and
colors are brighter with the new generation of ISO 800 films. Keep in
mind, however, that color, contrast, and grain differ from film to film--as
well as from speed to speed. So, before you pass final judgment on a film,
do a comparison test and see which film best meets your needs.
Slide film shooters, like me, are using new ISO 200 slide films for the
same reason: better color, contrast, and grain. But there is another important
factor that makes these new ISO 200 slide films a good choice for low-light
shooting--their pushability. This new generation of slide films can be
"pushed" (exposed at a higher ISO setting) to one, two, and
three stops with good results--eliminating the need to pack a bunch of
different films in a camera bag, or when a faster film is not readily
available.
|
| |
Bouncing
the light off the ceiling of this Thai performer's
dressing room produced a very soft and flattering effect.
(Canon EOS 1N, Canon 17-35mm f/2.8, Kodak Elite Chrome 200.)
|
|
If you are not familiar with
"pushing" a film, here's a general guideline: First,
check with your film's manufacturer (the web is a good source of
information) about "pushing," which basically means exposing
a film at a higher ISO setting and then having it processed for that setting.
Here's why it's very important to know a film's "push"
capabilities. A one stop "push" for one manufacturer's
ISO 200 film may be to expose the film at ISO 400; another's may
be ISO 320 (as is the case with Kodak's Elite Chrome 200 film).
Also, some films have not-so-well-known "pushing" requirements.
For example, did you know that you can shoot Kodachrome 200 at ISO 500?
That's a 11/3 stop push--and the only push that's commercially
available for this film.
Now that we've discussed natural light shooting, here's some
advice on what to do when the lights are turned on. First, it's
important to realize that the color temperature of the light changes.
This change would affect the color/tint of your picture if you used daylight-balanced
film, which I assume most of you use.
Color print shooters don't have that much to worry about when shooting
in scenes illuminated by incandescent bulbs (the kind in most table lamps)
because the colors in prints can be corrected somewhat in the lab. If
you don't like the "warmer" color/tint, take your prints
back to the processor for a remake. Your color/tint may not be perfect,
but it can be improved.
Slide film shooters have to worry because the color in slides cannot be
color corrected in the lab at the time of processing--under standard processing
conditions. When shooting a scene or subject that's illuminated
by incandescent light bulbs, slide film shooters need to use tungsten
film (ISO 160 that can be pushed to ISO 320), or an 80B filter, which
balances the light. Serious color print shooters, of course, can use an
80B filter, too, for better color.
|
| |
A
combination of flash and natural light was used to illuminate
this Thai dancer. To prevent the dancer from being "washed
out," I reduced the flash output by 11/3 stops. (Canon
EOS 1N, Canon 70-200mm f/2.8 lens, Canon 540 EZ flash, Kodak
Elite Chrome 200.)
|
|
Things get more complicated
for slide shooters (and color print shooters to a lesser degree) when
shooting under fluorescent lamps because there are several type of fluorescent
lamps, and each requires its own type of filtration. Mixed lighting is
a problem, too.
There are lots of Color Correction (CC) filters around to ensure good
color in a photograph when taking pictures under fluorescent lamps. To
find out which filter to use, CC charts are available from major film
manufacturers. For best results, use a color meter (Minolta makes a nice
one), which measures the color temperature of the light and recommends
a filter (or filters) and exposure compensation.
Another idea for getting good and better color is to get your picture
into the digital darkroom, where you can fine-tune your images in imaging
programs like Adobe Photoshop with relative ease.
Fast Lens. Camera and independent lens manufacturers
offer what pros and advanced amateurs call "fast" lenses.
Fast lenses, usually f/1.4, f/1.8, or f/2.8, allow more light (at the
maximum aperture) into the camera than slower lenses--f/3.5, f/4.5, and
so on. As the light level reaching the film increases, the shutter speed
at which you can shoot also increases. With a fast shutter speed, you
get less camera shake and fewer blurry pictures. So for low-light shooting,
a fast lens is a big asset.
|
| |
Is
this picture of a statue in a Hindu temple in Singapore
a flash or natural light shot? Actually, it's both.
I use my flash to add just a touch of light, color, and
detail to the scene. (Canon EOS 1N, 17-35mm f/2.8 lens,
Canon 540 EZ flash, Kodak Elite Chrome 200.)
|
|
Camera Support. I
usually like to travel light and leave my tripod at home. When I know
I'm going to be shooting in low light, however, my tripod is an
essential part of my shooting gear.
I use the tripod to steady my camera when I need to shoot at a shutter
speed slower than the focal length of the lens, which is the basic rule
for hand holding a lens. (For example, I don't hand hold a 200mm
lens at a shutter speed below 1/200 of a sec.)
When I am using a tripod something interesting happens. I find myself
slowing down and looking at the scene in the viewfinder in more detail.
It's a Zen thing.
Other camera supports I use in low light include a bean bag, mini-tripod,
and a convenient wall--a camera support that is often overlooked.
One thing to remember when shooting color film in low light is something
called reciprocity failure, which is basically the film's failure
to reproduce accurate colors. This can and usually happens during long
exposures, but it can be corrected with filters. Every film "fails"
at a different slow shutter speed, so check with your film's manufacturer
about how to avoid disappointment.
Fill Flash. At the beginning of this article I mentioned
blasting a subject with a flash in low light. (I was not speaking of shooting
in total darkness, which may be necessary.)
|
| |
This
statue in a Singapore temple illustrates the beautiful soft
effect created by indirect lighting. (Canon EOS 1N, Canon
24mm f/2.8 lens, Kodak Elite Chrome 200.)
|
|
In low light a better approach
is to reduce the flash output, which is possible on many of today's
accessory flash units while shooting in the TTL (Through The Lens) automatic
exposure mode.
In low-light situations, while in the TTL mode, I usually reduce the output
of my flash by 1 stop or 11/3 stops. This reduction in flash output produces
a very natural looking picture--without harsh shadows and without washing
out highlights on the subject. I use this technique only when the natural
light level is high enough for a natural light exposure. If it were not
high enough, using this technique would produce an underexposed picture.
Therefore, when the light level is too low, I use my flash at full power.
Usually...and here's why. When I'm photographing a person
in near or total darkness, if my subject does not fill the frame, I reduce
the flash output. Otherwise, the subject would most likely be overexposed
because the flash exposure system would "think" that the entire
frame (including the area behind my subject) needs to be illuminated.
The result would be an overexposed subject.
I shoot on full power, again in the TTL mode, when the subject fills the
frame, and I remember the photo adage, "The name of the game is
to fill the frame."
Remember to fill the frame in TTL flash photography and you'll virtually
be guaranteed of a properly exposed picture. Exceptions are when your
subject is bright white, very dark, or highly reflective. In these situations,
I'd recommend taking exposures over and under the recommended setting
to ensure the results you want. (I do this anyway, in all situations,
to make sure I get a good shot.)
My closing thought on low-light photography is to look at it not only
as a challenge, but as an opportunity to put your creative talents to
work.
|