| |
1
Photos © 2003, Ben Clay, All Rights Reserved
|
|
Photographing highly reflective
objects can be one of the most challenging tasks a product photographer
can face. Simply trying to control and modify the reflections that show
up can prove to be daunting. However, once you know how to modify these,
getting professional results may be a lot easier than you might have
thought.
Straight Shot
I first took a shot with a point-and-shoot camera with flash for comparison
purposes (#1).
|
|
The result reveals the common
effects from this type of lighting. The camera has rendered a decent exposure
of the teapot, but there are several reasons as to why this image is less
than professional looking. First are the distracting reflections. Since
the teapot is highly reflective, it mirrors everything in the room including
windows, a table, and three separate reflections of the camera flash.
The flash also creates a hard-edged, unnatural looking shadow on the table
and flattens out the perspective of the teapot considerably.
|
|
Lighting Setup
I brought the teapot into a small office space with white walls and set
up a simple lighting set. I placed two sawhorses near the corner of the
room and placed a sheet of white foamcore in the corner to create a little
pocket of white reflective surfaces (the foamcore and the two intersecting
walls). I then brought in a Photoflex Small Starlite Kit and positioned
it close to the left side of the teapot. Finally, I mounted an Olympus
E-20N digital camera to a tripod in a vertical position and dialed in
some custom settings.
I first set the exposure mode to Manual, the focusing mode to MF, the
ISO to its lowest setting (80), and the Record Mode (resolution) to TIFF.
I then created a custom white balance setting to match the color temperature
of the Starlite Kit (3200K). I set the aperture to f/8 to get an adequate
depth of field, set the shutter speed to 1/30 sec, focused and took #2
and #3.
|
|
The result shows an improvement
over the last shot, but the reflections of the foamcore, the SilverDome
softbox, and even the silver legs of the tripod are still quite obvious.
Since the teapot was black, I decided to see if I could minimize the effects
of the reflections by using black foamcore instead of white. I made the
switch, re-focused the camera, slowed the shutter speed to 1/20 sec to
lighten the overall exposure, and took #4 and #5.
|
|
Another Approach
Again, the result shows a marked improvement, but transition between the
reflection of the foamcore and the reflection on the back wall/ceiling
is still sharply defined. Instead, I thought of a different approach.
Rather than placing the teapot on a large sheet of foamcore, I decided
to create a makeshift pedestal for the teapot that would not render any
reflections. I cut out two small circular pieces of foamcore (slightly
smaller in diameter than the base of the teapot), adhered them together
with ghee (a 50/50 mixture of kneaded eraser and modeling clay), cut a
small hole in the center of the foamcore, and rotated it onto the base
of a tripod stand (with tripod head removed) so that the center screw
held the foamcore securely in place.
|
|
I then replaced the sheet of
black foamcore and sawhorses with the tripod and placed the teapot on
the newly customized teapot stand (#6).
After re-framing the shot, I took another exposure at the same camera
settings (#7).
Notice how there is no surface reflection in the base of the teapot. First
problem solved. Next, I went about modifying the reflection of the softbox.
I tried moving the Starlite Kit up and down, side to side, even rotating
the softbox to different angles to try and make the reflection look more
natural, but it invariably just ended up looking like a white square stuck
onto the surface of the teapot. And since the finish of the teapot was
slightly mottled, it rendered the edges of the softbox as somewhat jagged.
|
|
Enter Double Diffusion
Instead, I decided to create a gradual transition from light to dark across
the teapot to give it a more natural sense of shape. In order to do this,
I had to apply what is known as a double-diffusing technique.
A Starlite Kit is composed of components that work to create diffused
light. The light from the Starlite Head and Lamp pass through the inner
baffle and face of the SilverDome softbox to create a soft, natural-looking
light. But as we've seen in the example earlier, the edges of the
softbox will be easily revealed in any object that is highly reflective.
In order to eliminate these hard-edged reflections, you need to place
another panel of diffusion in between the object and the softbox.
|
|
This is where the Photoflex
LitePanel system works its magic. The LitePanel basically consists of
a shock-chorded frame onto which you can attach different types of reflective
or translucent material. It's very similar to how the LiteDisc or
MultiDisc work, only on a bigger scale. The LitePanel frames come in different
dimensions, and here I used a 39x72" frame with the translucent
fabric attached. I placed it in between the Starlite Kit and the teapot
and attached LitePanel legs to the base to keep it angled upright (#8).
After the LitePanel was in position, I attached black gaffer's tape
to the legs of the tripod to eliminate its reflection, lowered the shutter
speed on the camera to 1/10 sec to accommodate for reduced exposure and
took #9.
|
|
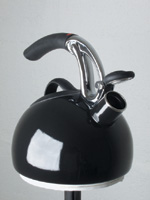
As a result, notice how the
reflection now moves gradually from light to dark, giving the teapot a
more natural sense of dimension. This shot shows a natural, well-lit rendering
of a highly reflective object. The left side is illuminated with soft,
graduated light, while the right side receives a subtle bounce-fill from
the light reflecting off the right-hand wall. The image was now ready
for a few digital touchups.
After I downloaded the images to my computer, I opened up the final shot
in Adobe Photoshop and made a few edits to really make the image shine.
I used the Pen tool to fill the background with white, created a drop-shadow
under the base of the teapot to make it appear as though it was resting
on a pure white surface, applied a subtle Gradation layer to the body
of the teapot to smooth out certain areas of the reflection even more,
and finally created some digital steam shooting out of the spout (#10).
|
|
As you can see, the digital
effects only help to enhance the overall lighting of the shot. To see
both a more in-depth version of this lesson and how these digital steps
were applied, check out this lesson on www.webphotoschool.com,
as well as the lesson entitled, "Enhancing Reflective Product Shots
Through Photoshop."
If you would like to continue your digital step by step education lessons
on editing, printing, and e-mailing your photos it will be on the private
section of the Web Photo School. To enroll for WPS just go to www.shutterbug.net
and click on WPS Free Lessons.
|