- REVIEWS
Camera Reviews 
More Reviews Mobile Reviews Photography Reviews - GALLERIES
- VIDEOS
- BUYER'S GUIDES
Lesson Of The Month
Modifying White Balance For Indoor Portraits
If you are just starting
out with a digital camera or are making the switch from traditional
to digital, you will do well to take some extra time to learn a few
important principles of digital photography before you start taking
pictures. Understanding the features of a digital camera (image quality,
image resolution, ISO, focal distances, depth of field, and white balance
settings) and how they differ from that of a traditional camera will
allow you to greatly improve the quality of your images. (For more information
on these and other photographic/digital processes, visit www.webphotoschool.com.)
|
|||
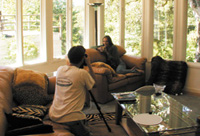
While there are many different
types of locations that lend themselves to portrait photography, living
rooms with a lot of windows tend to work exceptionally well. The indirect
light that illuminates a room is both soft and directional, which are
both key ingredients for flattering portraits. The downsides to shooting
indoors are that oftentimes there is not enough light to achieve a good
exposure without risking motion blur and that you can't control
the direction of the light. |
|||
When composing a portrait, it is
important to pay attention to both the light falling on the subject as well
as to how the background is affecting the elements within your frame. And
as with many portraits, you might also want to choose a low aperture setting
to throw the background somewhat out of focus, as this will draw more attention
to your subject. | |||
To see how a change in color
temperature would affect the mood of the shot, we decided to set the White
Balance to the Incandescent setting. Incandescent light (3200ÞK)
is much warmer than daylight (about 2300ÞK warmer), so in effect
the camera compensates by rendering the color values with a blue cast.
And as you can see from the next result shot, when the camera records
daylight from an Incandescent setting, it looks as though a blue filter
has been passed in front of the lens (#3). |
|||
Next, we decided to swing the
color balance in the opposite direction, so we set it to the Overcast
setting. Since clouds, which are neutral in tone, filter the relatively
warm light of the sun, the color temperature on an overcast day (around
6500ÞK) is somewhat cooler than that of a sunny day. After we adjusted
the White Balance, we took another shot (#4). |
|||
Technical Equipment |


- Log in or register to post comments


![]()
Get the Latest Photo Tips, News & Reviews from Shutterbug!
| Camera Reviews Other Reviews | Mobile Reviews Photography Reviews Columns | News | Features | How-To | Resources |
 © 2024 Shutterbug
AVTech Media Americas Inc., USA
All rights reserved