- REVIEWS
Camera Reviews 
More Reviews Mobile Reviews Photography Reviews - GALLERIES
- VIDEOS
- BUYER'S GUIDES
The Lensbaby 3G; Selective Focus SLR Lens
If photography is your pastime, you can afford to indulge in toys. If it is your occupation you tend to be more selective about what you spend your money on; toys are an extravagance--you couldn't afford 'em when you were struggling, and you don't need 'em now that you have a client base which likes your style.
But what if a toy is also a tool? Isn't it important to keep ourselves young, our vision fresh, always on the lookout for something new to invigorate our work and to keep it from becoming stale? The Lensbaby 3G (#1) fits this description, that rare combination of toy that can be an effective tool in a photographer's kit.
 |
|
|
What first interested me in trying a Lensbaby was a request by the editor of a weekly food magazine in Salem, Oregon, D'Lish. I had been photographing feature food spreads for D'Lish for several months when the editor yawned and said she was bored with the straight work, could I do something more edgy? Something fun. Something like you see in Bon Appétit magazine--you know, the magazine that pays the big bucks.
The style of photography she was referring to is selective focus with limited depth of field, a very old style which is easy to do with a large format camera. All you have to do is focus on the central point (sweet spot) with the back standard then swing and tilt the front standard to obtain the overall focus effect. Choosing the appropriate aperture for sharpness within the desired depth of field finishes it off.
Unfortunately, or perhaps fortunately, this is the age of digital, especially when it comes to commercial work. The magazine wants digital files. So, rather than photographing on 4x5 film, sending it out for development and scanning the results, I decided to try the Lensbaby, which promised to provide similar results.
The image of food, seen in #2, was made using the Lensbaby handheld on a Minolta 7D 6-megapixel camera with a 17-35mm lens. Although I used the Lensbaby handheld in this image, more accurate and repeatable results will be found on a tripod. For this I highly recommend either the Manfrotto 3444, which allows the camera to be used offset from the tripod legs, or any Gitzo with a lateral arm attachment. Either of these will allow you to move in and around the subject and create the highest quality, repeatable images using the Lensbaby.
 |
|
|
The Lensbaby comes with a pocket-size tool kit which includes a set of seven metal apertures and a Magnetic Aperture Removal Tool (MART) with which to change them. In the old days, before you or I were born (if you're older than that you don't have to admit it), removable metal apertures made of brass were known as Waterhouse Stops. In any event, the metal apertures come in sizes from f/2.8 to f/22. If no aperture ring is used the default f/stop is 2. Lensbaby recommends starting with f/4 or f/5.6. This makes it easier to focus the Lensbaby during the learning curve yet limits the depth of field so the effect of selective focus limited depth of field can be easily achieved.
The apertures can be quickly swapped out by using the MART to remove the existing aperture and dropping the new aperture in place. The aperture is held in perfect alignment by three magnetic pins. The design is unique and clever and, more importantly, it works.
Not all cameras will meter through the Lensbaby. These cameras need to be set on manual and exposure determined with a handheld meter or the ol' trial and error test exposure method (which is a good argument for using a tripod--in case the image is perfect but the exposure is off). Other cameras, including the Nikon F-series film camera and the D200, D1X, and D2X, will meter through the aperture in Aperture Priority (Av) mode. The Canon EOS series, on the other hand, will meter through the aperture in either Manual or Av mode. Instructions are included for metering with other cameras, including the Minolta 7D camera, which I use.
In addition to the seven standard apertures Lensbaby offers an accessory Creative Aperture Kit. This kit comes with two special apertures, one in the shape of a heart and the other in the shape of a star. Using one of these two will cause specular highlights to appear as either heart or star shapes. Cool. Also cool are the five blank disks that you can use to create your own shapes using an X-acto knife or a punch, which can be purchased in craft stores.
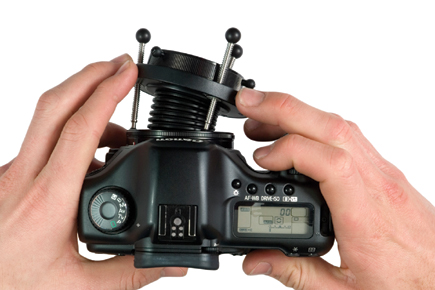
In neutral position the Lensbaby will focus at about 18". To focus on other distances you need to position your fingers around the lens then squeeze the front element closer to the film/sensor plane or push it away, see #3. Squeezing the lens closer focuses the Lensbaby farther away (think of focusing on infinity--the focusing element is as close to the film/sensor as it can get). Pushing it away focuses the Lensbaby closer. So, the technique is to move the lens in and out until the area of the subject, say the eyes, that you want to be in focus are...in focus. Once you have found the "sweet spot" you bend the lens right, left, up, down, or any combination, moving it around until the background focus is the way you want it. The rule of thumb (forefinger in this case) is to move the Lensbaby toward the area you want in focus. Once the subject appears the way you want it, you lock the lens by pressing an easy to access button with your right index finger. Finally, the Lensbaby 3G has a focusing ring that allows you to fine focus before taking the final image.
 |
|
|
All of the above is easy to do once you get used to it. The hard part is to keep the handheld camera from moving in and out once everything is set, which is why I recommend a tripod, especially when you are first learning to use the Lensbaby.
|
| |||||||||
- Log in or register to post comments


![]()
Get the Latest Photo Tips, News & Reviews from Shutterbug!
| Camera Reviews Other Reviews | Mobile Reviews Photography Reviews Columns | News | Features | How-To | Resources |
 © 2024 Shutterbug
AVTech Media Americas Inc., USA
All rights reserved