- REVIEWS
Camera Reviews 
More Reviews Mobile Reviews Photography Reviews - GALLERIES
- VIDEOS
- BUYER'S GUIDES
Lens Effects
Lens Effects
Light And Lenses, Plus A Unique Point Of View
by Jim Zuckerman
Lenses don’t interpret the world as our eyes do. The way light interacts with glass and with the metal blades of a lens aperture is different than how it interacts with our eyes, and it’s noteworthy to mention some of the effects that can be created when taking pictures with various lenses. Some of these effects are desirable and some are undesirable. In some cases, we purposely alter reality for an artistic purpose, and other times we are the victims of the laws of optics and have to deal with factors that are beyond our control. Here are some fascinating effects created by add-on optics and by the nature of light as it interacts with glass.
Lensbaby
The Lensbaby (www.lensbaby.com) is an innovative lens design that has a lot of creative potential. When the first one was introduced, I wondered why someone hadn’t thought of this sooner. There are three models available—the Muse, the Composer, and the Control Freak. In addition, the company offers a lens swap system that is comprised of small plastic lenses used in conjunction with the Composer. The lenses fit directly on the camera body, and they are variations on the idea that sharpness isn’t necessarily the only way to fly. The lenses have a flexible structure that allows you to bend and angle them in such a way that the lens is oblique to the plane of the sensor, thus creating an area in the picture that is sharp surrounded by areas that are blurred and distorted.
 |
|
|
You can see the effects through the viewfinder on D-SLR cameras. It is basically a trial and error procedure; you experiment with the lens movement until you like what you see. In photos (#1, #2 and #3) you can see the ethereal, dream-like effects you can get with flower photography.
 |
|
|
 |
|
|
On the Muse, you bring a subject into focus by manually bending the flexible tube in any direction. It is extremely small, lightweight, and simple to use. The Control Freak does the same thing except that with three protruding knobs you can lock the lens into any position. When you find a particular type of abstraction that is appealing, you can tighten the knobs to hold the lens in place so you can use this same look for other types of compositions. The Composer allows you to rotate the lens over a large ball, thus giving you a very smooth transition between the various distortions possible with the lens. In conjunction with the various plastic lenses, you can create intriguing dream-like images of any subject you shoot.
A wide angle lens is also available so you can broaden the view for landscapes, architecture, fashion (such as #4), and many other types of subjects. It can even be used for a unique type of perspective with macro photography (see figure A).
 |
|
|
 |
|
|
Lens Flare
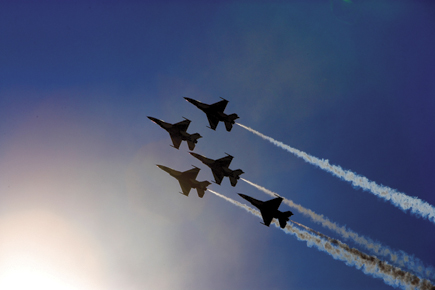
When you shoot directly into the sun, much of the time you can see lens flare in your pictures. Sometimes the flare is defined and obvious, as in (#5), and sometimes it’s subtle. Flare is often responsible for lowering the contrast of an image as you can see in (#6). Both of these pictures were taken with wide angle lenses. If you look for the flare, you can easily see it in the viewfinder at the time you are taking the picture. Photo (#7) was taken with a telephoto, and the lens flare is larger and much more subtle here. If you look closely, you can see the large, hexagonal flare engulfing the jet in the lower part of the lead formation.
 |
|
|
 |
|
|
 |
|
|
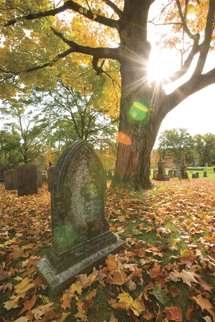
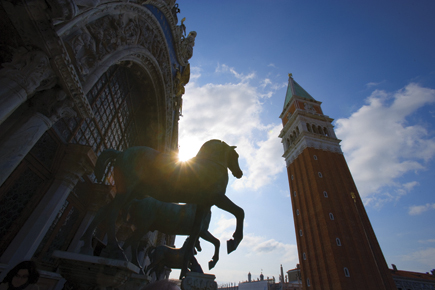
Lens manufacturers use various coatings on the front glass element of their lenses to help minimize this, but the truth is that it’s unavoidable. Sometimes you can partially hide the sun behind a branch or the edge of some other object, and this can help eliminate it. I tried to do this in Venice, Italy (#8) but you can see that there is still a lot of flare against the body of the horse. In the picture at Bryce Canyon (#9), I successfully eliminated the flare by using the foreground birch tree to partially block the early morning sun.
 |
|
|
 |
|
|
When the sun is very low in the sky and atmospheric moisture and airborne particles diffuse the light, lens flare is reduced and sometimes it’s eliminated altogether. When shooting in the middle of the day, however, including the sun in the composition almost guarantees flare.
When the sun is composed just outside the picture area, as in photo (#10), flare can still creep into your pictures. Using a lens hood to block the sun from striking the lens can eliminate it. If you aren’t using a hood you can use your hand. I do this often. The key, though, is to be on the lookout for flare because it’s very easy to get caught up in the picture taking and forget that this may be a problem. If you aren’t thinking about it when you’re shooting, more than likely you won’t notice it until you examine the images on your computer monitor, and then your only remedy is Photoshop.
 |
|
|
As a last resort, a combination of the Clone Tool and the Healing Brush in Photoshop or Elements can get rid of most flare. However, it takes skill and finesse because sometimes the lens flare blends into the photograph in insidious ways.
Star Effects
When you use a wide angle lens in combination with a small lens aperture, any point source of light is turned into a star burst. The star is most defined when you use an aperture between f/16 and f/32. This happens when you shoot the sun, street lamps, headlights of cars, and even the dancing reflections of light on the surface of water. Photo (#11) shows a section of the Las Vegas Strip, and in the foreground the street lamp was turned into a star by using f/20 on a 16mm wide angle. I didn’t use a filter to produce this effect.
 |
|
|
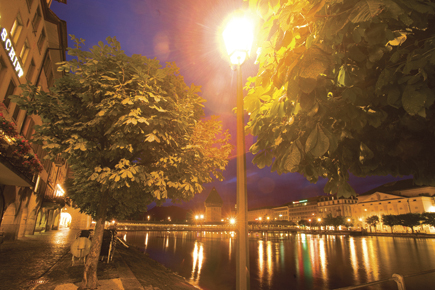
A shot in Lucerne, Switzerland (#12), shows distant street lights radiating streaks of light as predicted, but notice the foreground lamp. Because it is large in the foreground, it isn’t a point source of light. Therefore, it doesn’t exhibit the same characteristic star pattern.
 |
|
|
When I photographed the famous statue of Christ on Corcovado Mountain in Rio de Janeiro, Brazil (#13), I used the huge outstretched arm to partially block the sun. This reduced the sun in size, ensuring that it became a point source and therefore I was able to capture the star. The fact that this was taken with a wide angle lens also reduced the size of the sun.
 |
|
|
Zoom Abstractions
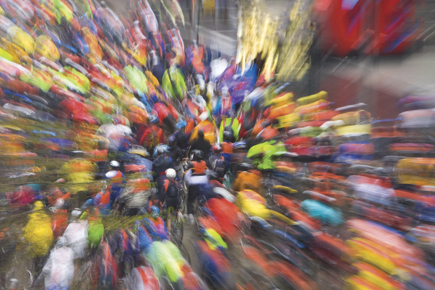
A technique that has been around ever since we’ve had zoom lenses is shooting a scene with a relatively long exposure and, during the interval the shutter is open, the focal length of the lens is changed. The resulting abstract shows radiating streaks of color, and it’s always a surprise even though we basically know what’s going to happen. It’s impossible to predict exactly how the picture will look, and that’s part of the fun. Photo (#14) of fans at a football game shows that one of the strategies in this technique is to include a lot of color in the shot. I did the same thing in (#15) of a bicycle event in New York. Taken from a 50 story window, I zoomed my 70-200mm medium telephoto and produced an intriguing abstract.
 |
|
|
 |
|
|
It doesn’t matter if you zoom from wide angle to telephoto or the opposite in terms of abstracting the image. However, there is one consideration that’s important. When you focus a zoom lens at the wide angle position and then zoom in to full telephoto, the focus is usually lost. The lens has to be refocused to take a sharp picture. That means if you create a zoom abstraction and move the lens from wide angle to telephoto, the image will probably not be sharp. There is a difference between an abstract that is blurred due to movement versus blurred due to being out of focus. In the former, the abstraction has sharply defined lines while in the latter the image devolves into what I call “colorful mush.” This is usually not what you want. Therefore, I recommend focusing on the subject at full telephoto and then during the slow shutter speed move the lens from the telephoto position to the wide angle.
How long should the shutter speed be? I usually use between 1⁄2 second and one full second. That interval allows enough time to manipulate the lens. If you use one full second, you can experiment with only moving the lens for part of the exposure. This creates a double exposure effect where the sharply defined scene appears to be combined with its own zoom abstraction. Photo (#16) of the Las Vegas Strip is an example of this.
 |
|
|
You can use this technique with any focal length zoom lens, from a 10-22mm wide angle zoom to a 100-400mm telephoto zoom.
Filters
Filters are placed over a lens for several reasons. One of the primary reasons many photographers use skylight and UV filters is to protect the front glass element of the lens. These filters don’t affect the picture in any discernible way.
For creative purposes, filters can change the color of your pictures in some way. You can make subtle changes such as adding some warmth (meaning reddish-yellow) to an image, or you can make a gross change where you introduce a deep blue color, for example, to suggest night photography. You can intensify sunsets by adding a rich orange cast, and you can color balance various types of fluorescent lights. When I shot film, I used color filters to affect black and white images and especially when working with black and white infrared film, since discontinued.
With the introduction of Photoshop and digital technology, I don’t manipulate color with filters any more. It’s too easy to do it digitally, and the control is infinitely greater on the computer. Even if you like to shoot black and white, the ability to alter tone and contrast in post-processing is much better than it is with the use of filters. If Ansel Adams had Photoshop, I’m sure he would have created the rich tonalities in his famous images on the computer. Some filters, though, are still useful, but they have nothing to do with color but more with controlling the amount of light that enters the lens.
Filters used in this way are called Neutral Density filters. They can be purchased in varying densities to reduce the light from 1-3 or more f/stops. The purpose of these filters is to enable you to use longer shutter speeds in lighting conditions that wouldn’t normally permit that.
For example, if you want to blur moving water under a bright overcast sky, even at f/32 and 50 ISO the shutter speed will be about 1⁄2 second. If you really wanted a 4 second exposure to make the moving water look ultra soft, you couldn’t do it. With a 3 f/stop ND filter, however, the reduction of light entering the camera would give you the ability to take a 4 second exposure. That’s what I did in (#17). Similarly, the picture on the Cinque Terra coast in Italy (#18), was taken with a 30 second exposure in an attempt to show how violent the ocean was at dusk. Because there was still some light in the sky, there was no way I could keep the shutter open for that length of time without overexposing the image, even at f/32 and the lowest ISO on the camera. A Neutral Density filter allowed me to do that.
 |
|
|
 |
|
|
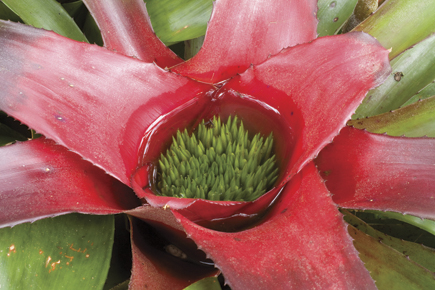
A polarizing filter can act like an ND filter. It reduces the light by 1-2 f/stops, and that is enough in many circumstances to give you what you want. A polarizing filter is used primarily for two purposes. First, it darkens the blue sky and makes the clouds stand out more dramatically. It also makes the blue sky seem more saturated in color. Second, it helps to minimize or eliminate altogether reflections on shiny surfaces like glass, wood, the surface of a body of water, and even the sheen on leaves. You can see in photos (#19) and (#20) that the use of a polarizing filter minimized to a small degree the sheen on the shiny tropical leaves.
 |
|
|
 |
|
|
Regarding darkening the sky and enriching the blue color, this can now be done in Photoshop very easily, therefore I don’t use a polarizing filter for this purpose any longer. However, for cutting down unwanted reflections, it is still a valid tool for photographers.
Graduated Neutral Density filters are still very popular with photographers because they solve a major problem when you shoot landscapes, cityscapes, and seascapes. When the sky is much lighter than earth-bound subjects, there is an exposure discrepancy that both film and digital technology don’t handle very well. If you expose to get good detail in the sky, the bottom portion of the picture will be too dark. If you expose for the land or the body of water, the sky will be overexposed.
 |
|
|
 |
|
|
To address this problem, graduated ND filters were designed to have light-reducing density in the top of the filter that gradually blends into the bottom portion, which is clear. When placed in front of the lens, the exposure for the sky is reduced and therefore it is easier to expose for all areas of the scene correctly. Photos (#21 and #22) show a before and after of this type of filter being applied to the scene. These filters come in different densities, and they are best used when the demarcation between the sky and the land is defined in roughly a horizontal line. If there is a lot of elements from the bottom portion of the image that stick up into the sky (like a city skyline), then the tops of those things will be darkened as well and the result won’t look great. You can also get graduated ND filters with color effects in the top portion, used to get color in a blank or characterless sky.
- Log in or register to post comments


![]()
Get the Latest Photo Tips, News & Reviews from Shutterbug!
| Camera Reviews Other Reviews | Mobile Reviews Photography Reviews Columns | News | Features | How-To | Resources |
 © 2024 Shutterbug
AVTech Media Americas Inc., USA
All rights reserved