- REVIEWS
Camera Reviews 
More Reviews Mobile Reviews Photography Reviews - GALLERIES
- VIDEOS
- BUYER'S GUIDES
Floral Photography: The Beauty And Variety Of Nature’s Designs
I’m sure that everyone who has ever owned a camera has taken pictures of flowers. It’s impossible not to. Flowers are too beautiful to resist, and there are so many species and varieties that you could devote your entire life to shooting nothing but flowers and hardly scratch the surface.
There are many styles and techniques photographers use to shoot flowers, from complete abstractions to images that show every detail with tack sharp clarity. I will present a few different ways of photographing flowers here, and then I encourage you to experiment and develop your own artistic approach. There is no end to what you can do.
Maximum Detail
My own preference for shooting flowers is to show every detail with maximum sharpness. The structures that make up the flowers are intriguing, the colors are stunning, and even the smallest species is captivating when studied closely. It seems to me that photography’s role is to reveal this detail so we can capture and then contemplate the beauty of nature’s details. For example, who would want to blur or abstract the tulip shown in image (#1)? There is so much here to appreciate that I feel it would be a shame to turn this into a blur of color.

All Photos © Jim Zuckerman
There are five important ingredients that go into good flower photography.
1. Complete depth of field. Only a small lens aperture will produce the kind of depth of field required to show the detail in a flower, and this is particularly true when the flower is small and/or you are using a telephoto lens. If your lens has a focal length of over 80mm (and this applies to full frame lenses or those for smaller sensor cameras) the focal length alone contributes to a shallow depth of field, and the only way to overcome that is to use apertures such as f/22 or f/32. This is especially important when photographing subjects with several planes of focus such as the yellow ladyslippers, (#2). The background is acceptably out of focus, but it was essential that all parts of the flowers be sharp. I used f/32 to achieve that.

2. Use a tripod. The only way you can use very small lens apertures is if you use a tripod. As you close the aperture down, the light is reduced significantly. This in turn forces the shutter speed to be too long to hand-hold the camera. Raising the ISO is not a good solution because of the increase in digital noise. The only way to shoot flowers, assuming you want as much detail as possible, is to use a tripod, a small lens aperture and a slow shutter speed.
I recommend using a tripod with a short center column as in figure A. This particular model is the Induro carbon fiber CT-214 (www.indurogear.com), and the legs of the tripod can be extended almost parallel with the ground. With the short center column, the camera can be positioned just a few inches above ground level. For wildflowers, this is essential.

3. Shoot in soft light. Contrary to what many photographers think, the colors and details in flowers are best revealed with diffused light typical of an overcast sky. Contrast is minimal and the colors—whether they are subtle or intense—appear brilliant and saturated. The impatients I shot in Michigan (#3) and the Indian paintbrush from Texas (#4) are examples. Direct sunlight would have been much less effective in producing artistic images of these flowers.


4. Fill the frame. Don’t include unnecessary elements when photographing flowers. Fill the frame as much as possible with the subjects. Dirt, dying blossoms, distracting stems and other elements can detract from the composition. If the subject flower is too small in the frame, it will seem insignificant no matter how beautiful it might be. If you are shooting a field of flowers or even a garden, then different parameters apply. For individual flowers (or a small cluster of flowers such as #5 and #6) get close.


5. Choose uncluttered backgrounds. Always pay attention to the background at the time of shooting. Backgrounds are virtually as important as subjects in making a picture work. If they are messy and there is a lot going on, they pull our attention away from your subjects. Very light areas behind a subject are usually distracting, and pronounced graphic lines are also a problem. Just as you carefully consider your subjects, at the same time you need to carefully consider the background. For example, is it too light? Too messy? Too attention grabbing? Does it have distracting lines or colors? Is it too sharp or not sharp enough? The background should either complement the subject or be an integral part of the subject. Sometimes there is nothing that you can do; other times you can change your shooting angle and eliminate distractions.
Compare photos (#7) and (#8). The picture of the two lily blooms has a background that is much lighter than the flowers—and in fact it’s overexposed. Consequently it’s terribly distracting. The flowers were in shade but the background was lit by direct sunlight, and when I exposed correctly for the lilies the background became washed out. In (#8) the background is much more muted because the sun had gone behind a cloud. What a difference the background makes!


Black Background
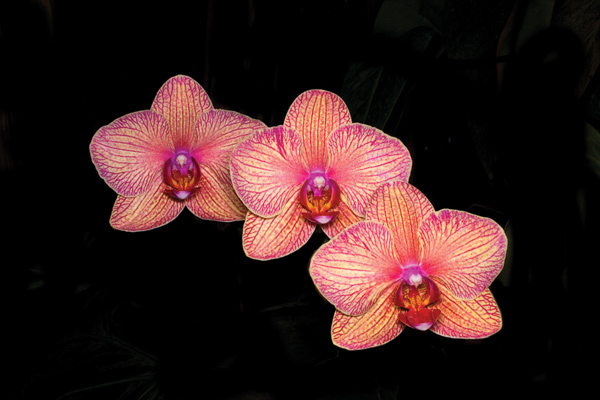
Whenever you are in doubt as to the best way to photograph a flower, you can never go wrong with using black as a background. It’s clean, elegant, and it forces all of the attention on the subject. Nothing in the background is distracting at all. Any species of flower works, from orchids (#9) to exotic tulips (#10).


I prefer to use black velvet (I buy two yards of material) instead of other types of fabrics for the background. Velvet (or the less expensive velveteen) absorbs light much better and there is less likelihood of the fabric’s texture showing or, worse, the background looking like dark gray instead of black. If you are using flash, place the background at least 2 feet in back of the flower so the light fall-off from the flash will underexpose the velvet. This is an additional guarantee that the background will remain black.
I use the black velvet both indoors and outdoors. When I shoot in my home, I use window light or flash. When I shoot outside, I always use diffused daylight. A black piece of velvet is a great way to eliminate messy backgrounds and isolate a flower from its environment. The orchid pictured in (#11) was taken in a public greenhouse, and I had my wife hold the fabric behind the blossom. Instantly the flower came to life and the busy tangle of stems and other flowers were eliminated. The same thing happened in (#12) where I could totally separate the orchids from the background.

In photographing a simple bouquet of flowers in a vase, such as Valentine roses for my wife (#13) I also used a black background. This precluded the need to set up a mini studio and to arrange studio lights. I simply used window light and a piece of black velvet.

Abstracts
Just like there are many ways to photograph flowers, there are many ways to create abstractions of flowers. One is to blur the colors in flowers by spinning the camera around the lens axis at 1/8th and 1/4 of a second. Images (#14) and (#15) are examples. These were done hand-held, and all I did was physically turn the camera as I tripped the shutter. It is remarkable how many varied and intriguing abstracts can be created this way.


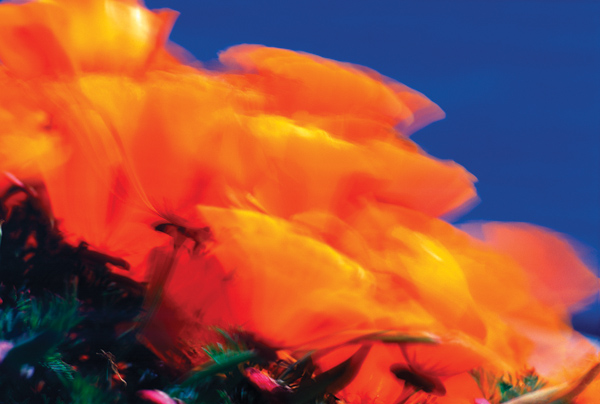
Another approach is to shoot on a windy day and let the wind blow the flowers while you shoot them with a slow shutter speed. I photographed California poppies (#16) using a one second exposure while on a tripod and the wind did the rest.
Another way to abstract flowers and make them look ethereal and dream-like is to use a LensBaby (www.lensbaby.com). This is a unique lens system that distorts and blurs images into artistic interpretations of reality. You can use this technique for many types of subjects, but flowers are my favorite. You can abstract the entire image so the flower is virtually unrecognizable, as in (#17) or you can retain some of the detail in the original and yet add an artistic type of diffusion like I did in (#18). I take these pictures hand-held, which makes this kind of flower photography unique in that a tripod isn’t necessary. I hold the camera with one hand, and with my other hand I bend, rotate and twist the LensBaby to create the abstract images.


Many floral photographers use selective focus to abstract most of the composition while a narrow sliver of it remains sharp. The tulip in (#19) and the macro shot of the rose in (#20) illustrate this. In order to get this kind of extremely shallow depth of field, I had to use the largest lens aperture plus a telephoto macro. However, I don’t own a telephoto macro, so instead I used a medium telephoto (the 70-200mm f/2.8) plus an extension tube to extend the focal length further. Simply using a large aperture isn’t enough to create abstractions like this.


A unique way to create artistic abstractions of flowers is to combine original images with various textures. You can make your own textures (by photographing rock textures, sand, pastel paint applied to watercolor paper, scratched metal surfaces, etc.) or you can purchase them online. There are also sets of textures that are downloadable for free. I prefer to use two collections of textures from Flypaper Textures Productions (www.flypapertextures.blogspot.com) and for floral work their Summer Painterly collection is especially beautiful. For example, (#21) and (#22) were both created with two different textures from this collection.


The technique is simple. You open the texture image and size it (Image>Image Size) according to the proportions you want. I choose the exact pixel dimensions of the flower photo, and I also make the dpi identical. The flower photo is then copied to the clipboard (Edit>Copy), and it’s pasted on top of the texture (Edit>Paste). You can also do the reverse, of course, where you paste the texture over the flower.
In the Layers Palette, click the submenu that begins with the word Normal, the Blending modes. By scrolling down the list of Blend modes with the Shift + (plus key) depressed you can see all the possible combinations of the way the two images can interact. I have had the most success with overlay. You can also vary the opacity of the floating layer for more effects.
Sometimes other Blend modes produce artistic images, such as (#23). To create this very abstract floral composite, I used the Color Blend mode to combine the texture with the flower photograph.

Depth Of Field
Depth of field (DOF) is the way you depict sharpness from the front to the back of the space in your image. You can control this sharpness completely by working with the three factors that determine DOF—the focal length of the lens, the aperture setting and camera to subject distance (foreground subject that you wish to be sharp). To create a very deep depth of field, deep meaning sharp from front to back:
1. Use a short focal length lens.
2. Use a very narrow aperture (such as f/16 or f/22).
3. Move back from the foreground subject.
However, in close-up photography the main object is to get close to your subject, so rely more on focal length and aperture to get the deepest DOF.
The converse of the above factors apply when you want a shallow DOF, to make the foreground sharp and the background unsharp:
1. Use a longer focal length lens (like a telephoto).
2. Use a wide aperture (such as f/2.8 or f/4).
3. Move close to the foreground subject.
- Log in or register to post comments


![]()
Get the Latest Photo Tips, News & Reviews from Shutterbug!
| Camera Reviews Other Reviews | Mobile Reviews Photography Reviews Columns | News | Features | How-To | Resources |
 © 2024 Shutterbug
AVTech Media Americas Inc., USA
All rights reserved