- REVIEWS
Camera Reviews 
More Reviews Mobile Reviews Photography Reviews - GALLERIES
- VIDEOS
- BUYER'S GUIDES
Fact Or Fantasy?
How To Interpret The Needs Of Your Client
Why do we have to choose fact or fantasy? Why can't wedding photography be a bit of each? That's the conclusion I've come to and that's what I believe most people want. Maybe, perhaps, a little more fantasy than fact, but that's what you and your clients have to decide. Don't forget though--you probably know more about what to expect than they do. The typical bride today gets married only two or three times in a lifetime. You probably are photographing two or three weddings a month. You must know more than they do what the final outcome is going to be--at least as far as the pictures are concerned. |
|||||||
Okay, so the magazines are
all hepped up on the "new" look in wedding photography--the
completely "unposed" look. But is that what you're really
selling? I'm sure that some people are. It looks good in the magazines.
It sells well on the newsstands. However, I find that the majority of
the girls who think they want just that end up buying what I've
been producing for most of my career, and showing you here in this article. |
|||||||
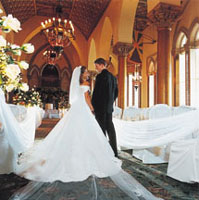
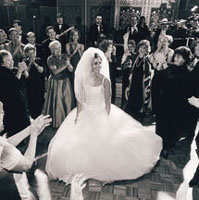
Then on the day of the wedding,
is there a bride alive who wouldn't want to have a memory of the
way she looked and how she felt just moments before she walked down the
aisle? What about her bouquet? Don't you think that she gave lots
and lots of thought to that, too? How could any bride resist a picture
like Photo 2? Details. Details. That's what we're capturing
here. Not just her flowers, but her hair, her veil, her whole "look,"
and mainly, her heart. |
|||||||
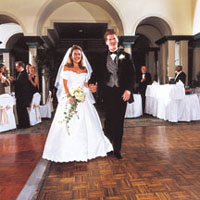
Without a doubt, couples who
have their photographs made together right from the beginning are the
ones who truly enjoy the whole day; ones who avoid the typical tensions
and pressures of the wedding day. Plus, look at the quality of the portraits
that they can come up with. |
|||||||
The typical bride and groom
portrait in front of the church altar doesn't have to look like
two cutout cardboard statues against a dark, busy background. By taking
the bride and groom as far from the background as possible, exposing for
the ambient light on the church altar, and then matching the light on
them to the f/stop with a flash, you can easily and quickly come up with
a picture like Photo 5--the two of them in the aisle. Of course, a backlight
behind her veil helps a lot, too, doesn't it? |
|||||||
What about her gown that the
bride has dreamed about, since she was old enough to play with paper dolls?
Don't you think she wants to see it all--the train, the veil, the
sleeves--everything? No better way to show the train than in a back profile
of the bride (Photo 6). And why not bring the groom into the picture,
too? Better yet, why not photograph them right in the room in which their
ceremony took place? |
|||||||
A wide angle lens on a Hasselblad
is our choice for these pictures. I say "our" selection because
most of my new bridal pictures are made in conjunction with Tim Roberts,
Roberts Photographics, Inc., Boca Raton, Florida. As a consultant for
Roberts and his studio operation, most of my actual photography is now
being done for him. The majority of the images in this article were made
on location together with him. |
|||||||
Even in this kiss, Tim was
careful to keep their faces outlined against a very simple area of the
background. The bright archway behind them and the garden area farther
back all seem to enhance the depth of the photograph. |
|||||||
By matching the ambient light
with the flash, we layered on just a little more light than was actually
there to begin with. Thus, when my lab, North American Photo, printed
for detail in the bride's gown and their faces, the sky went a little
darker than it actually was--creating a very nice cloudy effect in the
sky. |
|||||||
What actually made the candid
of a bride and groom coming back up the aisle after the ceremony (Photo
10) so interesting (other than the obvious glee that we always catch at
this moment) was the fact that Sharon turned her off-camera flash to the
ceiling for the recessional photographs. The light far behind them creates
so much depth that it's almost unbelievable. Yet, it's so
easy to do. We do this quite often to light up the backgrounds of these
aisle pictures. |
|||||||
Doesn't happen at your
weddings? You have to make things like this happen; the people will love
it then and when they see the pictures of it later. |
|||||||
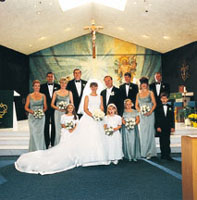
Altar returns are almost a
sure thing at most church weddings, but are you keeping them off the altar?
Far away from the background? (Photo 12) Are you keeping the bride and
groom down in front, centered, the main part of the picture--with the
attendants behind and around them? Most photographers put the bride and
groom up on the top step, the farthest from the camera and the smallest
in the picture. Doesn't make sense, does it? |
|||||||
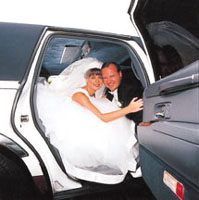
In simple pictures like this
one of the groom helping the bride into the car (Photo 13), we took care
to have the car parked in a sunny area, so that the sunlight would backlight
the bride and groom naturally. It makes quite a difference. The interplay
between the two of them makes it look very natural, almost an unposed
look. The people love it. |
|||||||
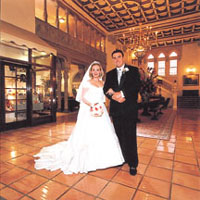
Photos 15 and 16 are always
great to show the couple afterward the great ambiance in the areas around
their wedding reception. Before they enter their party we pose them at
one end of the room, letting the complete setting be far behind them.
I've seen many photographers pose couples on the staircase. It's
my opinion that the surrounding areas have a much more grandeur look when
the couple are close to the camera and the background stays far behind
them. |
|||||||
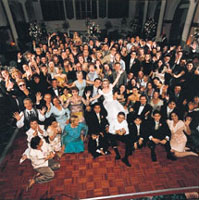
When the bride and groom enter
the reception area (Photo 17), they have no idea how we've lit up
the whole dance floor. We've taken two of our Photogenic portrait
lights and placed them on each side of the stage. The entire dance floor
is lit up to match the f/stop at which we're shooting. What a way
to add depth to our candids. Can't do this with just a slow shutter
speed, no matter what the film is. |
|||||||
And look what it does for our
candids (Photo 18). Just see how great it is when you pick up all those
people in the background and can see each and every one of their expressions.
People love these candids. |
|||||||
Worth the extra effort? What
do you think? We actually teach our prospective clients to look for things
like this in the work of the photographer they select. Without lighting
like this all the backgrounds go black. "Yuck. Is that what you
want?" |
|||||||
These were all made on the
grounds of Michele Gauger's studio in Whitewater, Wisconsin during
my fall class there. Photo 22 is a way of showing you how I work in bright
sunshine. I let the bright, direct sun split light the bride's face,
lighting only the right side of her, while it was also backlighting her
veil. |
|||||||
I came in pretty close with
a 60mm lens on my Hasselblad for that picture because with my first choice,
a 150mm lens, I was getting the flash, itself, in the picture. The exposure
was based on bright sunshine, probably 1/125 at f/16. |
|||||||
The last picture of this series
Photo 24 was made on Gauger's bridge. She had it built just for
this type of photography. There's a sharp drop-off of the land below
the bridge, so that you can get down low and photograph the couples against
the sky. |
|||||||
As a matter of fact, you can
interpret the wedding day in any way that you want. These are just a few
of the ideas that I like to use in order to add to the excitement of the
wedding day. |
|||||||
Is it any wonder that I'm
still excited about photographing weddings, even after I've spent
over 50 years in business? Now, wait until you/we see what's going
to be added in the new, digital era. I'm already going there, but
that's another story--in another issue of Shutterbug. |
|||||||
|
|
||||||


- Log in or register to post comments


![]()
Get the Latest Photo Tips, News & Reviews from Shutterbug!
| Camera Reviews Other Reviews | Mobile Reviews Photography Reviews Columns | News | Features | How-To | Resources |
 © 2024 Shutterbug
AVTech Media Americas Inc., USA
All rights reserved