- REVIEWS
Camera Reviews 
More Reviews Mobile Reviews Photography Reviews - GALLERIES
- VIDEOS
- BUYER'S GUIDES
The Digital Darkroom
Using The Shadow/Highlight Tool; A True "Highlight" Of The New Photoshop CS
Of all the new tools in Photoshop
CS, the one that I have heard the least about is the Shadow/Highlight
tool. And, yet, for photographers, it is an extremely useful tool. Think
of it as an alternate method for the Curves tool, one that often gives
people trouble. The Shadow/Highlight tool appears to be much easier
to understand and use, while producing a lot (not all) of the same type
of results as the Curves tool. |
|||||||
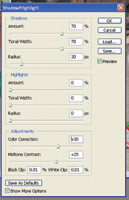
In this case, I have pulled
the slider bars to a setting of 70 percent for both the Amount and Tonal
Width. The Radius is set at 30 percent. As you start dragging these slider
bars, you will see immediate results in the picture as long as Preview
is checked. The tool is really very easy to use. Just start dragging the
slider bars back and forth until the picture looks good. |
|||||||
Image #5 shows a badly faded
picture. I don't know if it was originally sepia toned or if it
just turned brown with age. In either event, the picture is in pretty
poor condition. The first thing that I did was to convert the picture
to a true Grayscale image. See #6. The brown tones in the original were
produced by years of fading, resulting in uneven, or non-uniform brown
tones. These uneven levels of the color "brown" would be unevenly
restored if I tried using the Shadow/Highlight tool on it. I can always
return the image to a "sepia"-toned picture later if that
is what I want by using the Hue/Saturation tool. |
|||||||
Of course, there are lots
of scratches and dirt in the upper right-hand area of the picture that
still need to be cleaned up using regular restoration techniques. But,
the Shadow/Highlight tool has done excellent work with the overall image.
And, it took only seconds! |
|||||||
|
|
||||||
|
|
||||||


- Log in or register to post comments


![]()
Get the Latest Photo Tips, News & Reviews from Shutterbug!
| Camera Reviews Other Reviews | Mobile Reviews Photography Reviews Columns | News | Features | How-To | Resources |
 © 2024 Shutterbug
AVTech Media Americas Inc., USA
All rights reserved