- REVIEWS
Camera Reviews 
More Reviews Mobile Reviews Photography Reviews - GALLERIES
- VIDEOS
- BUYER'S GUIDES
The Digital Darkroom
Using The Extract Tool; Selecting Hard-To-Select Subjects Page 2
8. Here's the picture after I completed the green masking. You will have to use the Magnify tool and the little Hand tool to drag the magnified picture around so that you will be able to construct this green mask as accurately as possible.
|
|
|

9. After the green mask was finished, I used the Fill tool to fill in the middle area with the blue-colored mask.
|
|
|

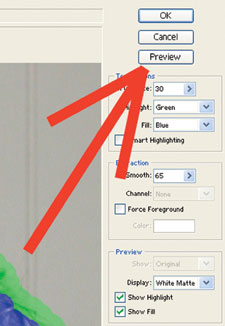
10 & 11. Next, I wanted to see a Preview of the masking before I committed to it. I clicked on Preview. Notice that I have drawn red arrows to several areas that need correction work. These are places where the width of the green mask was too great (allowing too much background to show through) and needs to be made narrower.
|
|
|
|
|
|

12 & 13. After re-working the width of the green mask
with the Erasure tool and then laying in a new green mask with the Smart Highlighting
tool and the regular Brush tool (re-sized to a smaller diameter), I again called
for a Preview. Since this looked pretty good, I went ahead and clicked on OK.
When I did that, the Extract tool performed the extraction and delivered the
extracted picture back to me in the regular Photoshop window. Just to show you
how nice the finished picture could look, I laid in a red-to-black gradient
for a background.
The Extract tool is certainly not a perfect answer to flyaway hair. And, if
the couple in my demonstration picture had been in front of a more cluttered
background, it would have been even harder to make the extraction. But, considering
the cost of
third-party plug-ins (that honestly aren't much better) it is a neat tool
for those special pictures that need it.
|
|
|

|
|
|

For more information on digital imaging, you might want to visit my website at: www.colorbat.com.
|
| |||||||||
- Log in or register to post comments


![]()
Get the Latest Photo Tips, News & Reviews from Shutterbug!
| Camera Reviews Other Reviews | Mobile Reviews Photography Reviews Columns | News | Features | How-To | Resources |
 © 2024 Shutterbug
AVTech Media Americas Inc., USA
All rights reserved