- REVIEWS
Camera Reviews 
More Reviews Mobile Reviews Photography Reviews - GALLERIES
- VIDEOS
- BUYER'S GUIDES
The Digital Darkroom
How To Scan Large Pictures
We use a flat-bed UMAX PowerLook
III scanner for scanning reflective material. It has a maximum scan
area of about 8.5x11.7". While that size handles a lot of what
we need to scan, every now and then a client will bring in a much larger
old picture that they want restored. |
||
First, we set the scanner
in the middle of the table so we could work all around it and have plenty
of room. Next, we removed the lid of the scanner. The lid is only necessary
to scanning transparent material or for holding things flat on the scanner
surface. Removing the lid would then give us unrestricted access to
the flat-bed surface of the machine. Higher Res Than Required Now, it was time to start
the stitch-together process. We would need a 16x20" finished picture.
So, we created a blank canvas that was a little larger than what we
needed to give us plenty of room to work. We created a blank canvas
that was 18x22"x300ppi, and copied the top-left scan onto it.
|
||
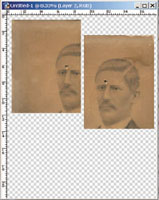
In order to align the two
images, one slightly overlapping the other, it is necessary to magnify
the blank canvas so you can more easily see what you are doing. Then,
go to the Layers Palette and adjust the opacity of the top layer to
about 50 percent. This will allow you to see through the top layer and
aid in the alignment process. In this case, it was easy to use the sharp
edges of the tear just above the right eye to perform the alignment. |
||
Once the alignment has been performed, you can go back to the Layers Palette and reset the opacity back to 100 percent. Then, in the Layers Palette, perform a Merge Down to combine the top layer with the layer under it. |
||
Next, we copied the top-right
scan onto the blank canvas. |
||
After this second alignment
was performed, we again restored the opacity to 100 percent, and merged
down the layer. |
||
Now, the real tough work of the restoration process would begin. But, that's for another article. However, here are the finished results on this particular picture. If you need more help doing these kinds of things, you can send an e-mail to me care of editorial@shutterbug.net. |


- Log in or register to post comments


![]()
Get the Latest Photo Tips, News & Reviews from Shutterbug!
| Camera Reviews Other Reviews | Mobile Reviews Photography Reviews Columns | News | Features | How-To | Resources |
 © 2024 Shutterbug
AVTech Media Americas Inc., USA
All rights reserved